Crawl product landing pages with the Data Crawler
Crawl your landing pages and extract additional product data from your website to enhance your feed with the Data Crawler data service in Productsup.
Introduction
The Data Crawler is a Productsup data service designed for crawling your products' landing pages to enhance your product feed with additional data that you don't have in any other data sources.
Note
The Data Crawler service is available for the import and intermediate stages.
When crawling the product links listed in one of your feed's columns, the Data Crawler extracts HTML code from those product pages and creates an additional data source in your Productsup site to add and populate the following new columns:
___service_datacrawler_urlcontains the URL of the crawled page.___service_datacrawler_datastores the source HTML code extracted from the crawled page.___service_datacrawler_datedisplays the date of the last crawl.___service_datacrawler_http_codeshows the HTTP status of the crawled page.___service_datacrawler_content_typecontains the encoding of the page, such as HTML or UTF-8.___service_datacrawler_size_downloaddisplays the size of the file with the extracted code.___service_datacrawler_total_timeshows how much time it took to crawl the page.___service_datacrawler_md5_urlcontains the crawled URL encoded in MD5.
Warning
The Data Crawler can slow down the performance of your Productsup site because it is a resource-intensive process.
Once the platform runs the Data Crawler service and populates these columns, you should extract your product data from the crawled HTML code by applying rule boxes in Data View or Dataflow. See Rule box category Work with HTML for more information.
Prerequisites
Note
The Data Crawler service is part of the Crawler Module, which is available at an additional cost in all platform editions. Contact support@productsup.com to discuss adding it to your organization.
The Crawler Module contains the following features:
The Data Crawler data service
The Web Crawler data source
The Image Properties Crawler data service
To set up the Data Crawler data service, you need:
A unique item identifier. See Set a unique item identifier for more information.
The rights to the domain you want to crawl. You must be the owner of the crawled website.
A column in your feed that contains product URLs. The URLs must have no tracking parameters.
Before running the Data Crawler data service, you should discuss the specifics of your website's performance with your website admin to gather the information required for setting up the Data Crawler. Find answers to these questions:
How many crawlers can access your website at a time?
What are your website's average and maximum response times?
Do the crawled pages require authentication? If yes, you need the HTTP username and password for the crawler to access the pages.
Add the Data Crawler service
Go to Data Services from your site's main menu and select ADD SERVICE.
Search for Data Crawler, select Add, and give it a desired name and column prefix.
By default,
___service_datacrawleris the column prefix.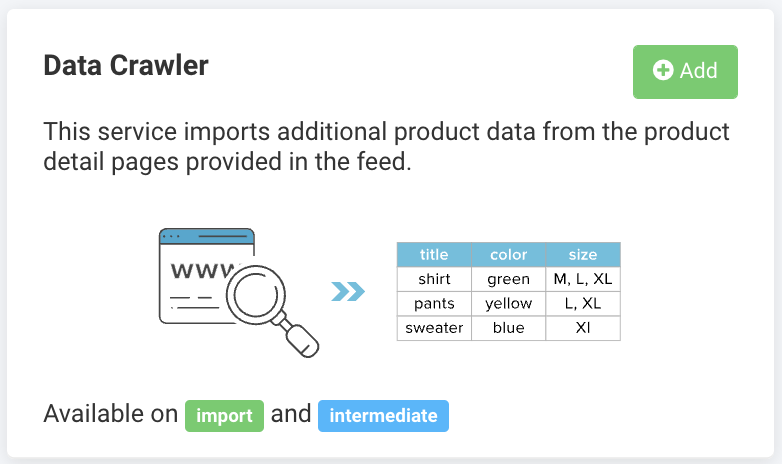
Choose the stage containing the column with the crawled URLs in Service Data Level and select Add.
Choose the column in your feed that contains the links to your landing pages in URL attribute.
If you chose Import in Step 3, the URL attribute drop-down list displays the columns of your import stage. If you chose Intermediate in that field, the drop-down list contains your intermediate-stage columns.
Note
If you want to crawl multiple columns containing product links, you need to create a copy of your Productsup site and set up a Data Crawler service in the copied site to crawl another link column.
In User Agent, you can see the name the crawler uses to access your website. By default, the name is
Mozilla/5.0 (X11; U; Linux i686; en-US; rv:1.8.1.6) Gecko/20070802 SeaMonkey/1.1.4 (productsup.io/crawler). You can modify it as needed, for example, by adding a hash at the end of the crawler name for security reasons.Tip
Whitelist your Productsup crawler using the name specified in this field for your website not to block the crawler.
In Concurrent Crawlers, choose the number of crawlers that can access your website simultaneously. By default, the number is
10.Warning
If you engage more crawlers than your website can handle, the crawling process can run quicker but may cause website performance issues.
In Request Timeout (seconds), you can set how long the crawler should wait for a response from your website. The expected input format is a digit identifying the number of seconds.
Use your website's maximum or average response time to enable the Data Crawler service to run efficiently.
By default, the crawler waits 10 seconds for a response before proceeding to a different link.
Enter the number of days the Data Crawler service should wait before recrawling a link in Expires After (days). The expected input format is a digit identifying the number of days.
The Data Crawler service crawls all new or changed links in your URL attribute every time the site runs. The Expires After (days) field determines when the service should recrawl the links it has already crawled.
Tip
You can enter
-1in Expires After (days) to recrawl all product links every time your site runs in Productsup. This tip is helpful for fast-changing product data, such as prices or availability.If you want to reduce the amount of space required to store the crawled HTML code, select the checkmark icon (✔) in Save data compressed (for big data/HTML sites).
If you use this option, you need to use the rule boxes HTML getElementById, HTML getElementByTagName, or HTML getElementByXpath to extract data from the compressed code before using split string and regex rule boxes. See Rule box category Work with HTML for more information.
If you want the platform to run the Data Crawler service during every refresh in Data View, select the checkmark icon (✔) in Trigger during a refresh in Data View.
To crawl websites protected by basic authentication, add your authentication data in HTTP Username and HTTP Password. For example, you need to fill out these fields if you want to crawl your staging environment.
In the Permissions panel, check the box I hereby confirm that Productsup is permitted to crawl the aforementioned pages. to verify that you, as the owner of the crawled website, give Productsup permission to crawl the selected links.
Select Save.
For the platform to process a new data service, select Run in the top-right corner of your site's view.
Warning
Once the Data Crawler has started to run, you can't stop it.
The first run of this service crawls all product links you have selected in Step 4, so it may take a while. The recommended time for the first run of the service is at night or at another time with low customer traffic on your product pages, which would minimize website performance issues.
Note
If you can't see the columns the Data Crawler added to your feed in Data View, ensure the platform hasn't hidden them:
Go to Data View from your site's main menu and choose the relevant stage or export in the drop-down list on your left.
Select the menu icon on the right and then select the eye icon.
Find the attributes in the list that use the custom prefix
___service_datacrawlerand select the eye icon next to each attribute you want Data View to display.Close the pop-up menu.
The naming of the attributes created by the Data Crawler data service depends on the column prefix you chose in Step 2. The attribute names the data service generates always start with three underscores (
___), which means the platform doesn't send those attributes to your export channels.
Edit the Data Crawler service
Go to Data Services from your site's main menu.
Search for your data service.
Select the cogwheel icon (⚙) next to the desired data service to edit settings.
Select Save.
Delete the Data Crawler service
Go to Data Services from your site's main menu.
Select the cogwheel icon
 next to the desired data service.
In the Danger Area panel, select Remove this service.
Select Yes.