Add Excel Export
Excel Export: add and set it up for generating .xlsx or .xlsm file in Productsup.
You may need to export your product data in an Excel file, for example, to use it for channels that require Excel format such as FabDis export, or to use the Excel files for internal purposes. To export your data to Excel files, follow one of the following ways:
Add and set up Excel Export in Exports. This method requires creating an Excel spreadsheet template with placeholders before setting up the export.
Add and set up Blank export (empty) in Exports if you don't need a template and you can manually add the required attributes in Dataflow. See Build your exports from scratch.
Order the creation of a custom export from Productsup as an additional service. You can then add your product data to it in Exports. Contact your Customer Success Manager.
This document describes the first option. In the following sections, you can find how to export your data into Excel file using Excel Export.
Prerequisites
To create a file with Excel Export, you need to:
Create an Office Open XML (.xlsx) file in Excel 2007 or later version.
Note
Productsup supports .xlsx and .xlsm. If your Excel template has another format, such as .xlt or .xltm, convert it into .xlsx or .xlsm.
Prepare a template. See Create a template.
Upload your Excel template file to an (S)FTP location of your choice.
Add and set up Excel Export in Exports.
Create a template
You can create either a two-dimensional data table, known as a data table sheet, or one worksheet tab per product called item setup sheet.
1. Data table sheets
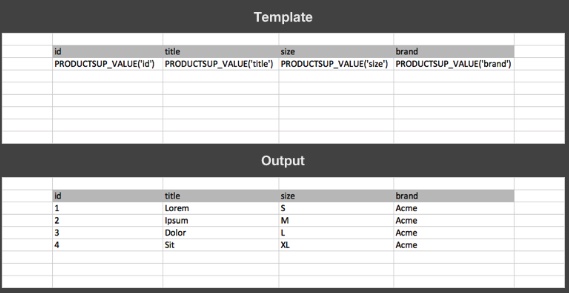
A data table sheet contains a table with attributes placed horizontally and item values fill the columns. You should define placeholders in a single row. After setting up the Excel Export and running the platform, the imported feed content replaces the rows with values.
Tip
If you want to add styles to the table, the entire table adapts to your chosen style. You can also apply a style to the placeholders if you want to style the text. These changes affect the final data.
2. Item setup sheets
The item setup sheets contain information about one item per worksheet. You need to create a template worksheet. You can freely design the template placing text and image placeholders wherever you want. After exporting, the platform reads the template sheet, creates worksheets per feed product, and removes the template itself from the final Excel file.

Create template placeholders
To use the Excel Export, your template must have placeholders for the attribute headers. The placeholders are text strings that refer to the needed attributes in the data feed in the platform to populate spreadsheets with the product data. The placeholders follow the format such as PRODUCTSUP_VALUE('attribute_name').

You can create the following types of placeholders in your template:
Text placeholder.
Image placeholder.
Number placeholder.
1. Text placeholder
You can use text placeholders both in data table sheets and item setup sheets.
To insert text from the data feed to the corresponding cell, use the placeholder PRODUCTSUP_VALUE('attribute name').
Data View attibutes | Text placeholders in template |
|---|---|
 |  |
The placeholder can be a part of the text or a standalone value:
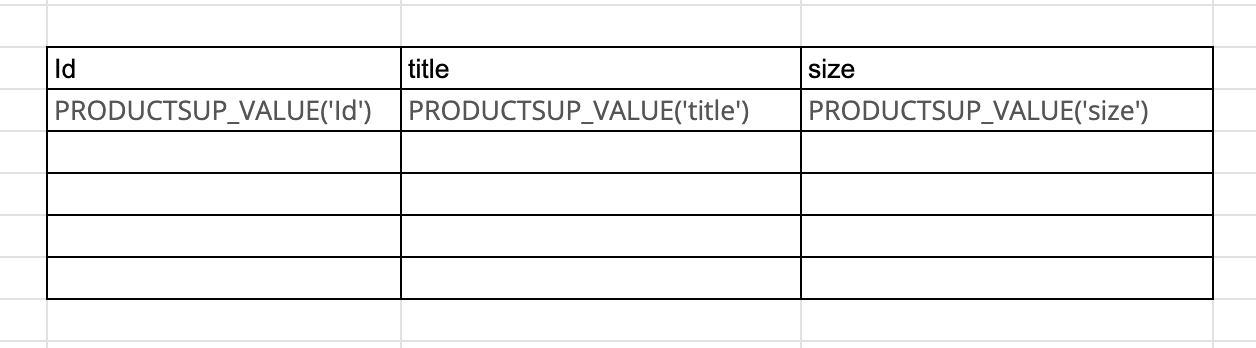
Part of the text: Title: PRODUCTSUP_VALUE('title').
Value in the attibute 'title'
Text placeholder output
New sneakers
Title: New sneakers
Standalone: PRODUCTSUP_VALUE('title').
Value in the attibute 'title'
Text placeholder output
New sneakers
New sneakers
In both examples, the values from the attribute title replaces PRODUCTSUP_VALUE('title').
2. Image placeholder
You can use image placeholders only in item setup sheets.
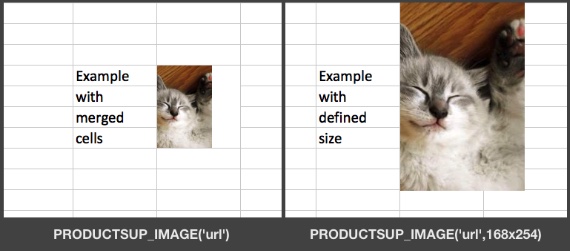
To insert an image, enter the placeholder PRODUCTSUP_IMAGE('attribute') in a cell separately from other contents. The attribute must contain an image URL. By default, the image placeholder positions the image in the upper-left cell corner. Then, it calculates the placeholder's cell size.
You can merge multiple cells vertically to expand the height of the image.
Alternatively, if you want to define the maximum image size, the placeholder takes a second argument, describing the width and height of the image. The image placeholder PRODUCTSUP_IMAGE('attribute',100x100) sets the image in a 100 x 100-pixel box in the same location. The image either takes up the full width or full height of the defined box, whichever fits first.
3. Number placeholder
You can use number placeholders both in data table sheets and item setup sheets.
To insert numbers in a number format instead of a string, use the placeholder PRODUCTSUP_NUMBER('attribute'). This placeholder only works with content that contains digits and dots and converts any other content into an empty value.
Data table template name options
If you need multiple data tables in different worksheets, you can provide a comma-separated (CSV) list of worksheet names for the data table template. The list of worksheet names lets you write the same data on multiple sheets. Productsup offers the Excel Macro Files destination that helps determine which product to add to which sheet.
On setting up the Excel Marco Files destination, you need to specify the export column name that contains the sheet name where you add each product in Sheet Name Column.
Note
If after the export, the exported file is empty, one of the possible reasons is that your attribute names contain commas (,) while commas also serve as a separator for the CSV file.
To solve the issue, check the Settings tab of the export. Choose CSV Enclosure and ,COMMA as a CSV separator. Also, change your data feed in the following way: put the attributes name containing commas between the double quotes, such as "PHOTO (300dpi, min.10x10)"; otherwise, the platform can't export the data.
Add and set up Excel Export
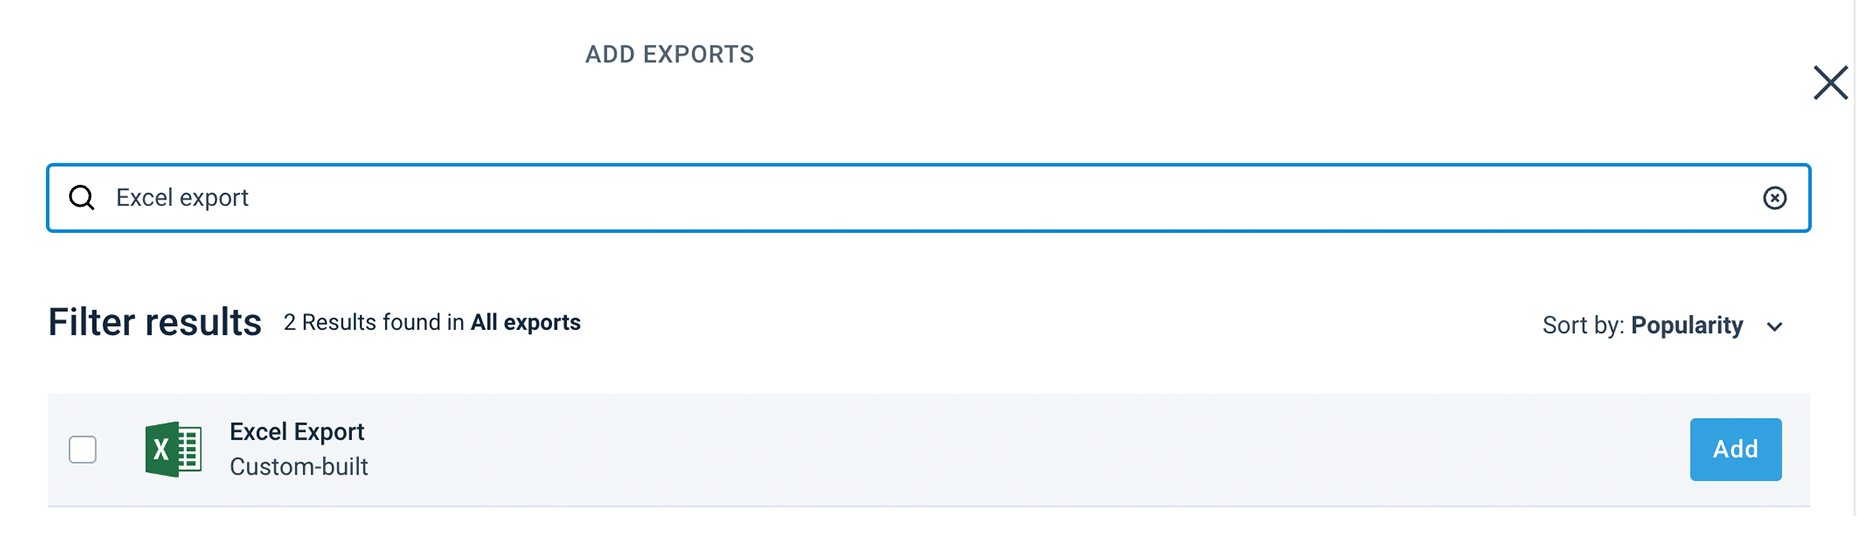
Go to Exports from your site's main menu and select ADD EXPORT. Search for Excel Export, hover over it, and select Add.
In Overview, select the name of the added export in the Export name column.
Select the pen icon at the top of the page and give your export a custom name as desired.
The custom name replaces the export name on the Excel Export Overview page.
Go to Dataflow in your site's main menu.
Select Excel Export from the top ribbon menu.
Add and connect the attributes you need from the Intermediate column, based on your Excel spreadsheet, to the Excel Export column.
Go back to Exports and select your added Excel Export.
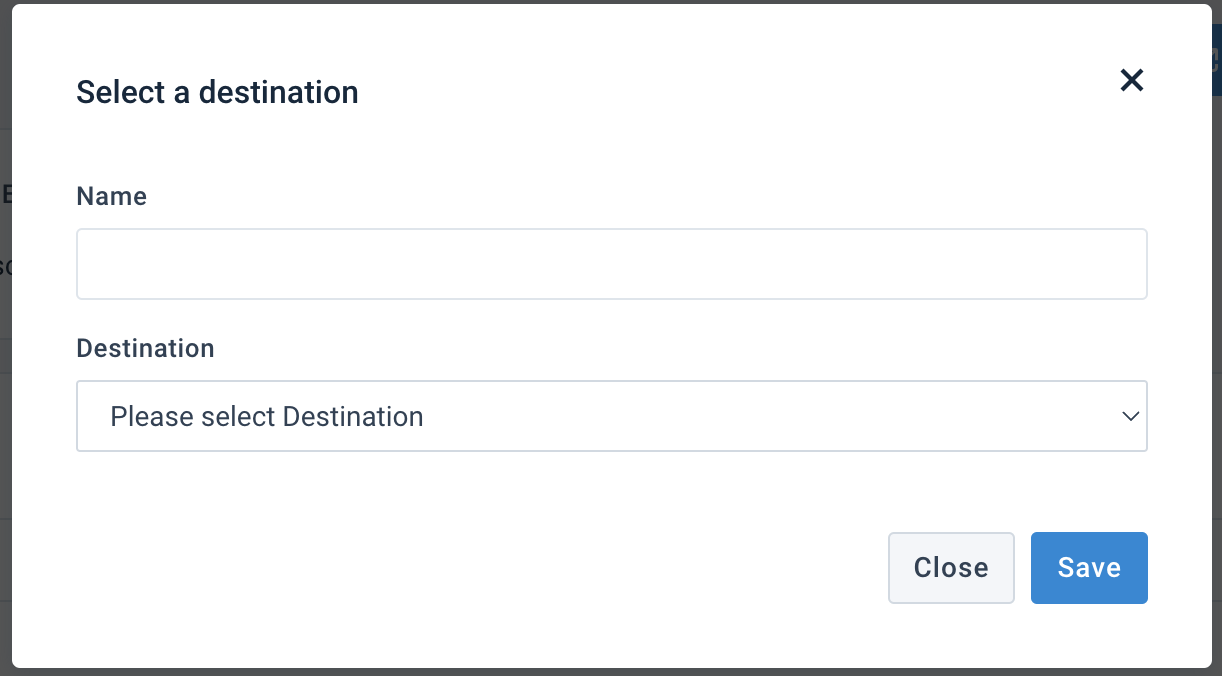
Select Add Destination and choose a necessary destination from the Destination drop-down list. Optionally, give it a name in Name and select Save.
Note
Depending on your files, choose between these two (2) destinations:
Excel Macro Files (xlsm) is a recommended destination for Excel spreadsheets when you want to embed the output .xlsx as a URL hosted on the Productsup Server.
Excel Spreadsheet (Productsup Server) is the destination for the Excel spreadsheets when you want the platform to upload the output file to the FTP of your choice.
Both destinations can generate delta files for all new, changed, unchanged, and deleted products when used with delta exports. This lets you send only the modified product data to your desired export channels instead of sending your entire product catalog every time there is a change in your data.
Set up a selected destination by taking the steps in one of the following sections depending on your destination.
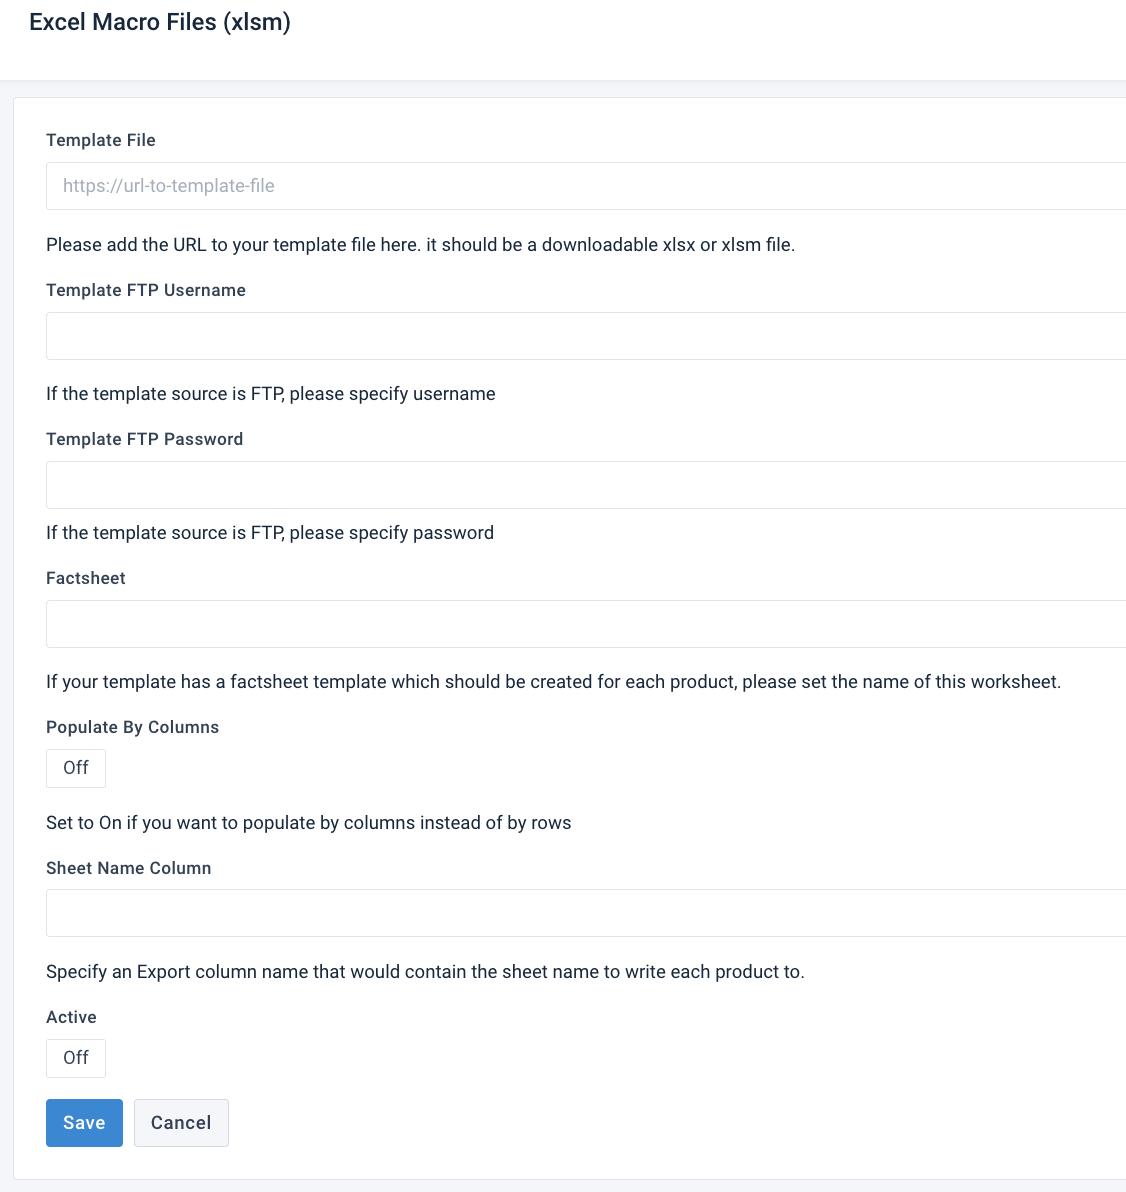
Set up Excel Macro Files (XLSM) destination (recommended)
If you select the Excel Marco Files (XLSM) destination, the setup page opens where you need to enter the following details:
In Template file, enter the URL of the file.
In Template File FTP Username and Template File FTP Password enter your FTP credentials to let the platform connect to the FTP server and download the file.
If your template creates a template per product, enter the name of this worksheet in Factsheet. Enter the name exactly as it appears on the Excel file.
Switch the Populate By Columns button to On if you want to populate data by columns instead of rows.
In Sheet Name Column, specify an export column name that contains the sheet name where you add each product.
Turn on the destination by switching Active to On.
Select Save.
Go to the Overview tab of your export, scroll to the Filename section, and select the Setup button. In Filename, change the name of your output file. The extension of your file should be .xlsx or .xlsm.
Set up Excel Spreadsheet (Productsup Server) destination
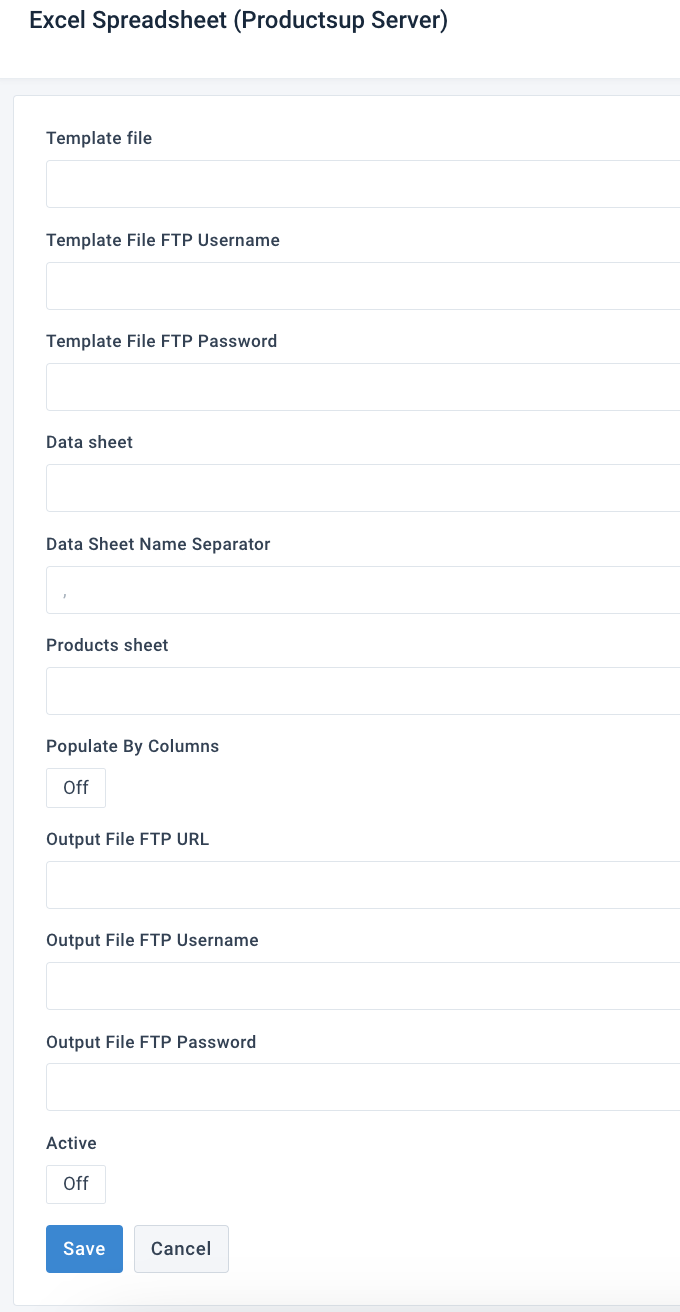
If you select the Excel Spreadsheet (Productsup Server) destination, the setup page opens where you need to enter the following details:
In Template file, enter the FTP URL of the file. Example:
https://url-to-template-file.In Template File FTP Username and Template File FTP Password enter your FTP credentials to let the platform connect to the FTP server and download the file.
If your template creates a datasheet template per product, set the name of the worksheet in Data sheet. Enter the name exactly as it appears on the Excel template.
In Data Sheet Name Separator, enter a delimiter if desired. By default, it is a comma (
,).Enter the name of the sheet or tab containing the product data in Products sheet.
Switch the Populate By Columns button to On if you want to populate data by columns instead of rows.
In Output File FTP URL, enter the FTP URL where the platform should send your output file and define the name of the output file at the end of the URL. For example,
ftp://ftp.productsup.com/filename.xlsxwherefilename.xlsxis the file name.Enter the FTP credentials in Output File FTP Username and Output File FTP Password.
Turn on the destination by switching Active to On.
Select Save.
Go to the Overview tab of your export, scroll to the Filename section, and select the Setup button. In Filename, change the name to the output file name defined in Step 7. The extension of your file should be .xlsx or .xlsm.