Rule box category Work with date & time
Use the rule box category Work with date & time to manage the date and time in your attributes in Productsup.
Introduction
The category Work with date & time contains all rule boxes that can help you convert date formats, set timestamps, and add values to your attributes based on a desired date and time.
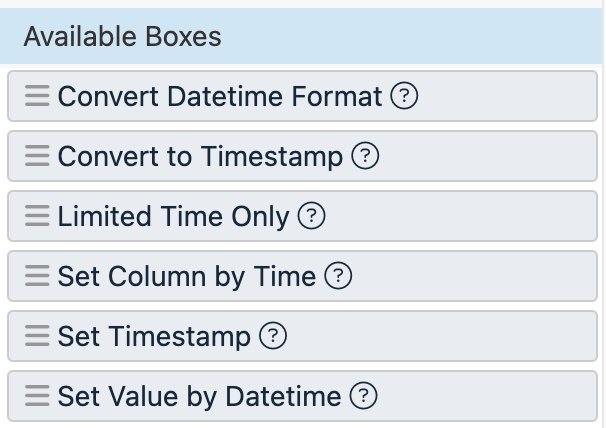
This rule box category contains the following rule boxes:
Convert Datetime Format changes the date and time format.
Convert to Timestamp converts a date to a timestamp.
Limited Time Only adds a temporary text or discount based on a date.
Set Column by Time assigns, appends, or prepends another attribute's value based on a date.
Set Timestamp adds the current date and time to an attribute.
Set Value by Datetime assigns a value based on comparing the date in the attribute with today's or another date.
Tip
Another option to work with time-bound values is to schedule rule boxes. See Advanced rule box options.
Convert Datetime Format
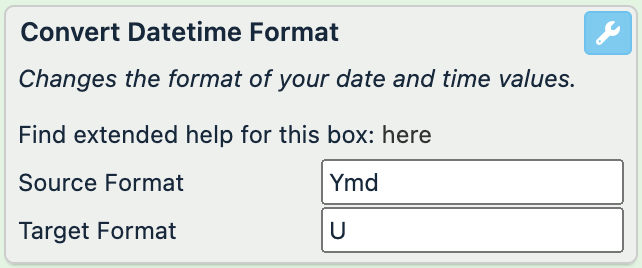
The Convert Datetime Format rule box changes the format of your date and time values.
Take the steps from Add a rule box to add the Convert Datetime Format rule box.
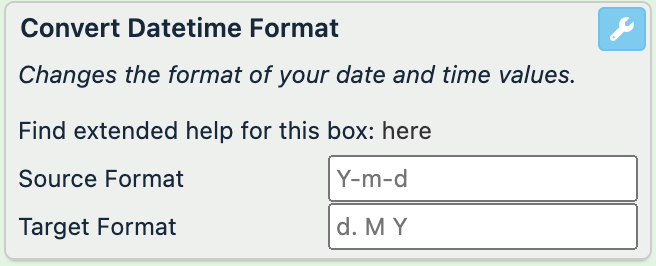
In Source Format, enter your current date format. See PHP: date - Manual for the supported formats.
Tip
If you want to convert your date format into a Unix timestamp, the attribute where you apply the rule box must contain the full date and time, including hours, minutes, and seconds. If it doesn't, the platform uses the provided date elements and adds the hours, minutes, and seconds of the moment when you saved the rule box or your last site run.
To assume the missing time elements, the rule box uses the GMT zone and the
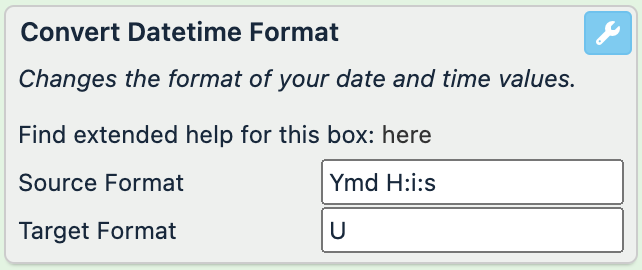
H:i:stime format.In Target Format, enter the desired date and time format. For example, enter
Uto convert your regular date format into a Unix timestamp. See PHP: date - Manual for other supported formats.Select Save.
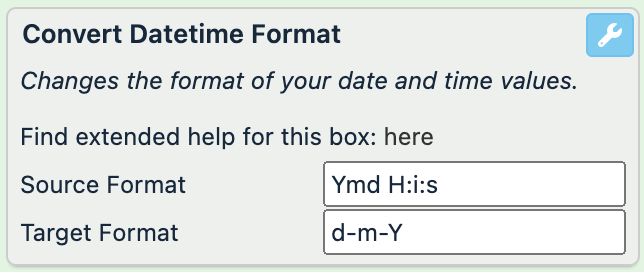
For example, the values in your date attribute are in one format, and you want to convert them to another format. You can achieve this with the following setups of the rule box Convert Datetime Format:
Rule box setup | date (before) | date (after) |
|---|---|---|
 |
|
|
 |
|
|
 |
|
|
The last row shows how the rule box works if your current value doesn't include hours, minutes, and seconds. Namely, it uses the moment when you saved the rule box, which was at 09:50:55 GMT+0000.
Convert to Timestamp
The Convert to Timestamp rule box converts a date or a date-related text into a Unix timestamp using your current time zone.
Examples of strings you can convert into timestamps using this rule box:
now
June 2, 2023
next Thursday
See PHP: strtotime - Manual for the supported string formats you can convert into a timestamp.
Note
If the rule box doesn't support the date and time format of a value, it empties the value.
To add the Convert to Timestamp rule box:
Take the steps from Add a rule box to add the Convert to Timestamp rule box.
Select Save.
For example, you have the following values in the date attribute and want to convert them all to timestamps. You can achieve this with the Convert to Timestamp rule box:
date (before) | date (after) |
|---|---|
01.02.2023 10:48:01 |
|
01.02.2023 |
|
now |
|
June 2, 2023 |
|
2025-04-10 22:00:18 |
|
last Thursday |
|
Note
The rule box uses your time zone to create timestamps, which in this example is GMT+1.
If your values contain only a date without the exact time, such as 01.02.2023 instead of 01.02.2023 10:48:01, the rule box Convert to Timestamp works as follows:
Assumes the time is
00:00in your current time zone.Converts the given date and the assumed time into the GMT zone.
Converts the full date and time in the GMT zone to a timestamp.
This is why the full date and time 01.02.2023 10:48:01 in the GMT+1 time zone has the timestamp 1675244881, but the same date without the time converts to 1675206000.
Limited Time Only
The Limited Time Only rule box temporarily changes a value in the attribute. This rule box can change a value by applying a discount, assigning a new value, and appending or prepending a string to a value. You can set the start and end dates or use dates stored in other attributes to create the timeframe when the platform should apply the desired changes.
Take the steps from Add a rule box to add the Limited Time Only rule box.
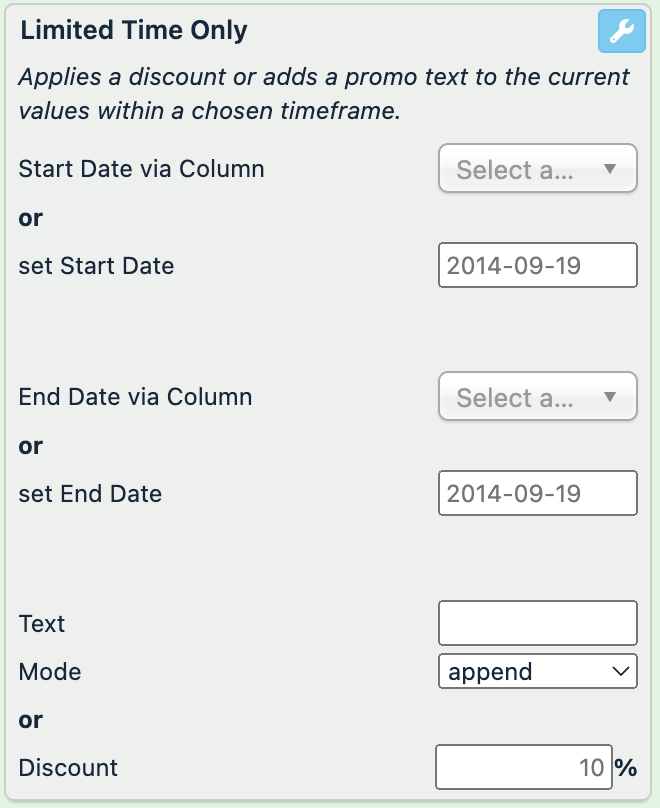
Use one of the following options to define the start date for applying the changes to your attribute:
Select a relevant attribute that stores the needed date in Start Date via Column.
If you add your rule box in the intermediate stage, only import-stage attributes are available in this drop-down menu. If you add it in the export stage, only intermediate-stage attributes are available.
Enter a static date manually in set Start Date.
Note
For both options, your dates must be in the format Y-m-d, for example, 2024-01-31. See Convert Datetime Format to change the date format if needed.
Use one of the following options to define the end date for applying the changes to your attribute:
Select a relevant attribute that stores the needed date in End Date via Column.
If you add your rule box in the intermediate stage, only import-stage attributes are available in this drop-down menu. If you add it in the export stage, only intermediate-stage attributes are available.
Enter a static date manually in set End Date.
Note
For both options, your dates must be in the format Y-m-d, for example, 2024-01-31. See Convert Datetime Format to change the date format if needed.
Choose how you want to change the values in your attribute:
If you want to add certain text to your attribute, enter the desired text in Text and choose how you want the rule box to add this text in Mode:
assign completely overwrites the current value with the desired text.
append adds the desired text at the end of the current value.
prepend adds the desired text at the beginning of the current value.
To add a discount to your attribute, enter the needed amount in Discount without the percent symbol (
%).
Select Save.
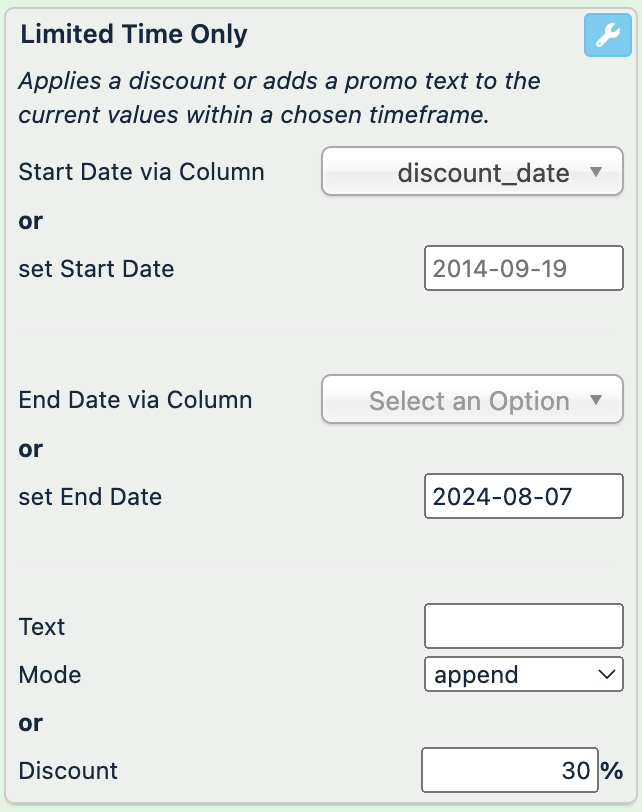
For example, you have the following values in the price attribute and want to add a 30% discount to the prices of your products based on the start dates in discount_date. The end of the sale should be on August 7, 2024. You can achieve this with the following setup of the Limited Time Only rule box:
discount_date (no changes) | price (before) | price (after) |
|---|---|---|
2024-07-10 | 300 |
|
2024-07-22 | 34 |
|
2024-08-22 | 3 |
|
Note
You apply the Limited Time Only rule box on July 22, 2024.
Set Column by Time
The Set Column by Time rule box assigns, appends, or prepends a value from another attribute based on a date-and-time condition. A date and time condition works as follows:
In the rule box setup, you choose a date attribute and select whether the date in that attribute should be in the past, future, or now to meet the desired date and time condition.
If the date meets the desired date and time condition, the platform assigns, appends, or prepends a value from a selected attribute to the current attribute.
Tip
The Set Column by Time rule box may be helpful when launching a sale.
Take the steps from Add a rule box to add the Set Column by Time rule box.
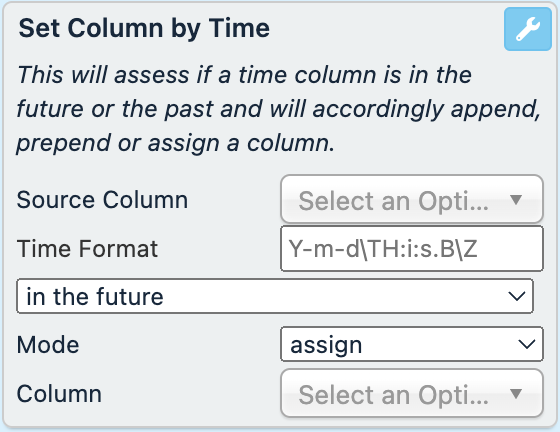
In Source Column, choose your date attribute.
In Time Format, enter the format used in your date attribute. See PHP: date - Manual for the supported formats.
In the drop-down menu, select your desired date and time condition:
in the future applies the change if the current value contains a future date.
in the past applies the change if the current value contains a past date.
now applies the change if the current value contains today's date.
In Column, select the attribute that stores the values you want to add.
In Mode, choose how you want to modify your current values if the date attribute meets the desired date and time condition:
Select Save.
For example, you are selling a popular sneaker model, but a newer one will drop soon, and you have that date in release_date. Once the new sneaker model becomes available, you want to announce a sale and append a short text from the sale_promo_text attribute to the title of the older sneakers in product_title. You can achieve this with the following setup of the Set Column by Time rule box:
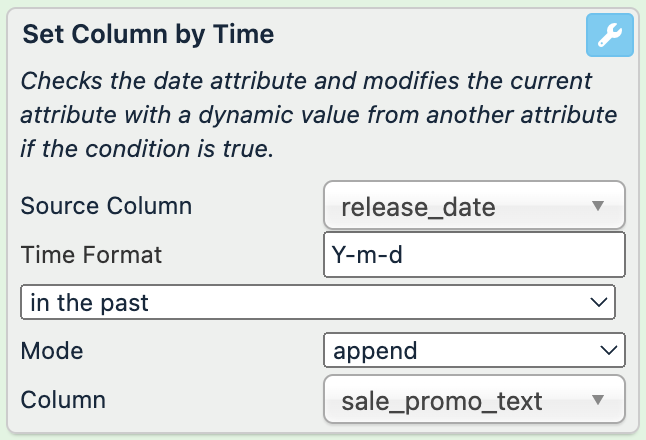
release_date (no changes) | sale_promo_text (no changes) | product_title (before) | product_title (after) |
|---|---|---|---|
2024-07-21 | 25% OFF | FIRE Sneakers 2023, Brown |
|
2024-10-03 | 25% OFF | FIRE Sneakers 2023, Orange |
|
06.07.2024 | 25% OFF | FIRE Sneakers 2023, Pale Green |
|
The platform checks whether the new sneakers' release date in release_date has passed. As soon as that date passes, the platform appends the text from sale_promo_text to the title of your product.
Note
You apply the Set Column by Time rule box on July 22, 2024.
Set Timestamp
The Set Timestamp rule box overwrites the values in an attribute with the current date and time in a desired time zone and format. See PHP: date - Manual for the supported formats.
Note
This rule box renews the timestamp every time you run the site or refresh Data View.
Take the steps from Add a rule box to add the Set Timestamp rule box.
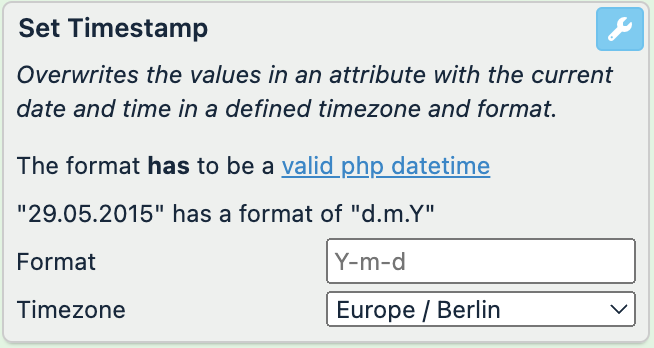
In Format, enter the date format that the rule box should use to add the current date and time to your attribute. See PHP: date - Manual for the supported formats.
Tip
To add a Unix timestamp instead of standard date formats, enter
U.In Timezone, select the needed time zone.
Select Save.
For example, you have the following values in the date attribute and want to overwrite them with today's date in the format DD.Mon YYYY. You can achieve this with the Set Timestamp rule box by entering d.M Y in Format and choosing the needed timezone:
date (before) | date (after) |
|---|---|
2024-07-21 |
|
| |
06.07.2024 |
|
Note
You apply the Set Timestamp rule box on July 22, 2024.
Set Value by Datetime
The Set Value by Datetime rule box compares a date value in an attribute with today's or another date to assign a new value based on the comparison. It follows this algorithm to compare dates and assign new values:
If |
| < |
| then | assign a new value. |
You can choose other inequality symbols, not only the less-than sign (<).
Take the steps from Add a rule box to add the Set Value by Datetime rule box.
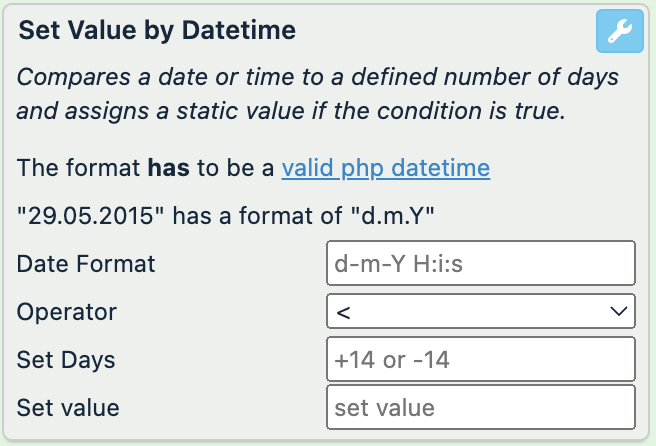
Enter the date format used in your attribute in Date Format. See PHP: date - Manual for the supported formats.
In Operator, choose an operator to compare the dates in your values to a desired date specified in Set Days:
<means the date specified in Set Days should be less than the date in the attribute.<=means the date specified in Set Days should be less than or equal to the date in the attribute.>=means the date specified in Set Days should be greater than or equal to the date in the attribute.>means the date specified in Set Days should be greater than the date in the attribute.
In Set Days, define the date you want to compare your current values to by entering
-or+and a number of days:Enter
+0to compare your date values to today's date.Enter
+1to compare your date values to tomorrow's date.Enter
-1to compare your date values to yesterday's date.
In Set value, enter the value you want to assign in the current attribute if a date in the attribute matches the set condition.
Select Save.
For example, you have the following values in the manufactured_on attribute and want to overwrite them with the value incorrect if the date in the attribute is later than last Friday, July 19, 2024. You can achieve this with the following setup of the Set Value by Datetime rule box:
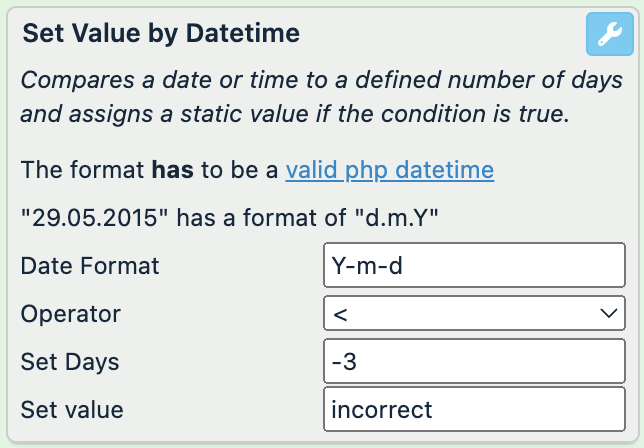
manufactured_on (before) | manufactured_on (after) |
|---|---|
2024-07-21 |
|
2024-07-19 | 2024-07-19 |
06.08.2024 | 06.08.2024 |
2024-07-16 | 2024-07-16 |
2024-10-03 |
|
Note
You apply the Set Value by Datetime rule box on Monday, July 22, 2024.