Use segments to apply rule boxes to specific product groups
Optimize specific product groups using rule boxes and product segments in Data View in Productsup.
Introduction
When optimizing your data in Data View, you may need to edit only a part of your products. You can combine these products into a segment and apply rule boxes to the whole segment without affecting other products.
For example, you need to offer different discounts depending on product categories: 10% discount for shoes and purses, 20% for sunglasses, and 50% for swimwear. In this case, you can create three separate segments for each product group and apply different discounts to each segment:
Segment 1 for shoes and purses.
Segment 2 for sunglasses.
Segment 3 for swimwear.
In Data View, you can create a segment where a chosen attribute contains content matching the search values. You can also choose filter options other than contains.
Here is a setup example for segment 1, as mentioned previously:

Tip
If you need to apply rule boxes to products based on the contents of multiple attributes, you can use the Rule box conditions feature available in Dataflow. See Apply rule boxes based on conditions.
Prerequisites
You can create segments at the import, intermediate, and export stages. To create a segment at a stage, you need to have product data available at that stage.
Create a segment
To create a product segment, take the following steps:
Go to Data View from your site's main menu.
Select the relevant stage in the drop-down menu on the left.
Tip
To apply rule boxes to a particular product group in the intermediate stage, create segments in the import stage.
To apply rule boxes to a particular product group in the export stage, create segments in the intermediate stage.
You can't apply rule boxes to the segments created at the export stage.
Select Filter in the attribute column where you want to create a segment.
In the Add Filter menu on the right, check if the first drop-down menu shows the needed attribute and choose the desired filter option in the second drop-down menu. The default filter option is
contains.In Search term, enter a value or select the menu icon at the end of the field to choose one of the values of this attribute.
If needed, add another value by selecting Add one more and entering the desired value in the newly added field Or. You can remove the additional value by selecting the x icon.
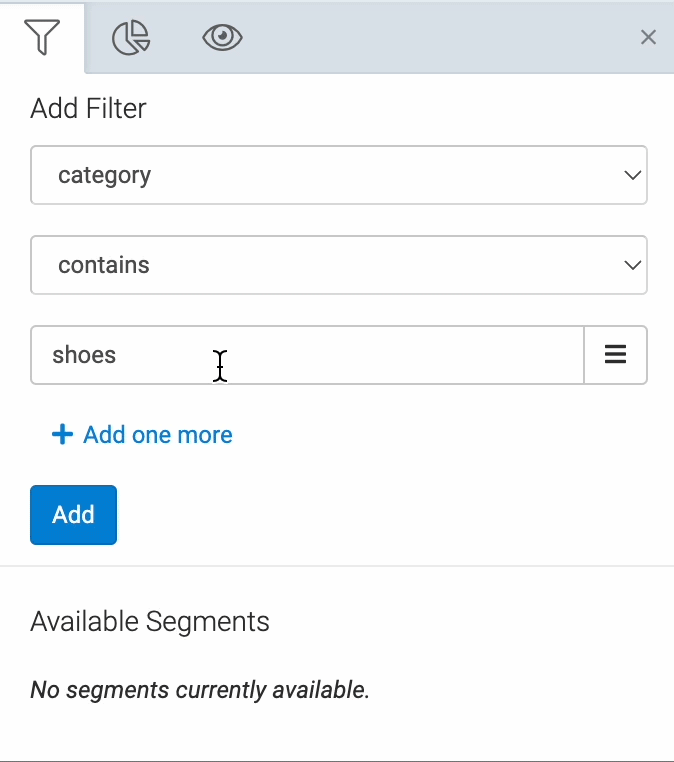
Select Add.
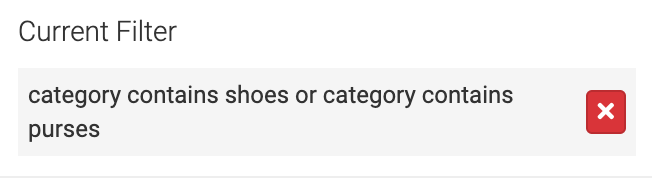
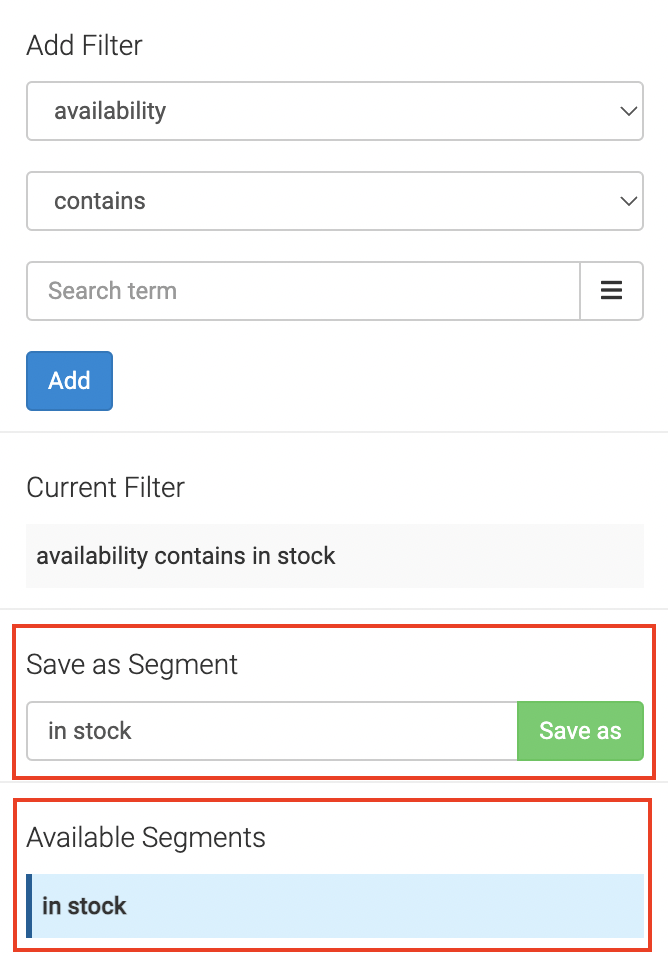
It takes some time for Data View to refresh and show only the products that have the desired values in the chosen attribute. You can see a summary of your applied filter in the section Current Filter. To go back and let Data View display all products, you can remove the applied filter by selecting the x icon in Current Filter.
In the section Save as Segment, enter the name of your segment and select Save as.
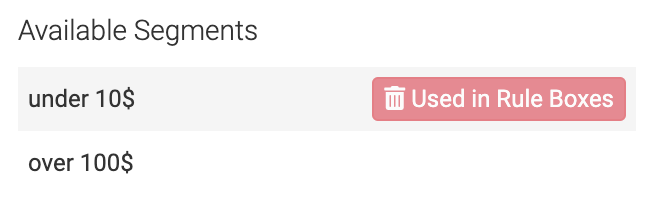
The segment appears in the section Available Segments. If you add more segments, you can switch between them using this section.
Apply a rule box to a product segment
To apply a rule box to a product segment, take the following steps:
Go to Data View from your site's main menu.
Choose the needed export or the intermediate stage in the drop-down menu on the left.
Select Edit in the attribute column where you want to apply a rule box to a product segment.
If you have already added the needed rule box, proceed to the next step. If not, choose Select an Option, select the needed rule box, and set it up.
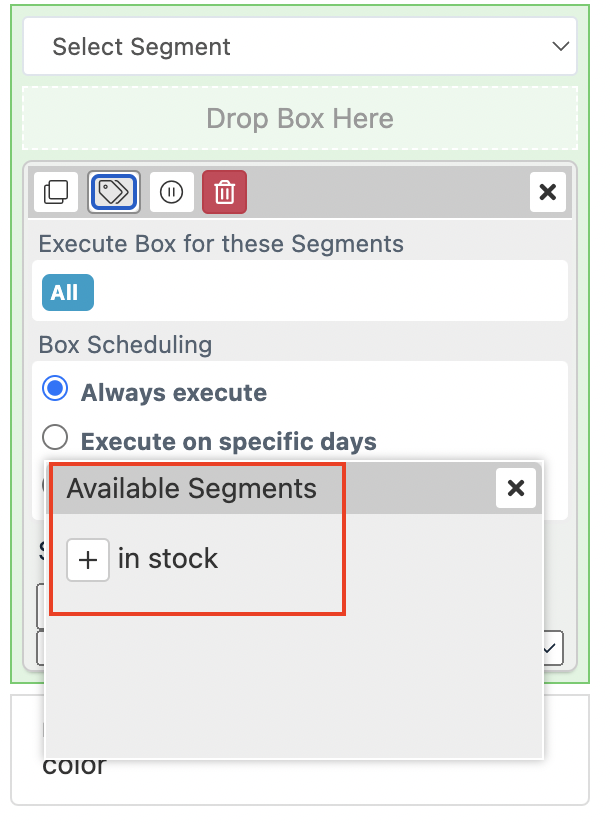
Select the wrench icon 🔧 in the top-right corner of the rule box.
Select the label icon 🏷 at the top of the rule box and go to the Available Segments window to select the plus icon + next to the needed product segment.
Tip
You can select several segments in one rule box. In this case, the platform applies the rule box to all products matching all selected segments.
Select Save.
The rule box affects the products of the selected segment only. The rest of the products remain unchanged.
Tip
Learn more about applying rule boxes to segments by taking a video course Optimization: Rule boxes for platform.productsup.com on our Academy website.
Edit a segment
To change the existing settings of a segment:
Go to Data View from your site's main menu.
Select the relevant stage in the drop-down menu on the left.
In the right corner of the top ribbon, select the menu icon.
Select the necessary segment in the Available Segments section.
Edit the desired settings of the segment. For example:
Change the attribute basis of the segment in the first drop-down menu in the Add Filter section.
Change the filter option in the second drop-down menu in the Add Filter section.
Add another value in Add one more.
Change the name of the segment in the section Save as Segment.
In the section Save as Segment, select Save.
Delete a segment
If you no longer need a product segment, you can delete it by following these steps:
Go to Data View from your site's main menu.
In the drop-down menu on the left, select the stage where you created the relevant segment.
Select the menu icon in the right corner of the top ribbon to open the Add Filter menu.
In the Add Filter menu, go to the section Available Segments and select the x icon next to the product segment you want to delete.
Warning
You can't delete a product segment used in a rule box. If you no longer need a segment but it is still used in a rule box, go to the relevant rule box and remove the segment from its settings first.
Platform-generated segment attributes
This section explains platform-generated attributes related to product segments. See the definition of platform-generated attributes in ???.
When you create a site, Productsup automatically adds the attribute ___segment_import at the import stage.
When you add an export in a new site, the platform automatically adds the following attributes:
___segment_importand___segment_intermediateat the intermediate stage.___segment_import,___segment_intermediate, and___segment_exportat the export stage.
When you create a segment at any stage, the platform locates the corresponding segment attributes at all stages and adds a segment ID in those attributes. For example, if you create a segment for shoes and purses at the import stage, the platform adds the ID of that segment in ___segment_import at the import, intermediate, and export stages to all shoes and purses in your feed.
If a product doesn't have a value in a segment attribute, it doesn't belong to any segment at the given stage.
Tip
When you create a segment, Data View doesn't immediately display segment IDs in the corresponding segment attributes. To see segment IDs, you need to run an import by selecting Import in the top-right corner of the site.
In most cases, you don't need to use platform-generated segment attributes as they serve a purely technical function for applying rule boxes to product segments.