Add Amazon Seller Central – Product Creation (US) export
Send your products to Amazon as a seller in the US via Productsup.
To let you sell your items on Amazon, Productsup has built an ecosystem that lets you send items data, inventory and price updates as well as order data to Amazon and import orders and offers data from Amazon into Productsup.
Productsup offers the following exports to send data to Amazon:
Export name | Export purpose and description |
|---|---|
Amazon Seller Central – Product Creation (US) | Sending your data to Amazon. Currently, the Amazon Seller Central – Product Creation (US) export is available only for US-based sellers and is in the beta phase. However, we can add more countries on demand. This is an API-based export. Now, we support only one category for test purposes – the US/SOFA category. To request other categories or countries, contact your Customer Success Manager or support@productsup.com. See the following sections in this document for information on setting up this export. |
Amazon Marketplace Shipment Update (SP-API) | Sending your order updates to Amazon using information stored in your ERP, order management, or shop system. The data may include order tracking IDs and carrier information. This API-based export uses delta files, which means it sends only new, updated, and deleted items to Amazon instead of the entire catalog. The export doesn't send unchanged items to Amazon, which helps reduce site-running times. |
Amazon Inventory and Price Update SP-API | Sending your inventory and price updates for the items placed on Amazon. This is an API-based export. |
Productsup offers the following data sources to import data about orders and offers from Amazon:
Data source name | Data source purpose and description |
|---|---|
Amazon Selling Partner API – Orders | Importing your orders data from your Amazon Seller Central account to Productsup. |
Amazon Selling Partner API – Offers | Importing your offers data from your Amazon Seller Central account to Productsup. |
Prerequisites
To set up the Amazon Seller Central – Product Creation (US) export in Productsup, you need to:
Create a seller account on Amazon if you don't have one.
Have login and password for your Amazon seller account. Productsup connects to Amazon via the Selling Partner API.
Prepare and send us a list of the Amazon product types and countries where you want to sell products.
Note
This export has category-specific attributes. Productsup supports only some categories by default. But we can add missing categories on request. To request the necessary categories, product types, countries, or languages for this integration, contact your Customer Success Manager or support@productsup.com and provide the following information:
List of product types
List of countries, regions, or marketplaces per product type. See Marketplace IDs for reference.
Import your items to Productsup as a main data source. See Add a main data source to import your products.
Add and set up Amazon Seller Central – Product Creation (US) export
Go to Exports from your site's main menu and select ADD EXPORT.
Search for Amazon Seller Central – Product Creation (US), hover over it, and select Add.

On the Exports page, select the name of the added export to set it up.
Select Add Destination and choose Amazon marketplace 2024 from the dropdown. Give it a name as desired, and select Save.
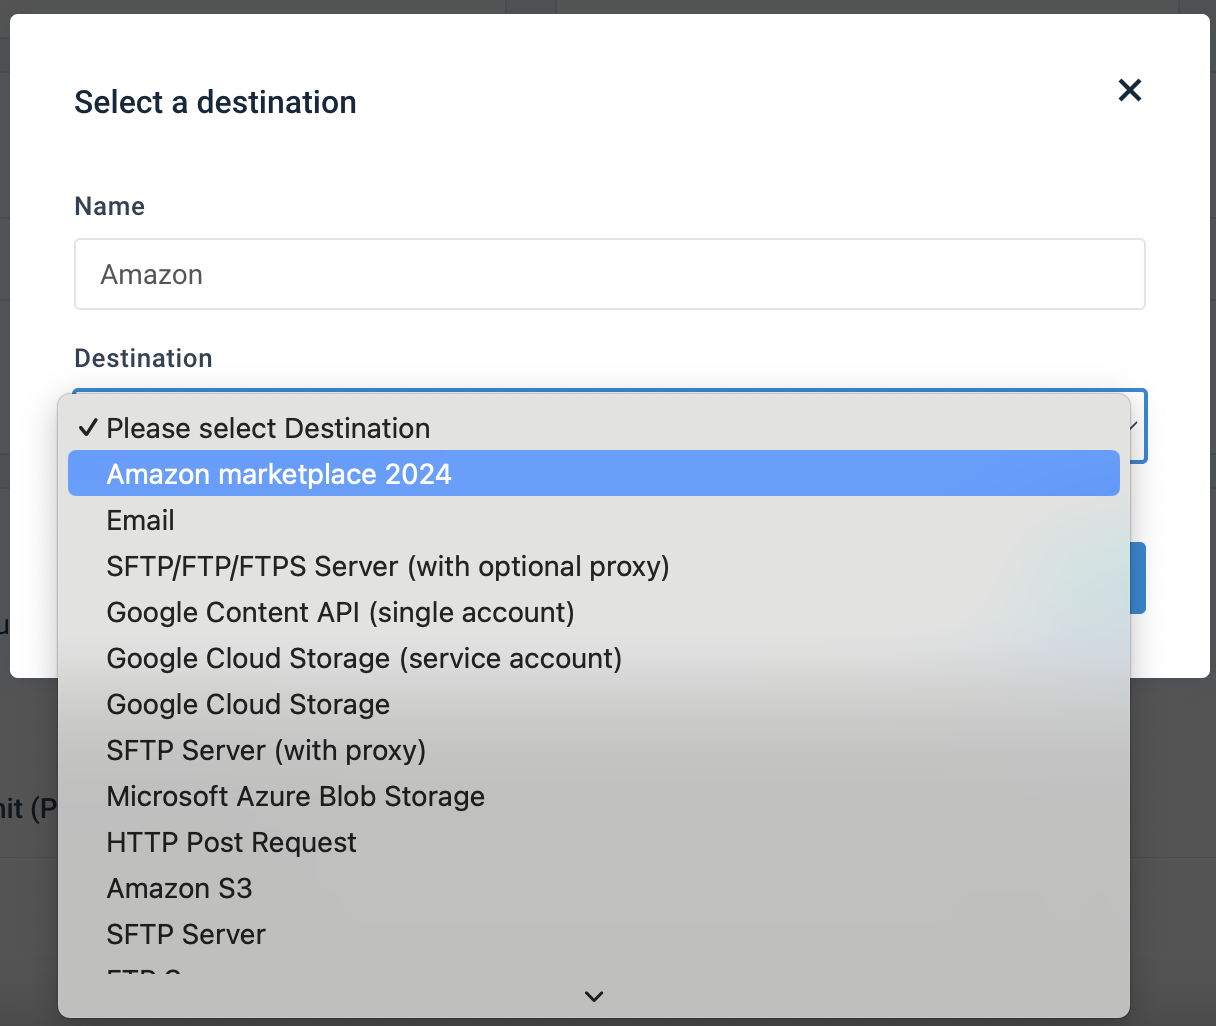
Select Add New Authentication or choose a previously created authentication from the Select authentication dropdown. See Add OAuth authentication to external systems to set up authentication with another platform.
Switch Active to On to activate the destination.
Select Save.
Next, set up a Classification Mapping list for Amazon. See the following section.
Set up a Classification Mapping list for Amazon
You must map your attributes to the Amazon categories using the Classification Mapping list to let Productsup know which category-specific attributes should be available to you.
Go to Lists from your site's main menu and select ADD LIST.
Choose Classification Mapping and select Continue.

In Name, give your mapping list a custom name to help you identify it among others. You can edit it later.
In Classification, select Amazon Seller Central – Product Creation (US).
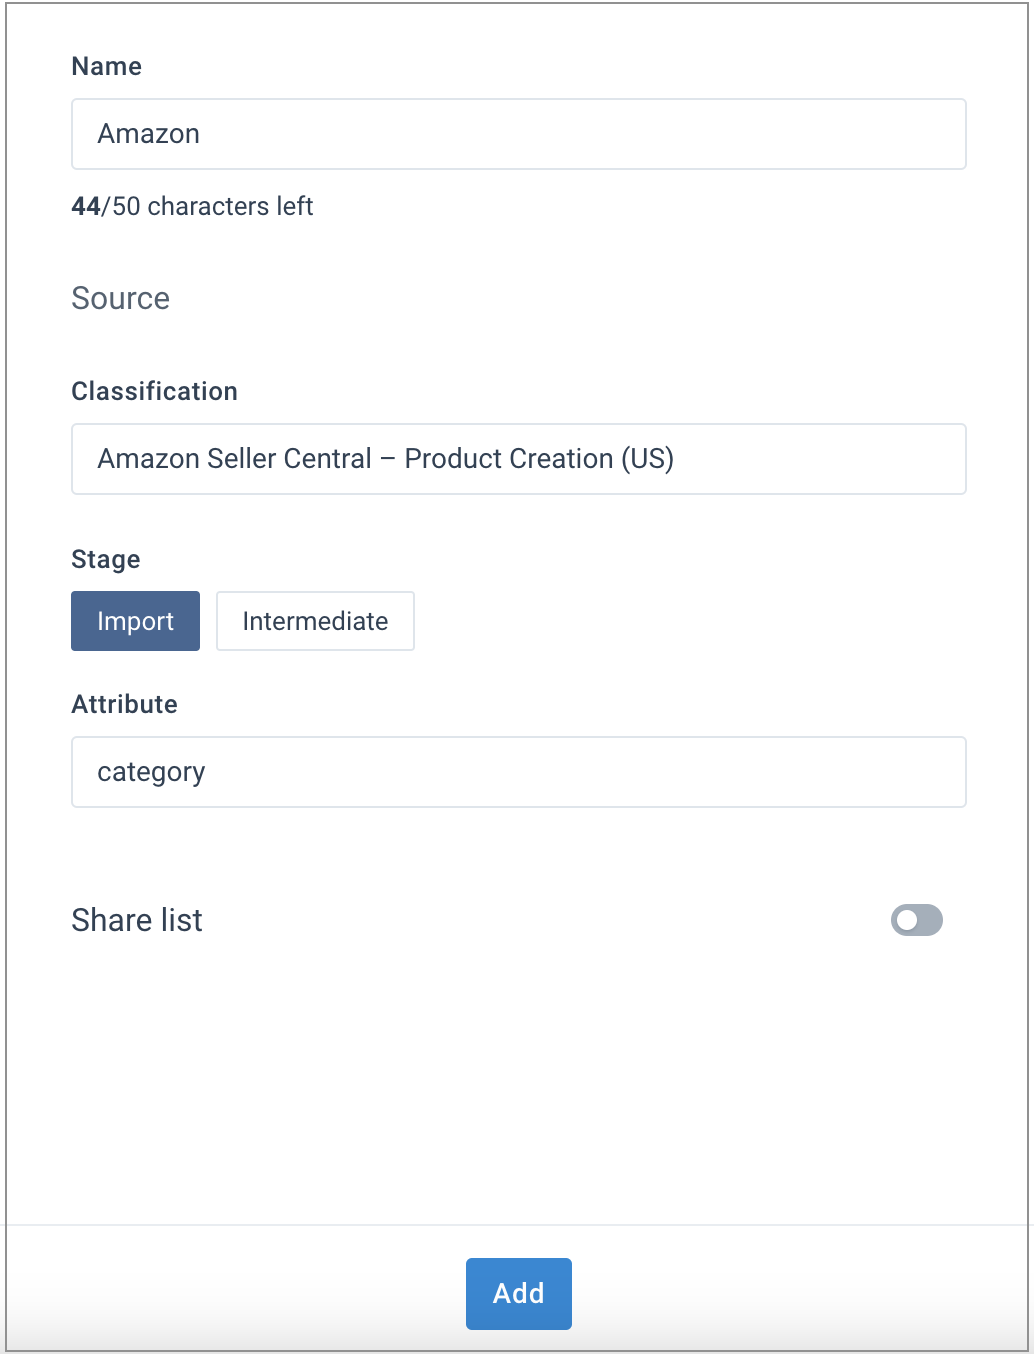
In Stage, choose Import to replace the imported categories with the categories accepted by Amazon.
In Attribute, choose your category attribute from your imported attributes. The platform later populates the list with the values from this attribute to let you map your categories to the Amazon categories.
Select Add.
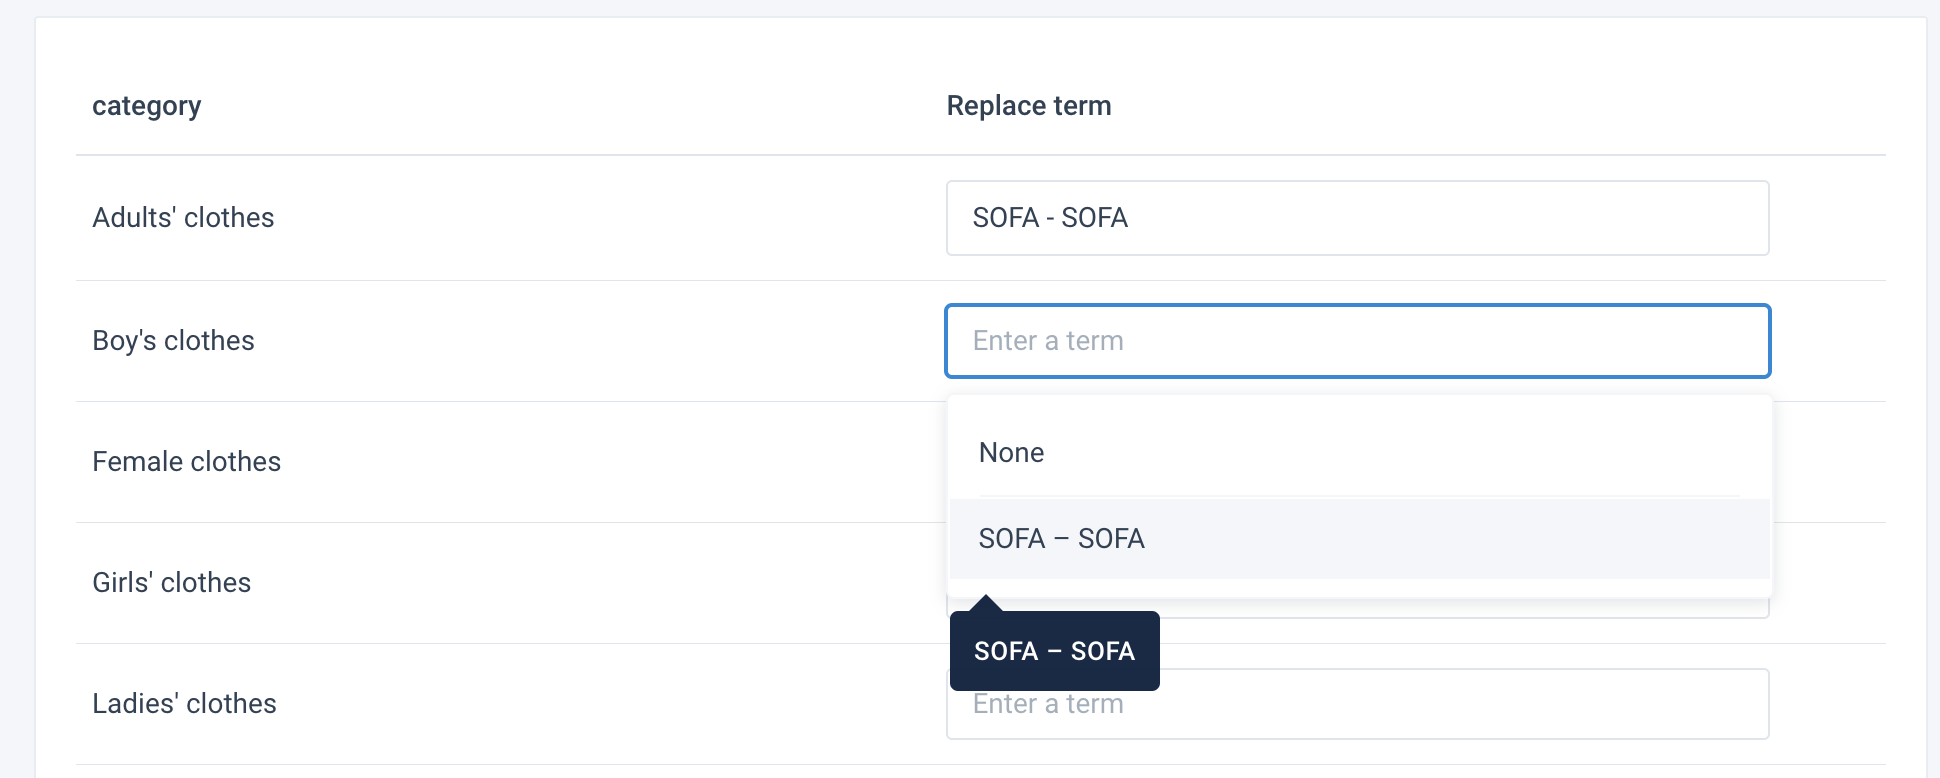
Map your categories pre-populated in the right-hand side column to the Amazon categories in the Replace term column, selecting a needed category from the dropdown.
Note
You must create and set up a new Classification Mapping list every time you modify the chosen category attribute in your data source and import its new values into your site. Otherwise, the existing list can't upload your new values, and you can't map them to the corresponding Amazon categories. Once you create a new Classification Mapping list, you need to choose it in the related rule box.
Map your attributes and add the Classification Mapping rule box. See the following section.
Map your attributes and add the Classification Mapping rule box
To map your custom categories to the Amazon categories, you must map the attribute in Dataflow and add the Classification Mapping rule box to apply the Classification Mapping list created in Set up a Classification Mapping list for Amazon.
Go to Dataflow from your site's main menu and select Amazon Seller Central – Product Creation (US) in the dropdown on the left.
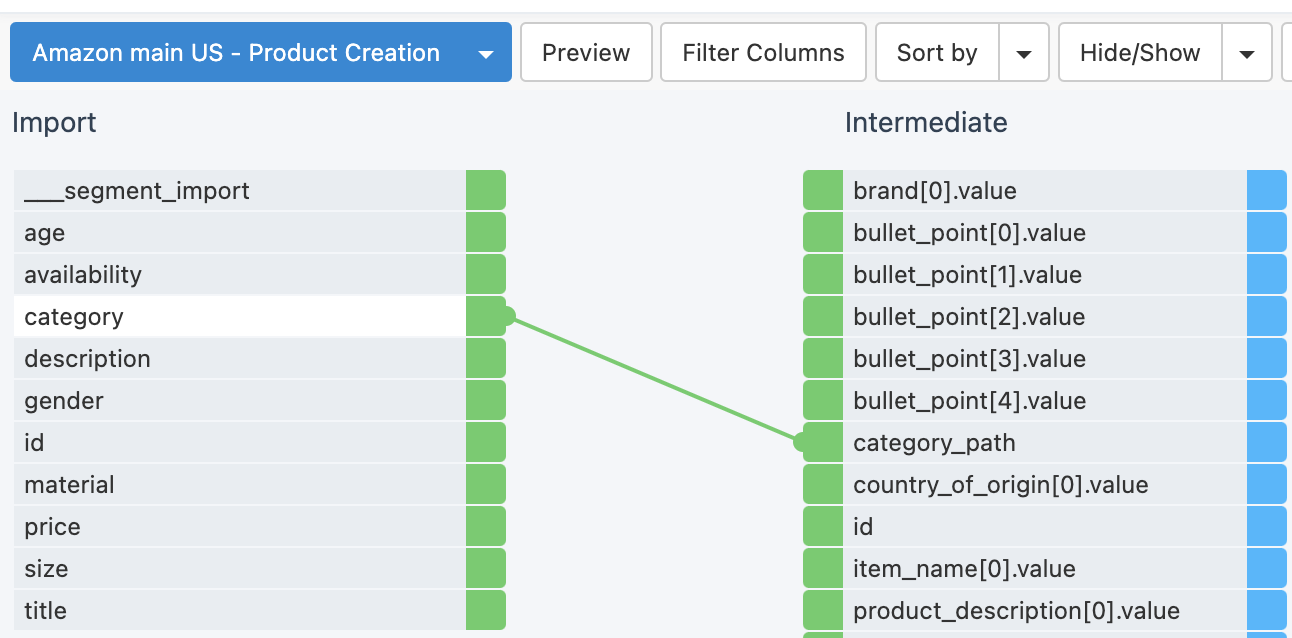
Map all relevant attributes from import to export.
Map your category attribute in the import stage to category_path in the intermediate stage.
Select category_path in the intermediate stage to add and set up the Classification Mapping rule box. Set up the rule box:
Choose the list created in Set up a Classification Mapping list for Amazon from the List dropdown.
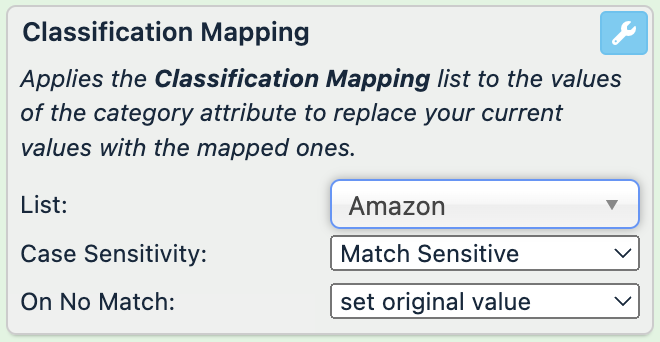
In , choose Match Sensitive to perform a case-sensitive search in the attribute's values or Match Insensitive to ignore the case of the values.
In On No Match, choose what should happen if there is no match with the values on the list:
set to empty string makes the cell empty
set original value leaves the original value
Select Save.
To let the site display your category-specific attributes in Dataflow, select Run or Import in the top-right corner of your view.
Warning
This run will fail because you still need to map all the mandatory attributes, so no data export occurs at this stage. The aim of the run is to import the necessary categories and attributes into Dataflow.
After the run is completed, check the Classifications dropdown in the top ribbon of Dataflow. You must see all categories.
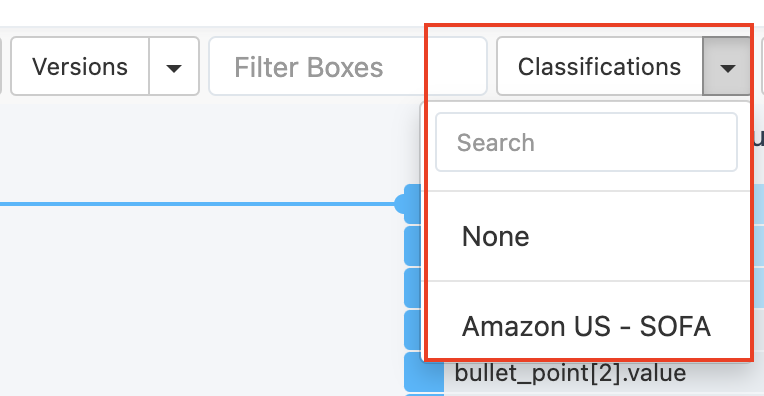
Tip
If you can't see the Classifications dropdown when the site run is complete, refresh your page.
Select each category in the Classifications dropdown and map all relevant attributes from import to export.
The fork icon to the right of the category-specific attribute name identifies attributes relevant to the selected Amazon category.
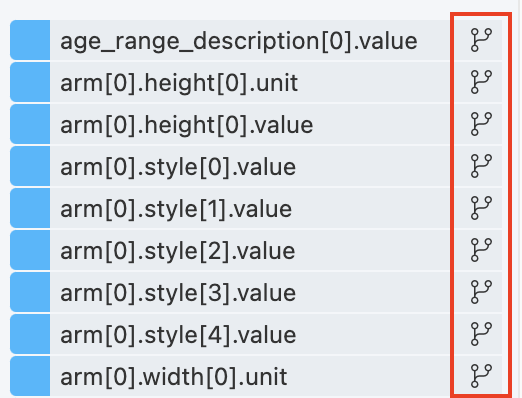
Note
If some attributes are missing in the intermediate stage, add them manually.
Check your export readiness. See the following section.
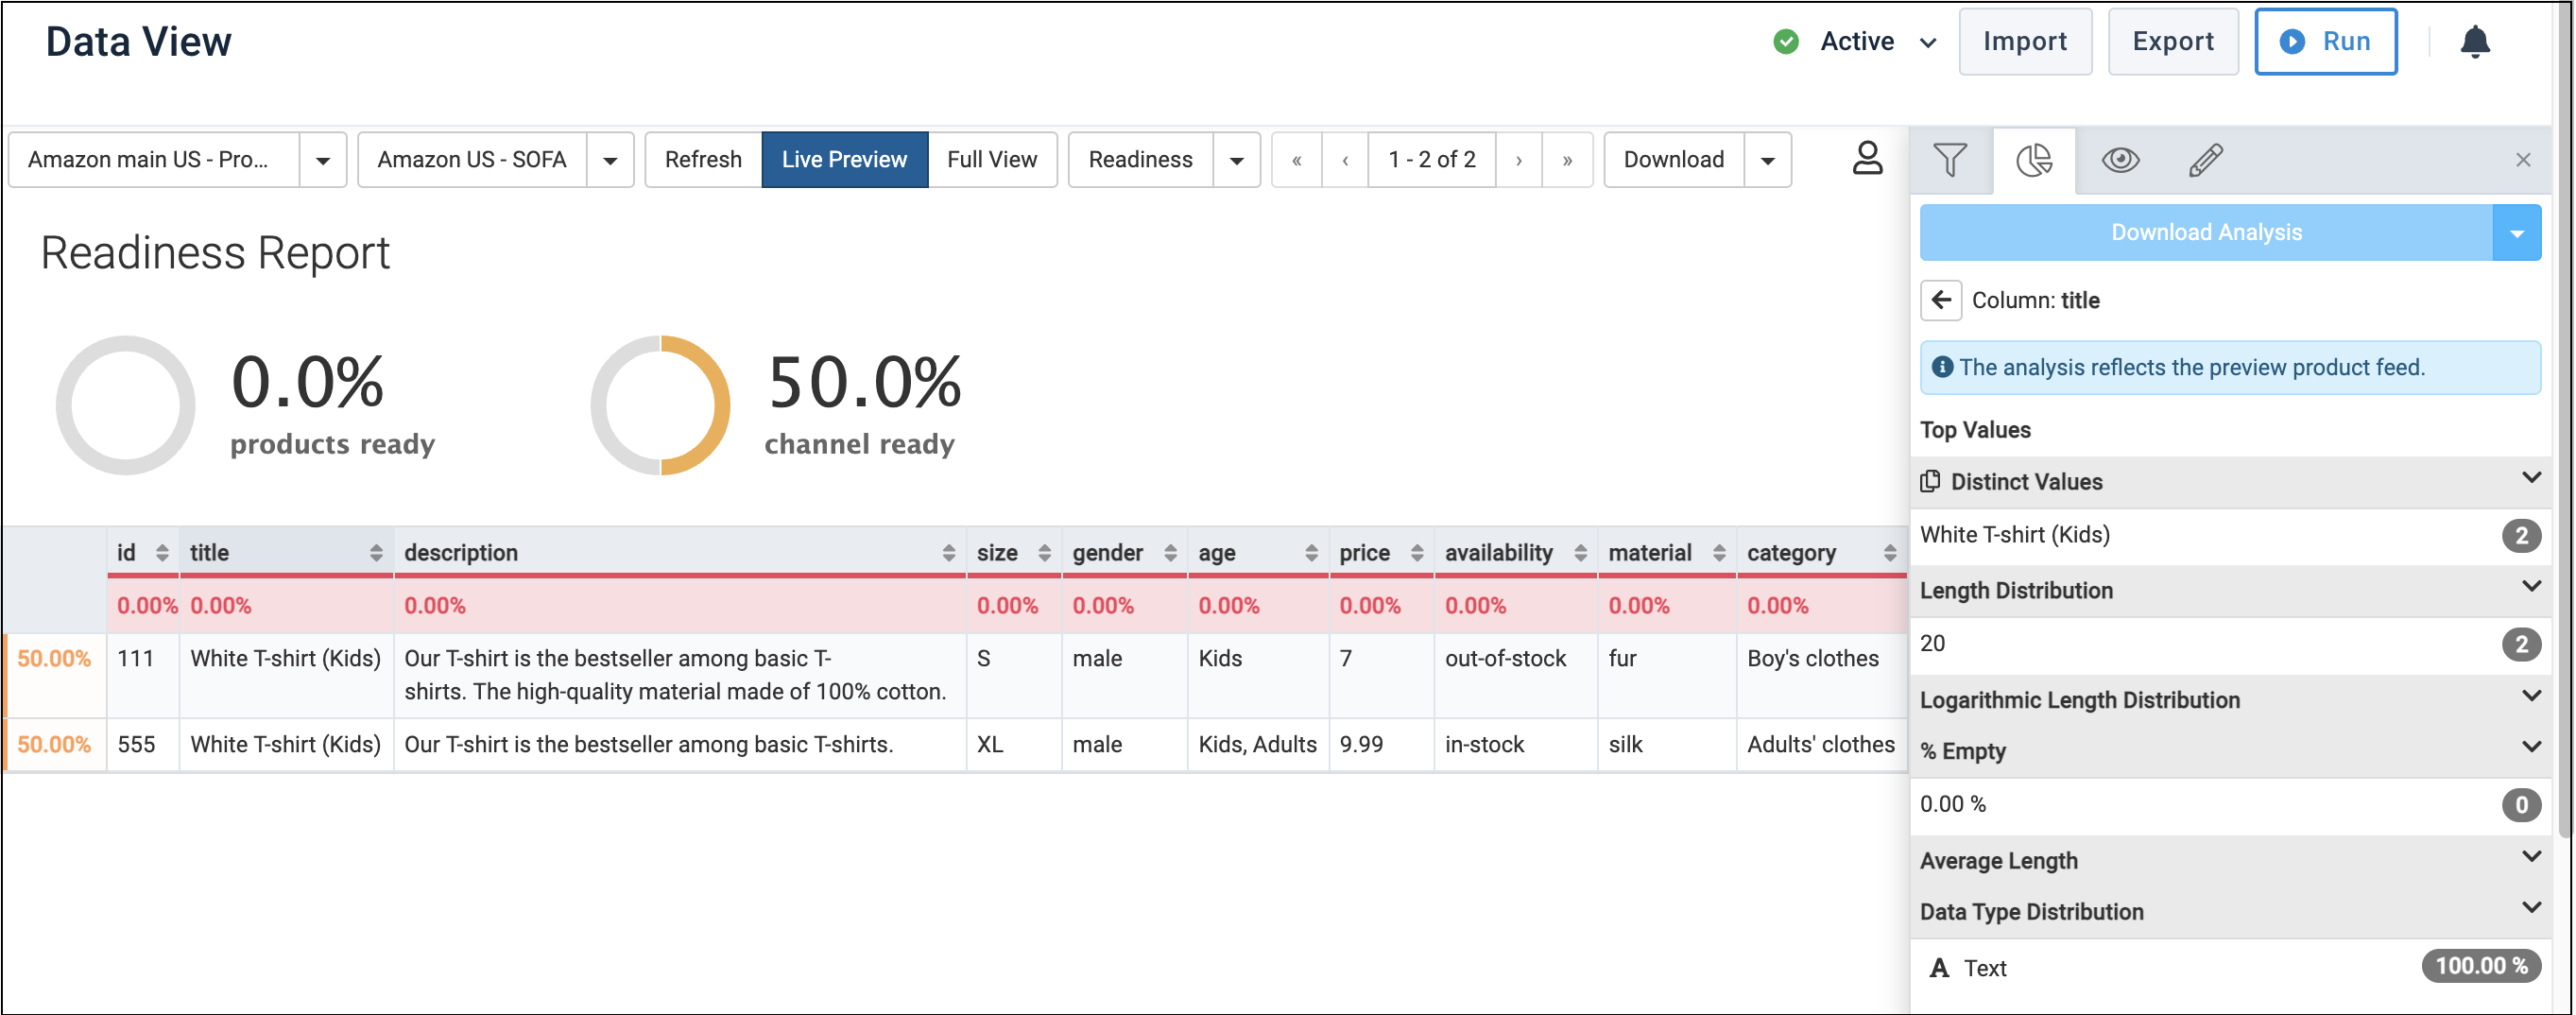
Check your export readiness
Use analyzer tests in Data View to checks your data completeness and readiness for export to Amazon.
Go to Data View from your site's main menu and choose Amazon Seller Central – Product Creation (US) from the dropdown on the top left-hand side.
For each attribute, select Analyze to ensure your data is compliant with Amazon's requirements. Alternatively, select the Overview dropdown and choose Readiness.
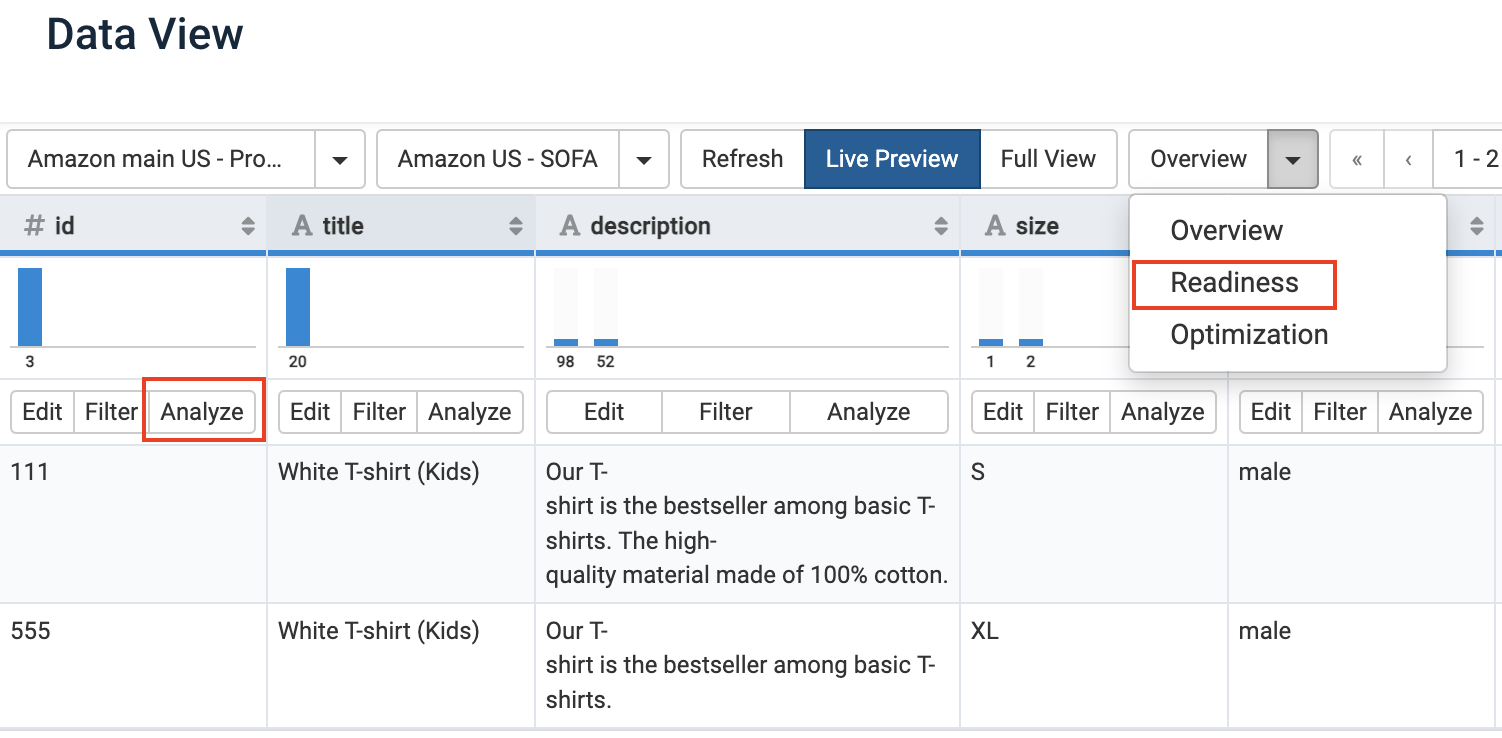
See the core readiness score and correct the data using rule boxes.
Once your data is ready, select Run in the top-right corner of your view to send your products to Amazon.
Note
You can open the Notifications panel
 to check the export progress.
Retrieve errors from Amazon to fix issues with your data
When your site run finishes, Amazon can send feedback on your export to Productsup to let you fix errors.
Go to Error Log from your site's main menu.
Select the Amazon errors tab.
Warning
It may take several minutes before you can see the Amazon errors tab.
If you need more information on errors, select Download CSV to download the Amazon feedback file.

Use rule boxes, attribute mapping, or data services to fix data issues and run the export again by selecting Run or Export in the top-right corner of your view.