Use an item setup sheet
Use an item setup spreadsheet to transmit product data in bulk to third parties in Productsup.
Introduction
Item setup sheets are spreadsheet files used for transmitting data in bulk to third parties. You can also refer to item setup sheets as new line forms, new line cards, product sheets, and fact sheets. These files are typically sent for sending product data to marketplaces, data pools, retailers, etc. Item setup sheets are commonly in the XLSX or macro-enabled XLSM format.
Some item setup sheets provide instructions on completing them, how you must specify your data, which attributes they require, and applicable restrictions information. Most item setup sheets contain large numbers of attributes and options, which you can mirror into the platform using a template. Productsup lets you paste your data into a preformatted spreadsheet known as the placeholder setup sheet for efficiency.
Productsup integrates your item setup sheet into the platform by creating a CSV file containing your product attribute names or headers.
Prerequisites
There are a few options to choose from before you export data using an item setup sheet in the platform.
You first need an item setup sheet with requirements and an export.
Productsup can create a channel template with the attributes you need as an additional service. You can then add your product data to the channel template in Export A/B. Productsup can also add Analyzer tests if they're available to ensure the data meets your export channel requirements.
You can use a Blank Export and manually add your required attributes in Dataflow within the platform.
Next, you need a placeholder setup sheet.
Productsup can create a placeholder setup sheet as an additional service.
You can manually create and add a placeholder in the placeholder setup sheet.
(Optional) Map and optimize Dataflow attributes as necessary.
Set up your export destination.
Manually create an export template and placeholder setup sheet
You need an item setup sheet with requirements to use the Blank Export template found in Exports or before Productsup can create an export. To use an item setup sheet, you first need a placeholder setup sheet and an export.
The placeholder setup sheet is a preformatted template for pasting your item setup sheet product data. Use a placeholder sheet to add item setup sheet attributes in the Productsup platform. For example, the platform extracts the values you define from the item setup sheet, then to the placeholder file, and places those product values in your channel for export.
Your item setup sheet can include several sheets if one contains the necessary attributes for sending product data. The following is an example of how an item setup sheet can look:

In the previous example, the sheet has duplicate attribute names. It's impossible to add duplicate attribute names when creating the export and the placeholder value in the placeholder setup sheet. If you find any duplicated values, make them unique. You can use numbers to differentiate attributes of the same name, such as Feature 1, Feature 2, Feature 3, etc.
To add an export in the platform using the previous attribute value examples,
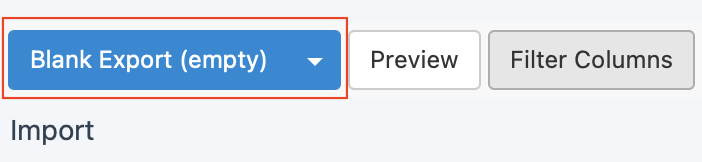
Go to Exports from your site's main menu and select ADD EXPORT. Search for the channel template Blank Export to send product data to and select Add. Select Add again to confirm it as an export.
Go to Dataflow from your site's main menu and select Blank Export in the top ribbon drop-down menu on the left.
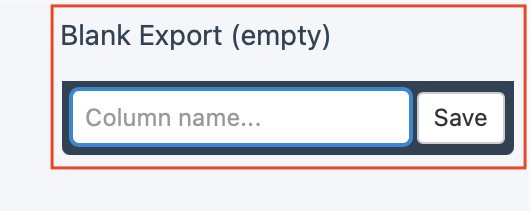
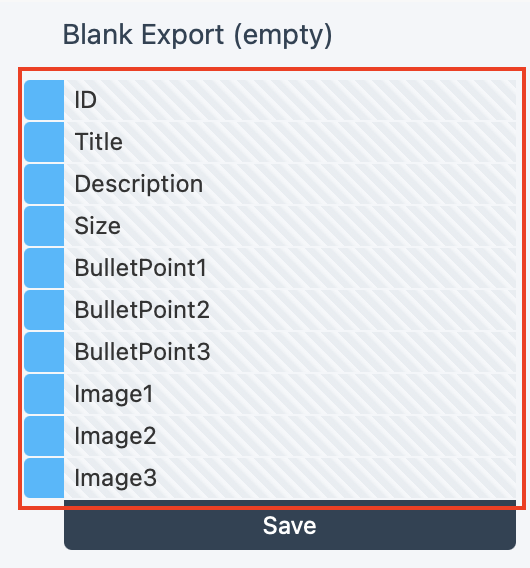
(For admins only. Otherwise, contact your local admin) On the far right, under the Blank Export (empty) title, select the Drop or Click to add new field button and enter your attribute names in the Column name field. Select Save to continue adding attribute values.
Create a placeholder setup sheet
The placeholder setup sheet needs Productsup placeholders. If the contents are text strings, they use the following format:
PRODUCTSUP_VALUE('attribute_name')
For numbers only, use:
PRODUCTSUP_NUMBER'('attribute_name')
For images, apply the following. Including the maximum image size, for example, 100x100 is optional:
PRODUCTSUP_IMAGE('attribute_name',100x100)
The value in the apostrophes must match the attribute names exactly as you created them in the channel template or export. In the current example, the placeholder item setup sheet with all products row-based in one sheet looks as follows:

Productsup also supports fact sheets, which contain one product per sheet, as follows:

Open the original item setup sheet and identify where you need to populate data. If you have any sample lines under the attribute headers, remove them. Do not remove any cells containing formulas.
Leave the row directly underneath the column headers empty, and paste your placeholders in that row for each column. This empty row lets you paste transposed data into this space correctly.
Copy the values you last pasted into the Excel Spreadsheet.
In Excel:
Right-click the first cell in the empty row, select Paste Special, mark the Transpose option, then select OK.
Delete the non-transposed placeholders.
Tip
When you save your file with the newly added placeholders, add the ending
_with_placeholdersto help you locate the file.Ensure each column needing data now contains the correct Productsup placeholder.
Add the ending
“_with_placeholders”to the placeholder setup sheet filename to identify the file containing placeholders. Save the file as a.csvfile. You must store the file on an FTP Server and can also create a new FTP via Productsup on the organization level.
Here is an example of a placeholder file filled in:

Map and optimize Dataflow attributes
It is best to confirm attribute mappings in Dataflow to ensure they are correct, using an export template produced by Productsup or a manually created template. If necessary, for example, you can optimize your data using additional rules in Data View or Lists.
You can use the Analyzer test on the export level if you use an export template produced by Productsup, given they had the requirements before creating the export. The Analyzer test supports you in ensuring your data is correctly formatted before export.
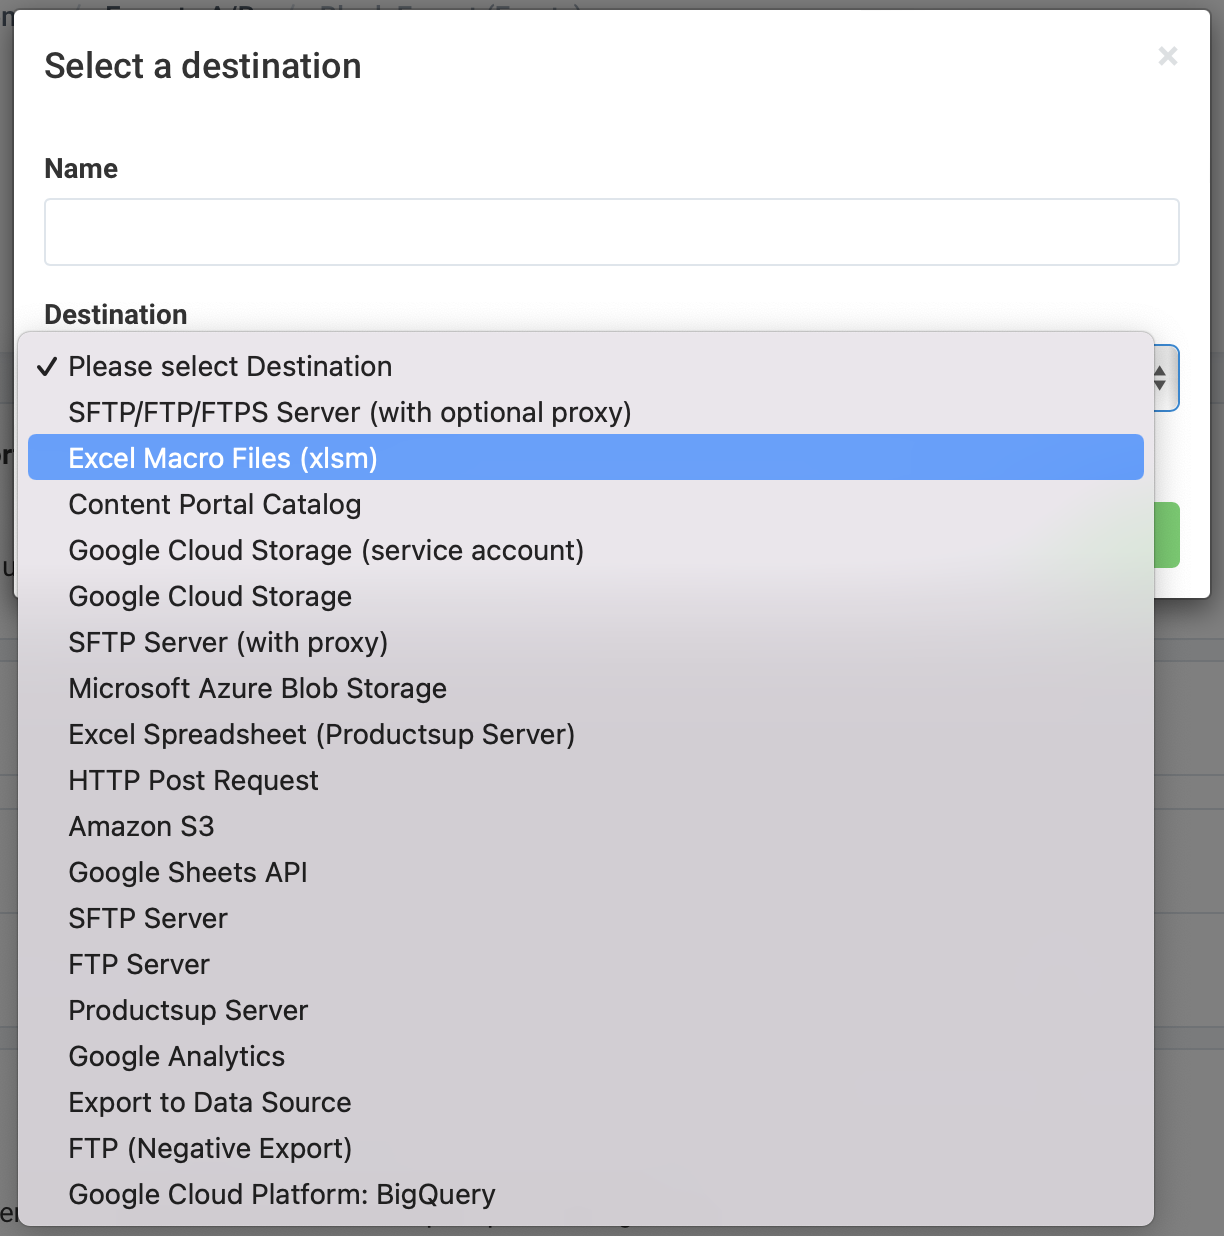
Set up item setup sheet export destination
Once you have the export and the placeholder setup sheet, you must add and configure the export destination.
Go to Exports from your site's main menu and select Add export.
Give your export a custom name if desired, then select Add.
The custom name replaces the export name on the export's overview page.
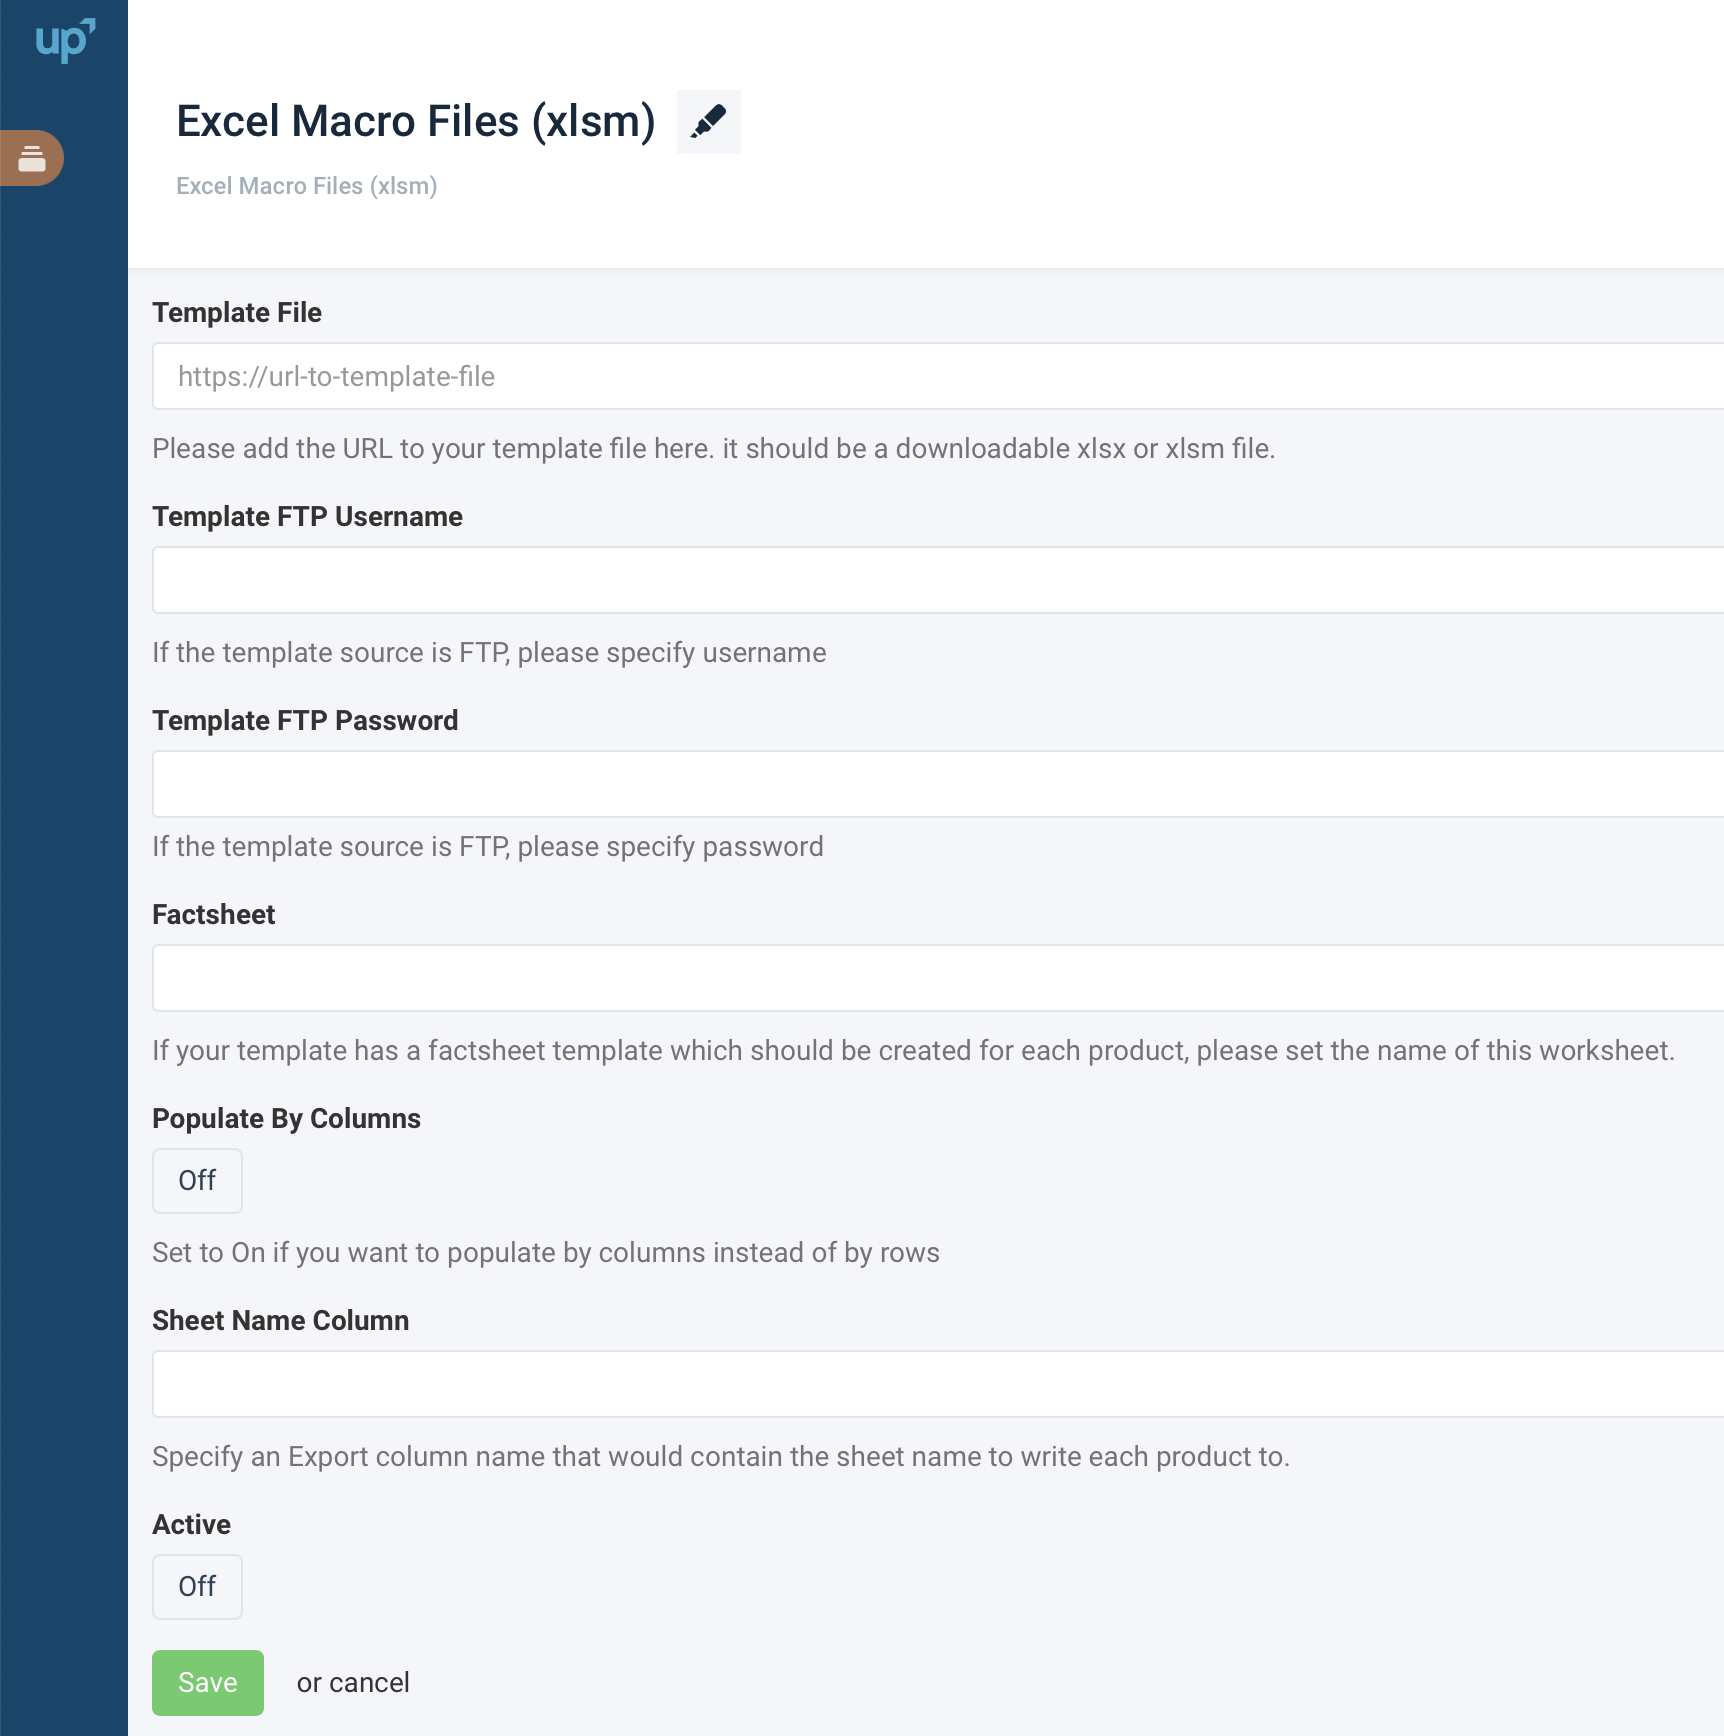
Select Add Destination and choose Excel Macro Files (xlsm) from the drop-down list. You can optionally give your destination a title in Name. Then select Save.
On the destination settings page, enter the placeholder file location in Template File.
Enter your template source FTP credentials in Template FTP Username and Template FTP Password.
If your template uses a fact sheet template containing one product per sheet, set the worksheet's name in Factsheet.
Set Populate By Columns to On if you want to populate cells using columns instead of rows.
In Sheet Name Column, identify an export column name containing the sheet name where you write for each product.
Turn on your export by switching Active to On, and lastly, select Save.