Add an FTP, SFTP, or FTPS destination
FTP, SFTP, and FTPS servers to send you data from Productsup.
Most exports in Productsup can send data to FTP, SFTP, and FTPS servers:
FTP (File Transfer Protocol) is a standard communication protocol for transferring and exchanging files between a server and a client. FTP often uses plain-text authentication via standard login data, such as username and password. If configured so, FTP can enable users to connect to servers anonymously.
SFTP (SSH File Transfer Protocol) is a data transfer protocol for exchanging data between a server and a client that uses a secure channel, such as SSH, and is accessible to authenticated users only.
FTPS (File Transfer Protocol Secure or File Transfer Protocol SSL) is an extension of the standard FTP that supports Transport Layer Security (TLS). When using FTPS, a client and a server establish a traditional FTP connection and then use port 21 to establish an additional SSL connection before authenticating users or transferring data.
FTPS Implicit is an older method of securing FTP connections that uses port 990 to establish an SSL connection between a server and a client before authenticating users or transferring data.
Most of the time, the requirements of your channel determine the needed server type.
Note
Our export destinations don't support the inclusion of basic auth within FTP, SFTP, or FTPS URLs, such as ftp://[user[:password]@]host[:port]/[url-path]. Instead, each destination contains individual fields for the URL host, directory, username, and password.
Prerequisites
Before setting up the needed destination in Productsup, you should:
Decide whether you want to use an FTP, SFTP, or FTPS server. This influences the destination you should choose.
Get the login credentials for your server:
If your export channel requires using their server to upload data, get the host and user credentials from your export channel.
If you can send data to your export channel using third-party FTP servers, you can use an FTP server hosted by Productsup. Go to FTP Accounts from your organization's main menu to create an FTP server and set up its credentials. See Create an FTP server hosted by Productsup.

Note
The FTP Accounts feature is available to admin users only. You may need to contact your organization's admin to create a new FTP server or get the credentials of an existing one.
Set up the FTP Server destination
Tip
Choose the FTP Server destination if you created a Productsup-hosted server in FTP Accounts or if you need to send data to a third-party FTP server. A proxy option is available with this destination.
Go to Exports from your site's main menu and select an export from the list to open the export setup page. If your site doesn't have the needed export yet, select ADD EXPORT to find and add an export.
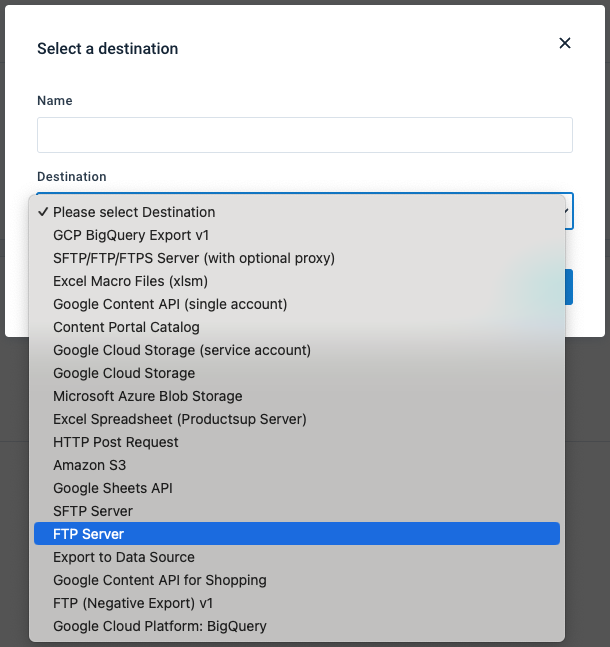
On the export setup page, select Add Destination, choose FTP Server from the drop-down list, give it a name, and then select Save.
On the destination setup page, provide your server host in FTP Host.
Tip
If you want Productsup to connect to your FTP server using a proxy, make sure your FTP host starts with
proxyftp://.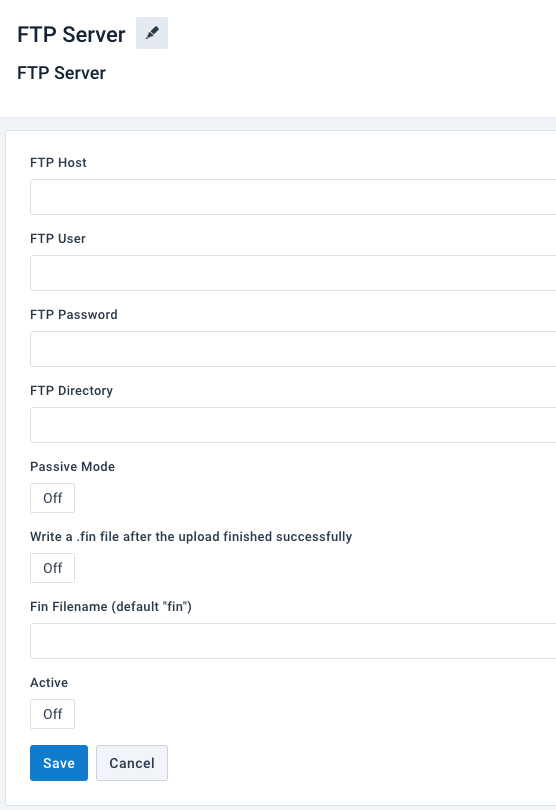
Enter your server credentials in FTP User and FTP Password.
If you want to send your data to a specific folder on your FTP server, provide the path to the desired folder in FTP Directory. By default, the platform sends your data to the root folder.
Toggle the Passive Mode button to choose the desired type of FTP connection.
If you turn this option On, the platform uses the passive FTP mode for data transfer letting the client connect to the server, which is more suitable for scenarios featuring a firewall. If you leave this option Off, the platform uses the active FTP mode letting the server connect to the client using port
20.Note
For the command channel between the client and the FTP server, the platform uses port
21.See Active vs. Passive FTP Simplified for the differences between the two modes.
If you want the platform to add an empty .fin file to your FTP server every time it successfully finishes uploading data to the server, toggle Write a .fin file after the upload finished successfully to On.
To specify a different extension for this file, enter it in Fin Filename (default "fin"). The default full name of the file is
{export-file-name-with-extension}.fin. If you provide a different extension in Fin Filename (default "fin"), the full name of the file will use the pattern {export-file-name-with-extension}.{provided-extension}.The platform automatically deletes the old .fin file when a new data upload starts.
Toggle Active to On to activate the destination.
Select Save.
When your data is ready for export, select Run in the top-right corner of your page to let the platform import, process, and send your data to the destinations of all active exports in your site.
If you want to run only the export where you added your FTP destination, you should:
Select Import to let the site import and process your data.
Go to Exports, select the needed export, and choose Export this export.

Once the site finishes the export, you can use a desktop app like Cyberduck or FileZilla to log into your FTP server and check the uploaded files. If everything is as expected, you can let your channel start an import from the FTP server.
Tip
If you used an FTP server hosted by Productsup, you need to copy your FTP server link and user credentials and paste them into the import settings of your channel. The server link is
ftp://ftp.productsup.com/. You can find your user credentials in FTP Accounts.
Set up the SFTP Server destination
Tip
Choose the SFTP Server destination if you need to send data to a third-party SFTP server. A proxy option is available with this destination.
Go to Exports from your site's main menu and select an export from the list to open the export setup page. If your site doesn't have the needed export yet, select ADD EXPORT to find and add an export.
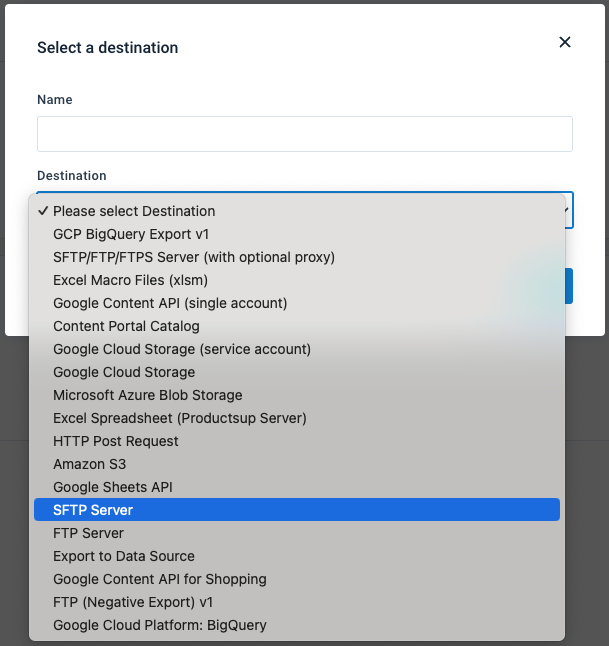
On the export setup page, select Add Destination, choose SFTP Server from the drop-down list, give it a name, and then select Save.
On the destination setup page, provide your SFTP server host in Host.
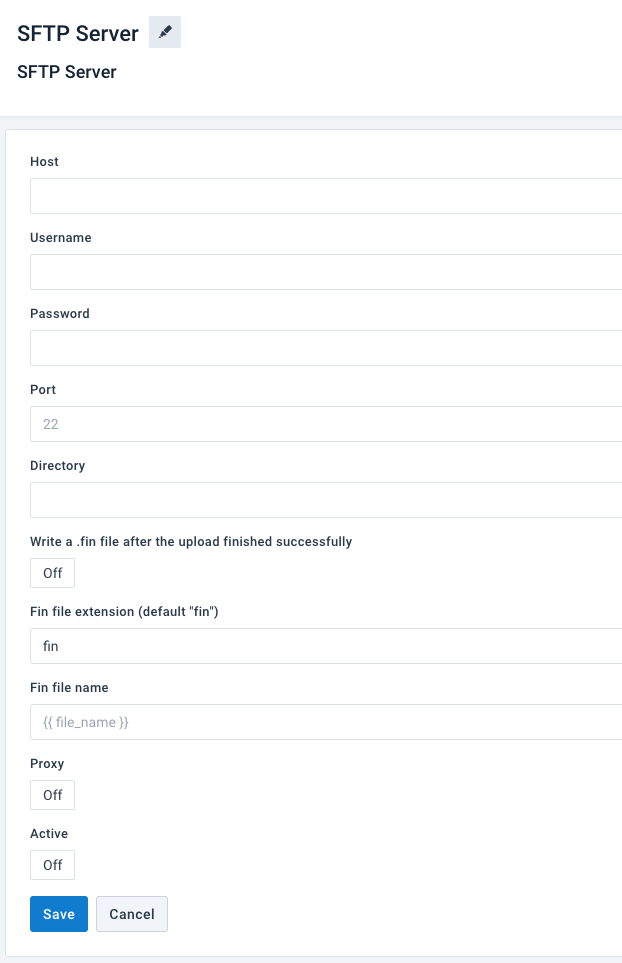
Enter your SFTP server credentials in Username and Password.
In Port, enter the number of the port that the platform should use to establish a connection with your SFTP server. By default, the platform uses port
22.If you want to send your data to a specific folder on your SFTP server, provide the path to the desired folder in Directory. By default, the platform sends your data to the root folder.
If you want the platform to add an empty .fin file to your SFTP server every time it successfully finishes uploading data to the server, toggle Write a .fin file after the upload finished successfully to On.
To specify a different name and extension for this file, enter them in Fin file name and Fin file extension (default "fin"). The default full name of the file is
{export-file-name-with-extension}.fin. If you provide a different name and extension, the full name of the file will use the pattern {provided-name}.{provided-extension}.The platform automatically deletes the old .fin file when a new data upload starts.
Toggle Proxy to On if you want the platform to use a proxy to connect to your SFTP server.
See Enable Download Proxy for a list of IPs you need to whitelist so that Productsup can send data to the server via a proxy.
Toggle Active to On to activate the destination.
Select Save.
When your data is ready for export, select Run in the top-right corner of your page to let the platform import, process, and send your data to the destinations of all active exports in your site.
If you want to run only the export where you added your SFTP destination, you should:
Select Import to let the site import and process your data.
Go to Exports, select the needed export, and choose Export this export.

Once the site finishes the export, you can use a desktop app like Cyberduck or FileZilla to log into your SFTP server and check the uploaded files. If everything is as expected, you can let your channel start an import from the SFTP server.
Set up the destination SFTP/FTP/FTPS Server (with optional proxy)
Tip
Choose the destination SFTP/FTP/FTPS Server (with optional proxy) if you need to send data to an FTPS server or if you want to provide more advanced settings for your server connection than possible via the FTP Server and SFTP Server destinations. A proxy option is available with this destination.
Go to Exports from your site's main menu and select an export from the list to open the export setup page. If your site doesn't have the needed export yet, select ADD EXPORT to find and add an export.
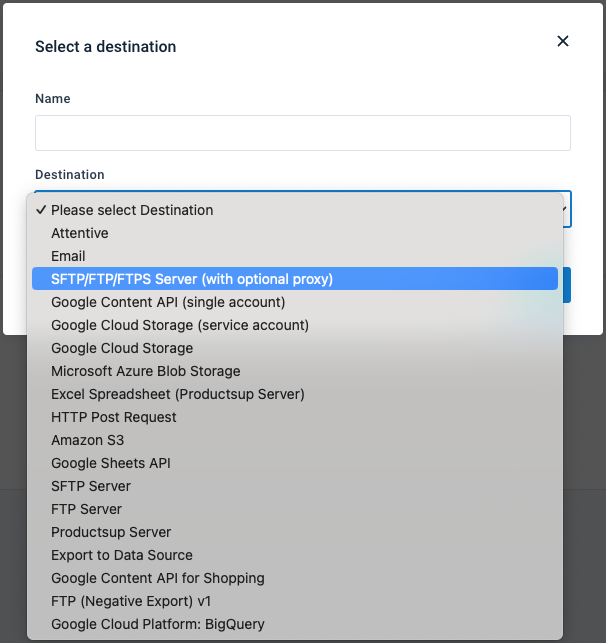
On the export setup page, select Add Destination, choose SFTP/FTP/FTPS Server (with optional proxy) from the drop-down list, give it a name, and then select Save.
On the destination setup page, select the needed server protocol in Protocol. The available options are:
FTP
FTPS
SFTP
FTPS Implicit
Provide your server host in Host. Leave out prefixes, such as
ftp://,sftp://, orftps://.In Port, enter the number of the port that the platform should use to establish a connection with your server. If you leave this blank, the platform uses the default port of the chosen protocol. For example, port
22for SFTP connections and port21for FTP connections.Enter your server credentials in Username and Password. Or provide your base64-encoded private SSH key in SSH Key must be (PEM format, RSA, ECDSA, or Ed25519, blank passphrase) instead of the password.
If you want to send your data to a specific folder on your server, provide the path to the desired folder in Directory. By default, the platform sends your data to the root folder.
Toggle the Passive Mode button to choose the desired type of server connection.
If you turn this option On, the platform uses the passive mode for data transfer letting the client connect to the server, which is more suitable for scenarios featuring a firewall. If you leave this option Off, the platform uses the active mode letting the server connect to the client.
Define the platform's behavior in case of server failure or inactivity:
In Timeout, enter the number of seconds the platform should wait before considering a request failed due to server inactivity. By default, the platform waits for
300seconds.In Max Retries on Failure, enter the number of new attempts the platform should automatically make in case of request failure. By default, the platform retries sending data
3times.
If you want the platform to add an empty .fin file to your server every time it successfully finishes uploading data to the server, toggle Enable fin file to On and provide the desired name and extension for this file in Fin File Name and Fin File Extension. If you don't want the platform to create such a file on your server, leave Enable fin file off.
If you provide a desired name and extension for the .fin file, the full name of the file will use the pattern {provided-name}.{provided-extension}.
When a new data upload starts, the platform automatically deletes the old .fin file.
Note
The default input in Fin File Name is
{{ file_name }}. The default input in Fin File Extension isfin. This makes the default full name of the file{export-file-name-without-extension}.fin. You can find your export file name at the bottom of the export setup page.If you enter
{{ base_file_name }}in Fin File Name and keepfinas the extension, the full name of the file will be{export-file-name-with-extension}.fin.Toggle Proxy to On if you want the platform to use a proxy to connect to your server.
See Enable Download Proxy for a list of IPs you need to whitelist so that Productsup can send data to the server via a proxy.
Toggle Enable ssh dss/rsa host key algorithms to On if your SFTP server uses the deprecated SSH-RSA or SSH-DSS host key algorithms. Use this option only if our support team suggests it.
Toggle Enable ssh rsa pubkey algorithm to On if you want to use more modern signature algorithms for public key authentication. This option defines the accepted algorithms for your public key to prove its identity to the server and replaces older, less secure options like SSH-RSA (RSA with SHA-1) with more modern algorithms, such as
ssh-ed25519andrsa-sha2-256orrsa-sha2-512.Toggle Enable ssh diffie-hellman-group14-sha1 key exchange algorithm to On if your SFTP server uses
diffie-hellman-group14-sha1, an outdated key exchange method used for establishing a secure connection. Use this option only if our support team suggests it.In SSH cipher, enter the encryption algorithm used for data transfer. Use this field only if your server requires you to explicitly specify the cipher algorithm.
In Override remote file name, provide the desired name for your export file if you want this destination to produce an export file with a name that differs from the one specified on the export setup page.
Toggle Active to On to activate the destination.
Select Save.
When your data is ready for export, select Run in the top-right corner of your page to let the platform import, process, and send your data to the destinations of all active exports in your site.
If you want to run only the export where you added your destination, you should:
Select Import to let the site import and process your data.
Go to Exports, select the needed export, and choose Export this export.

Once the site finishes the export, you can use a desktop app like Cyberduck or FileZilla to log into your server and check the uploaded files. If everything is as expected, you can let your channel start an import from the server.