Import JSON files - advanced settings
Learn how to import JSON files into Productsup using advanced settings in the platform.
JSON explained
JSON (JavaScript Object Notation) is a human-readable format for exchanging data between systems. It consists of key-value pairs that can look similar to this: {"id": "1111"}. In this example, id is the attribute key, and 1111 is the attribute value. In a JSON file, every key is enclosed in double quotation marks. Every value can be a string, array, object, or number. If a value is a string, it is also enclosed in double quotation marks.
Here is an example of a typical JSON file that stores data for one product in one object:
{
    "id": "1111",
    "title": "Shirt",
    "size": "L",
    "price": "30 EUR",
    "stock": "5"
}
If a JSON file stores data for multiple products, the file contains an array that opens and closes with a square bracket. Inside the array, each product is an object that opens and closes with a curly bracket:
[
    {
        "id": "1111",
        "title": "Shirt",
        "size": "L",
        "price": "30 EUR",
        "stock": "5"
    },
    {
        "id": "2222",
        "title": "Pants",
        "size": "S",
        "price": "60 EUR",
        "stock": "3"
    }
]
You can import your raw JSON files into Productsup using the following data source options:
Feed URL. See Import a file from a URL for more information.
Local File Import. See Import a file from your computer for more information.
Basic API Request with JSON Response.

Productsup Stream API and Productsup Platform API. See Import data via the Productsup Stream API and Import data via the Productsup Platform API for more information.
Specific data sources for PIM and other systems that use atypical JSON code.
To read and interpret JSON files correctly, the platform parses them before uploading their contents to your site. To ensure that parsing goes smoothly, you can use various JSON settings while setting up your data source option.
Note
Nested JSON files with complex structures may require custom development efforts on the Productsup side to let the platform parse them correctly. Reach out to your Customer Success Manager or contact support@productsup.com if you need help.
Import a JSON file with a root node
Some JSON files have root nodes. A root node is a key that contains an array storing all your products. It serves as an entry point from which the platform should start importing products in your file.
The root node in the following example is products:
{
    "products": [
        {
            "id": "1111",
            "title": "Shirt",
            "size": "L",
            "price": "30 EUR",
            "stock": "5"
        },
        {
            "id": "2222",
            "title": "Pants",
            "size": "S",
            "price": "60 EUR",
            "stock": "3"
        }
    ]
}
Warning
If your JSON file contains a root node and you don't specify it on the data source setup page, the import fails.
To specify a root node for your JSON file:
Go to Data Sources from your site's main menu and select the cogwheel icon (⚙) next to the relevant data source.
Find the Content Options panel at the bottom of the data source setup page and select Json Settings.
In Root Node, enter the key that serves as a root node in your JSON file. Don't include quotation marks in this field; only add the name of the key, for example,
products.
If your relevant root node is nested deep in the file's structure, you can use either option:
Enter the name of the relevant key only.
Specify the whole path leading up to the relevant key, such as
products>garden-furniture>spring-collection.
Select Save all settings.
Import a JSON file with variant keys
If your products are available in multiple sizes or colors, your JSON file may store this data in variant keys in each product. In the following example, the variant key sizes-and-stock contains different sizes and the related stock data:
{
    "products": [
        {
            "id": "1111",
            "title": "Shirt",
            "price": "30 EUR",
            "sizes-and-stock": [
                {
                    "size": "L",
                    "stock": "5"
                },
                {
                    "size": "S",
                    "stock": "2"
                }
            ]
        },
        {
            "id": "2222",
            "title": "Pants",
            "price": "60 EUR",
            "sizes-and-stock": [
                {
                    "size": "L",
                    "stock": "3"
                },
                {
                    "size": "M",
                    "stock": "5"
                }
            ]
        }
    ]
}
When importing products with variant keys, the platform creates one row per product by default and adds new columns for all attributes and values stored within the variant key. This is why you get the following data in your site:
id | title | price | sizesandstock_0_size | sizesandstock_0_stock | sizesandstock_1_size | sizesandstock_1_stock |
|---|---|---|---|---|---|---|
1111 | Shirt | 30 EUR | L | 5 | S | 2 |
2222 | Pants | 60 EUR | L | 3 | M | 5 |
However, the platform can also import variant keys as separate product rows:
id | title | price | sizesandstock_size | sizesandstock_stock |
|---|---|---|---|---|
1111 | Shirt | 30 EUR | L | 5 |
1111 | Shirt | 30 EUR | S | 2 |
2222 | Pants | 60 EUR | L | 3 |
2222 | Pants | 60 EUR | M | 5 |
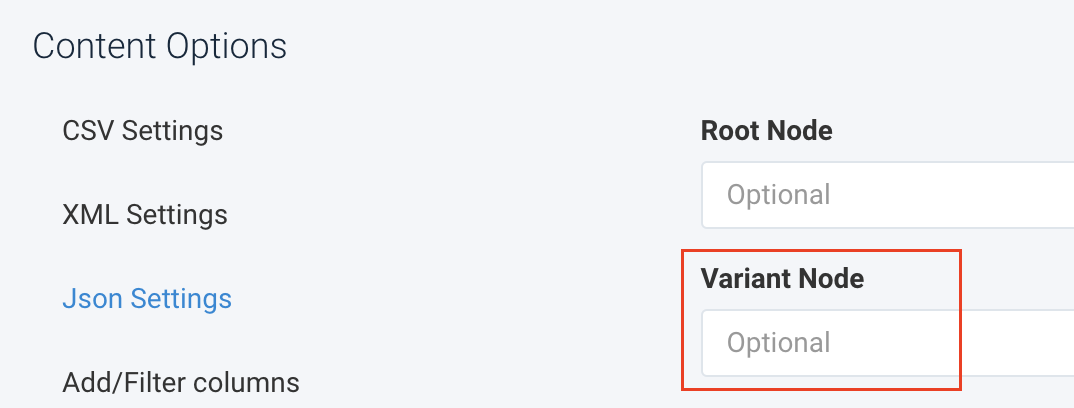
To let the platform import variant keys as separate product rows, use the Variant Node setting on the data source page:
Go to Data Sources from your site's main menu and select the cogwheel icon (⚙) next to the relevant data source.
Find the Content Options panel at the bottom of the data source setup page and select Json Settings.
In Variant Node, enter the variant key of your JSON file. Don't include quotation marks in this field; only add the name of the key, for example,
sizes-and-stock.
Note
If your file also has a root node, remember to enter it in Root Node. See Import a JSON file with a root node.
Select Save all settings.
Bundle repeating keys into one column
A JSON file may have a key with an array that stores multiple values. For example, see the size key:
{
    "id": "1111",
    "title": "Shirt",
    "price": "30 EUR",
    "size": [
            "XS",
            "M",
            "L"
    ]

}
By default, the platform creates a new column for each value in the array and imports the data as follows:
id | title | price | size_0 | size_1 | size_2 |
|---|---|---|---|---|---|
1111 | Shirt | 30 EUR | XS | M | L |
However, you can bundle the repeating values into one column and let the platform import the data this way:
id | title | price | size |
|---|---|---|---|
1111 | Shirt | 30 EUR | XS, M, L |
Note
You can use any delimiter to separate values.
To bundle repeating values into one column:
Go to Data Sources from your site's main menu and select the cogwheel icon (⚙) next to the relevant data source.
Find the Content Options panel at the bottom of the data source setup page and select Json Settings.
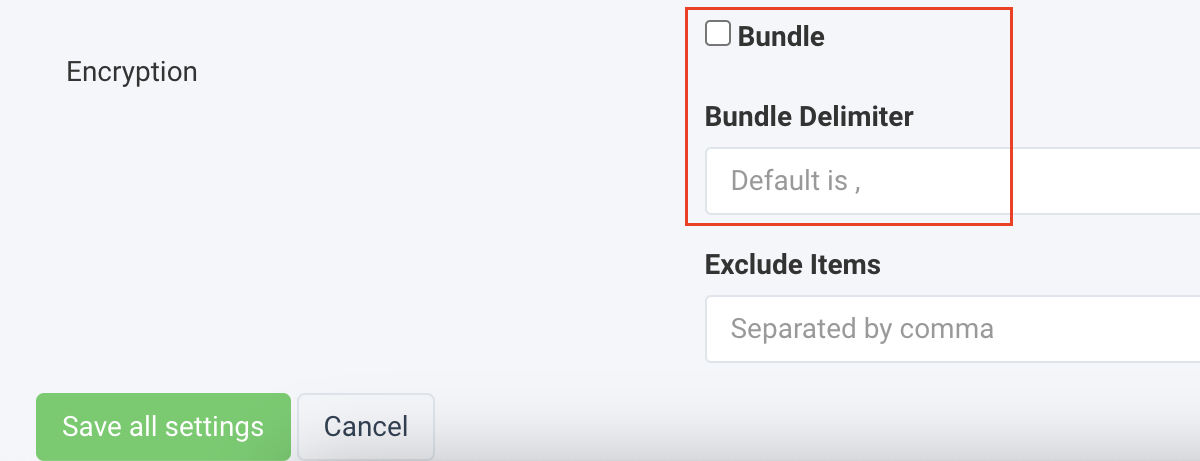
Check the Bundle box to enable the setting.
In Bundle Delimiter, enter the symbol that should separate your repeating values in a column. The default separator is a comma (
,).
Note
If your file also has a root node, remember to enter it in Root Node. See Import a JSON file with a root node.
Select Save all settings.
Exclude specific keys from a JSON file
You can let the platform exclude specific keys during import. For example, you may want the platform not to import the key updatedOn into your Productsup site:
{
  "id": "1111",
  "title": "Shirt",
  "size": "L",
  "updatedOn": "17.04.2023"
}
To let the platform skip an unneeded key:
Go to Data Sources from your site's main menu and select the cogwheel icon (⚙) next to the relevant data source.
Find the Content Options panel at the bottom of the data source setup page and select Json Settings.
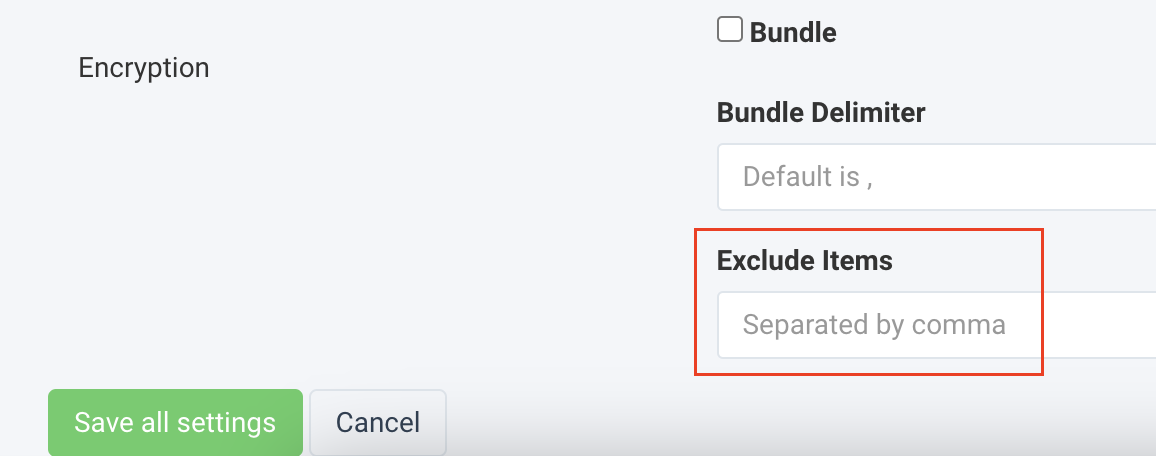
In Exclude Items, enter the key you want to skip during import. Don't include quotation marks in this field; only add the name of the key, for example,
updatedOn.
Tip
To exclude multiple keys during import, separate them with a comma.
Select Save all settings.
Transform a JSON file into a CSV file
Some export channels prefer uploading CSV files rather than JSON files. In these cases, you may want to transform your JSON file into a CSV file before Productsup imports it:
Go to Data Sources from your site's main menu and select the cogwheel icon (⚙) next to the relevant data source.
Select the Advanced Settings tab and choose I/O Settings.
In the Transform JSON to CSV option, select Add.

Use the fields Product Path and Multiline to provide the platform with the needed transformation details. See Transform JSON to CSV to fill out these fields.
Select Save.