Set up BMEcat 2005 and BMEcat 1.2 exports
Standardize and simplify product catalog exchanges between suppliers and purchasing companies by setting up the BMEcat 2005 and BMEcat 1.2 exports in Productsup.
Introduction
BMEcat is a product data exchange format based on the Extensible Markup Language (XML) that lets you standardize and simplify product catalog exchanges between suppliers and purchasing companies. A range of product databases, procurement systems, and marketplaces, such as 2BA, EFO, and Mercateo, require submitting data in the BMEcat format.
Often, partner systems require BMEcat combined with ETIM or another classification standard.
Productsup supports the following BMEcat versions:
BMEcat 2005 v4.0.2
BMEcat 2005 v4.0.3
BMEcat 2005 v5.0.1
BMEcat 1.2
BMEcat 1.2 and BMEcat 2005 versions mainly differ in the following aspects:
BMEcat 1.2 | BMEcat 2005 |
|---|---|
|
|
See the BMEcat official website to learn more about the differences between versions.
In Exports, you can choose a needed export depending on the version required by the partner system to which you export your data.
The configuration of the BMEcat 2005 exports is similar regardless of the specific BMEcat version (v4.0.2, v4.0.3, v5.0.1). See Add and set up the BMEcat 2005 export for the BMEcat 2005 exports setup information.
The configuration of the BMEcat 1.2 export slightly differs. See Add and set up the BMEcat 1.2 export for the BMEcat 1.2 export setup information.
Note
The platform still supports the legacy exports BME 2005 - Single-feature Approach and BMEcat 2005 - Bundled-features Approach exports if you started using them before the new exports became available. See Set up BMEcat 2005 Single-feature Approach export channel and Set up BMEcat 2005 Bundled-features Approach export channel for more information on the legacy exports.
Tip
Learn more about BMEcat and ETIM on our Academy website by taking the video course Distribution PX - Export Data.
Add and set up BMEcat 2005 (v4.0.2, v4.0.3, v5.0.1) with ETIM
Usually, you need to set up the BMEcat 2005 export in combination with a classification standard. This section demonstrates how to set up BMEcat with ETIM. But you can use the same setup principle with another classification standard.
If you need to set up the BMEcat 2005 export without a classification, skip the following section and see Add and set up the BMEcat 2005 export.
Prerequisites
To set up the BMEcat 2005 export with the ETIM classification standard, you need to:
Create and set up an ETIM-specific site. See Create or copy a site.
Add the ETIM export to your ETIM site. See Set up ETIM Classes exports.
Create and set up a BMEcat site. See Create or copy a site.
Set up the data source for BMEcat with ETIM. See Set up the data source for BMEcat with ETIM.
Then, you can add and set up a necessary BMEcat 2005 export. See Add and set up the BMEcat 2005 export.
Set up the data source for BMEcat with ETIM
Go to Exports from your ETIM site's menu and select the name of your ETIM export in the Export name column.
Note
To fulfill this step, first, you must do steps 1 to 3 from the Prerequisites.
Scroll down to the Filename section and select the file link to download the export file with the ETIM classification data for your product feed.
Go to Data Sources from your BMEcat site and add the main and additional data sources:
For Main Data Source, select the same data source as in the ETIM site or a different one as desired.
For Additional Data Source, reuse the link of the file exported with the ETIM export. See Step 2.
See Add the main data source and Add an additional data source to learn how to add data sources.
Select the cogwheel icon (⚙) next to the additional data source.
Go to the Advanced Settings tab and select I/O Settings.
Select Add next to Transform XML with XSLT.

Use the following XSLT code and adjust it for your setup to check if the desired output works fine. You can copy one item from the current XML and run the transformation at any online converter, such as XSL Transformer. If there are any issues, you can fix the XSLT code and apply it to the remaining items. Then, enter your code in the XSL Template field.
<?xml version="1.0" encoding="UTF-8"?>
<xsl:stylesheet xmlns:xsl="http://www.w3.org/1999/XSL/Transform"
    xmlns:xs="http://www.w3.org/2001/XMLSchema"
    exclude-result-prefixes="#all"
    xmlns:fun="urn:com:productsup:xslt:functions"
    version="2.0">

<xsl:output indent="yes" encoding="UTF-8" cdata-section-elements="Name" />
<xsl:strip-space elements="*"/>

<xsl:template match="node()|@*">
    <xsl:copy>
        <xsl:apply-templates select="node()|@*"/>
    </xsl:copy>
</xsl:template>

<xsl:template match="FEATURE">
    <xsl:element name="FEATURE">
        <xsl:apply-templates select="FNAME"/>
        <xsl:for-each select="FVALUE">
            <xsl:if test=". = ''">
                <xsl:element name="FVALUE">
                    <xsl:text>-</xsl:text>
                </xsl:element>
            </xsl:if>
            <xsl:if test=". != ''">
                <xsl:element name="FVALUE">
                    <xsl:value-of select="." />
                </xsl:element>
            </xsl:if>
        </xsl:for-each>
        <xsl:choose>
            <xsl:when test="FVALUE_DETAILS">
                <xsl:element name="FVALUEDETAILS">
                  <xsl:value-of select="FVALUE_DETAILS"/>
                </xsl:element>
            </xsl:when>
            <xsl:otherwise>
               <xsl:element name="FVALUEDETAILS">
                    <xsl:text>-</xsl:text>
               </xsl:element>
            </xsl:otherwise>
        </xsl:choose>
        <xsl:choose>
            <xsl:when test="FUNIT">
                <xsl:element name="FUNIT">
                  <xsl:value-of select="FUNIT"/>
                </xsl:element>
            </xsl:when>
            <xsl:otherwise>
               <xsl:element name="FUNIT">
                    <xsl:text>-</xsl:text>
               </xsl:element>
            </xsl:otherwise>
         </xsl:choose>

        <!--<xsl:apply-templates select="FUNIT"/>-->
    </xsl:element>
</xsl:template>

<xsl:template match="ARTICLES">
    <xsl:element name="ARTICLES">
        <xsl:apply-templates select="*"/>
    </xsl:element>
</xsl:template>

</xsl:stylesheet>
Select Save.
Go to the Overview tab and scroll to the Content Options section.
Select XML Settings from the left-hand side menu and enter
1in Bundle repeating nodes. Enter<###>in Bundle delimiter and select Save all settings.
Bundling lets you pass the ETIM information to BMEcat without creating an attribute in Dataflow for every feature. Now you have four (4) new columns in the import stage:
FNAMEis a feature name.FVALUEis a feature value.FUNITis a feature unit of measure.FVALUE_DETAILSis feature value details.
Add and set up the BMEcat 2005 export
Create a BMEcat site and add a necessary version of the BMEcat export.
Go to Exports from your BMEcat site's main menu and select ADD EXPORT.
Search for a necessary BMEcat 2005 export, hover over it, and select Add. The platform redirects you to Exports.

In Overview, select the name of the added export in the Export name column.
Select the pen icon at the top of the page and give your export a custom name as desired.
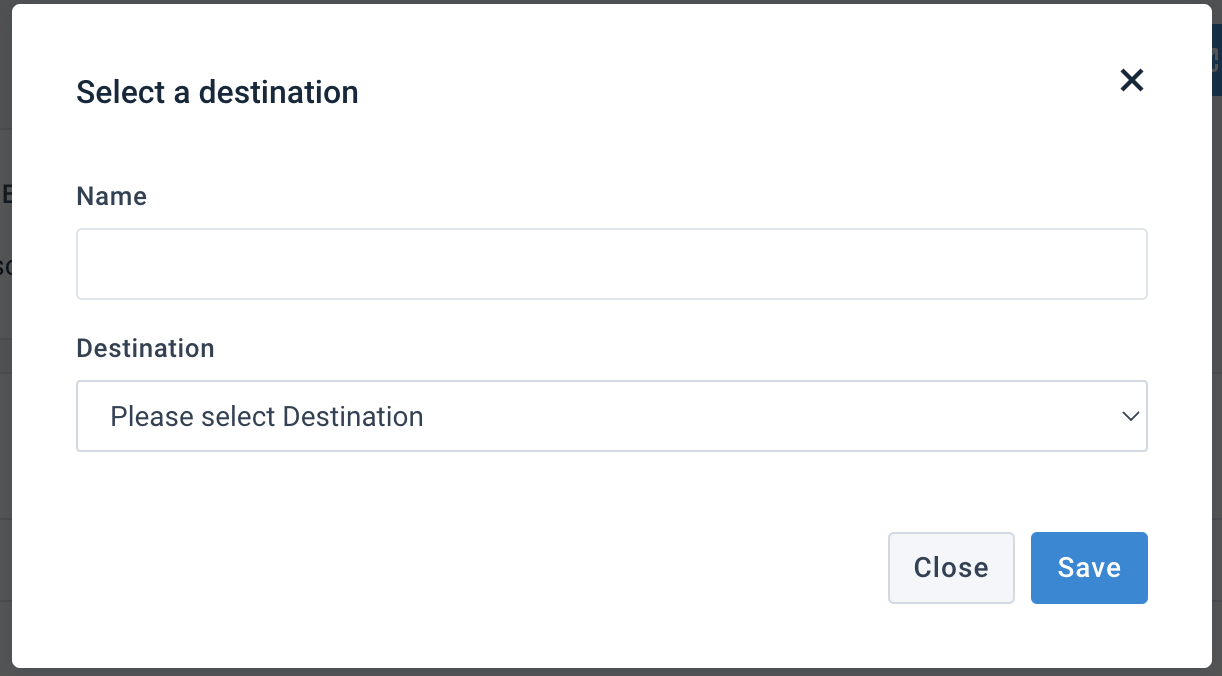
Select Add Destination and choose Productsup Server from the Destination drop-down menu. Give it a name as desired and select Save.
Note
You can also choose to send your data to MS SharePoint. In this case, select and set up the destination MS SharePoint for XML. See Send your data to Microsoft SharePoint to learn how to set it up.
Go to the Settings tab and toggle Export as XML to ON.
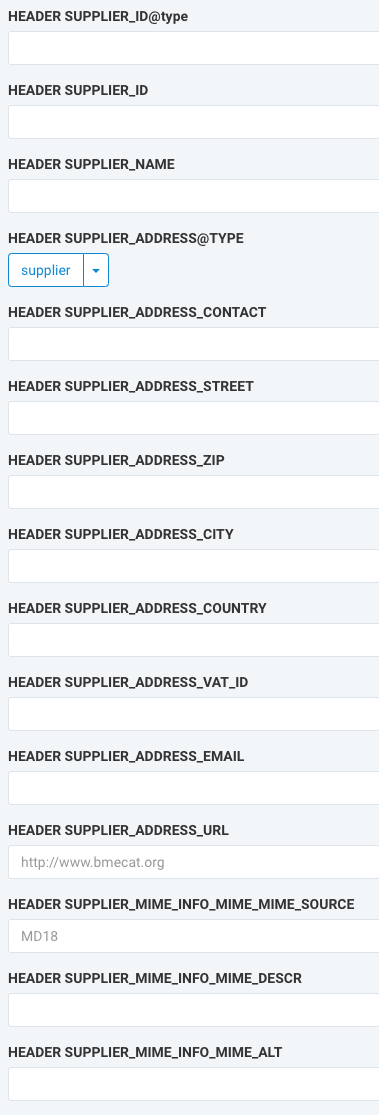
Enter the BMEcat header information into the fields shown in the following screenshot. These fields correspond to the
HEADERsection of your XML file.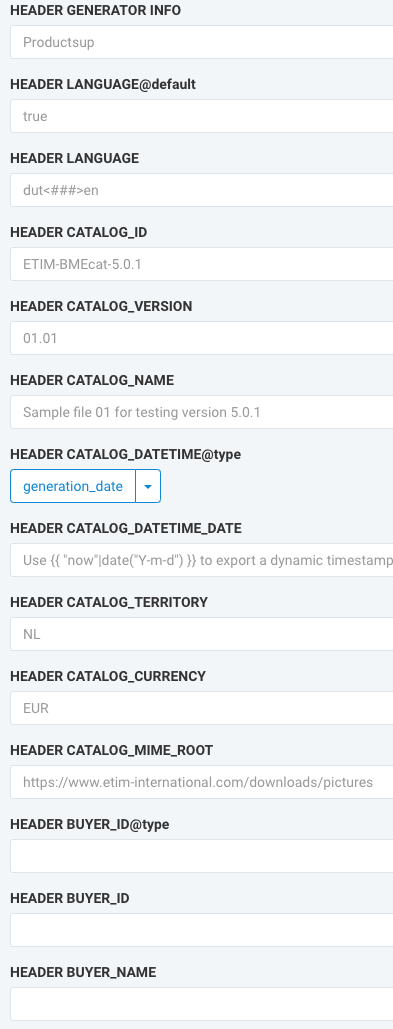
Note
The BMEcat header doesn't contain and send product descriptions. It only sends information about the identification and validity of the catalog, catalog creator, and receiver.
The BMEcat header contains default values, such as language and currency, applied to all products.
Toggle XSD Validation to yes to activate the validation analysis that appears in the Notification panel during the export.
Select Save.
Add and set up the BMEcat 1.2 export
If your partner system requires data in the BMEcat 1.2 format, you can add and configure the BMEcat 1.2 export in Exports. BMEcat 1.2 accepts values in plain language and doesn't require converting data to ETIM or another classification standard.
Go to Exports from your site's main menu and select ADD EXPORT.
Search for the BMEcat 1.2 export, hover over it, and select Add.
In Overview, select the name of the added export in the Export name column.
Select the pen icon at the top of the page and give your export a custom name as desired.
Select Add Destination and choose Productsup Server from the Destination drop-down menu. Give it a custom name as desired and select Save.

Note
You can also choose to send your data to MS SharePoint. In this case, select and set up the destination MS SharePoint for XML. See Send your data to Microsoft SharePoint to learn how to set it up.
Go to the Settings tab and toggle Export as XML to ON.
Enter the BMEcat header information in the fields shown in the following screenshot.
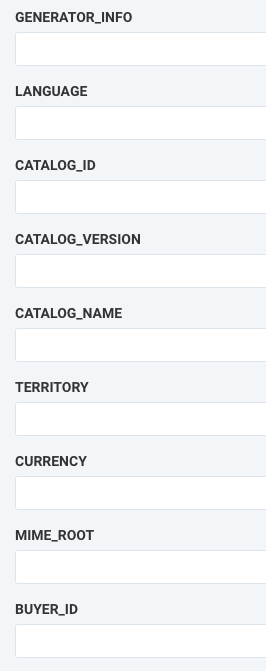
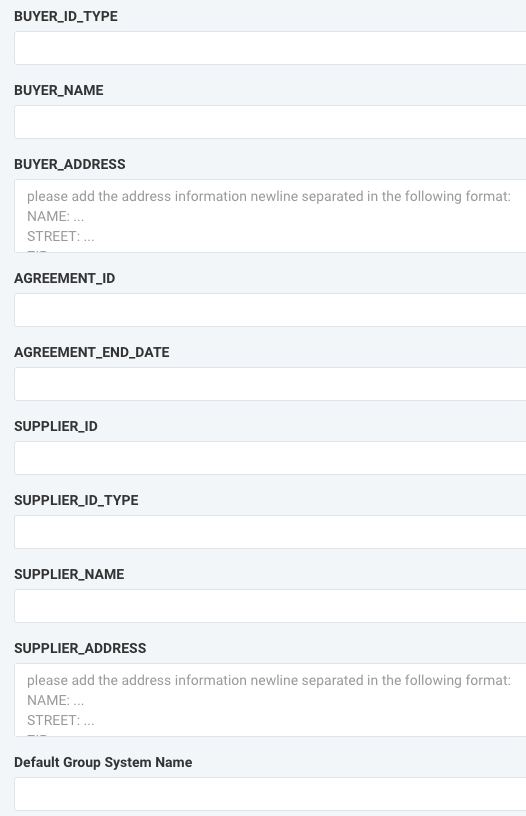
Select Save.
Map the BMEcat attributes in Dataflow
To continue the BMEcat setup in Dataflow, you should map the attributes between import and export. See Use Dataflow to map your attributes from import to export for more information.
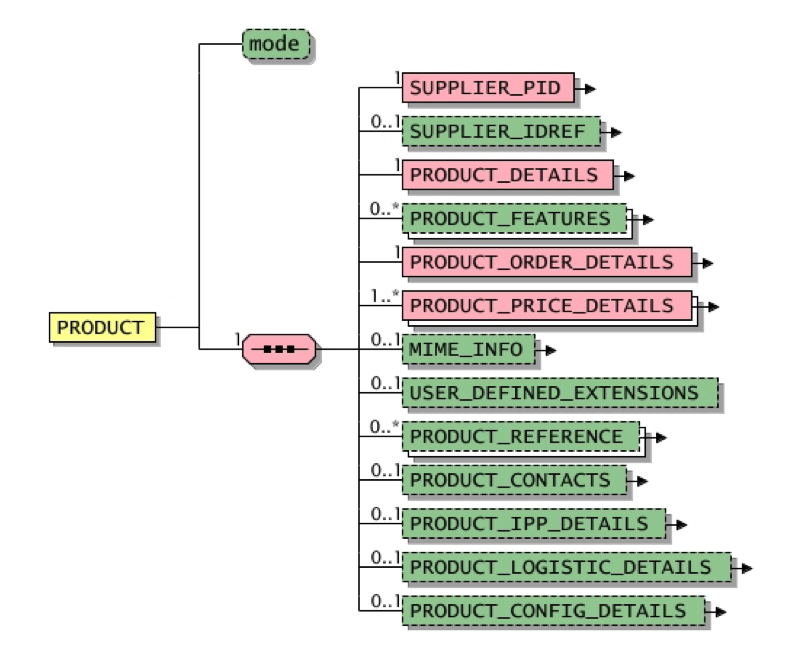
Remember that only structural elements containing values appear in the export stage of the BMEcat 2005 exports.
As shown in the following screenshot, the export stage contains the higher-level elements that store values under the main element PRODUCT. The SUPPLIER_PID element appears in the export stage because it carries a value. In contrast, the PRODUCT_DETAILS element doesn't appear in the export stage because it is a structural element and stores no values. Lower-level elements under PRODUCT_DETAILS, such as DESCRIPTION_SHORT and DESCRIPTION_LONG, appear in the export stage because these elements also store a value.
Important
You can see all the possible BMEcat 2005 attributes in the export stage. You mustn't create any additional attributes for the export manually, as the platform doesn't add them to the final BMEcat 2005 file. If you don't see an attribute you need, contact your Customer Success Manager or support at support@productsup.com.
Optimize your indexed attributes in the data feed for the BMEcat 2005 export
Some attributes can appear more than once in the file, for example, product descriptions in several languages for an item. You can refer to these attributes as indexed attributes. Some of the indexed attributes consist of several sub-attributes. All attributes have an index number counted by the platform that states the relationship between these sub-attributes.
For example, each FNAME value corresponds to the FVALUE value according to their position in the line: EF001622 to EV000138, EF010804 to EV000899, and so on.
FNAME | FVALUE |
|---|---|
EF001622<###>EF010804<###>EF000060<###>EF011789 | EV000138<###>EV000899<###>EV000154<###>EV004200 |
To escape creating an individual column for every indexed attribute, you can add several indexed attributes separated by the delimiter <###> within a field. For example, if an attribute has short descriptions in German, French, and Italian, you must populate the three (3) sub-attributes as follows:
DESCRIPTION_SHORT@default-lang: deuDESCRIPTION_SHORT@lang: deu<###>fra<###>itaDESCRIPTION_SHORT: Hochwertiges Werkzeug<###>High quality tool<###>Outil de haute qualité
If one of the sub-attributes is missing for an indexed attribute, you must use an empty value such as first-value<###><###>third-value. Skipping it leads to inconsistencies within the output file.
The following table lists the indexed attributes for BMEcat 2005 exports and their sub-attributes:
Attribute name | Sub-attribute name |
|---|---|
Description Short |
|
| |
| |
Description Long |
|
| |
Product Details |
|
| |
| |
Product Feature |
|
| |
| |
| |
Price |
|
| |
| |
| |
| |
MIME |
|
| |
| |
| |
MIME |
|
| |
| |
| |
| |
| |
| |
Description Very Short |
|
| |
Packing Unit |
|
| |
| |
| |
| |
| |
| |
| |
| |
| |
| |
| |
| |
| |
Product Characteristic |
|
| |
| |
| |
| |
| |
| |
| |
| |
| |
|
Note
When using the ETIM export, the XSLT code from step 7 takes care of Product Features and requires no additional manual adjustments.
To optimize the attributes of your product catalog in Dataflow:
Go to Dataflow from your site's main menu.
Map all the attributes you want to add to your BMEcat from import to export.
Go to Data View to review the data and, if required, add rule boxes to optimize your values. See Add a rule box and Find the needed rule box category for more information.
Using multiple Article Features in BMEcat 1.2
BMEcat 1.2 only uses Article Features as an indexed attribute. Article Feature corresponds to Product Feature in BMEcat 2005.
If you have only one (1) Article Feature, you can use single Article Feature attributes and map them in Dataflow:
REFERENCE_FEATURE_SYSTEM_NAMEREFERENCE_FEATURE_GROUP_IDFNAMEFVALUEFUNITFORDERFDESCRFVALUE_DETAILS
To use the multiple Article Features, add custom attributes in Dataflow and connect them from import to export. See Create new user-generated attributes to learn how to do it.
Warning
If you have single and multiple Article Features, disconnect single Article Features in Dataflow to prevent system conflicts.
Each Article Features attribute should have the number in the attribute name, such as ARTICLE_FEATURES/1/{FEATURE_NAME}. For example:
ARTICLE_FEATURES/1/REFERENCE_FEATURE_SYSTEM_NAME: Name
ARTICLE_FEATURES/1/REFERENCE_FEATURE_GROUP_ID: 12345
ARTICLE_FEATURES/1/FNAME: NameA<###>NameB<###>NameC
ARTICLE_FEATURES/1/FVALUE: 1<###>2<###>3
ARTICLE_FEATURES/1/FORDER: 1
ARTICLE_FEATURES/1/FDESCR: ArticleDetails
ARTICLE_FEATURES/1/FUNIT: mm<###>mm<###>mm
ARTICLE_FEATURES/2/REFERENCE_FEATURE_SYSTEM_NAME: Name
ARTICLE_FEATURES/2/REFERENCE_FEATURE_GROUP_ID: 12345
ARTICLE_FEATURES/2/FNAME: NameD<###>NameF<###>NameG
ARTICLE_FEATURES/2/FVALUE: 1<###>2<###>3
ARTICLE_FEATURES/2/FORDER: 2
ARTICLE_FEATURES/2/FDESCR: ArticleDetails
ARTICLE_FEATURES/2/FUNIT: mm<###>mm<###>mm
All Article Features under the same number belong to each other. You can add as many custom attributes as needed. You can add multiple values to the same attribute field, separating the values by the delimiter <###>.
Note
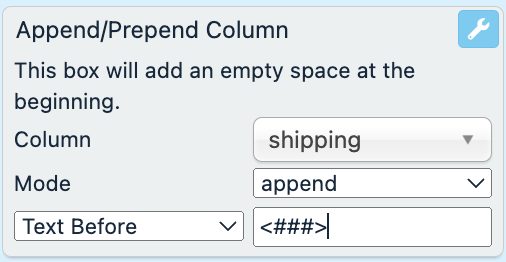
Depending on your data, you can use many ways to add values to the same field in Dataflow or Data View. For example, you can use the Append/Prepend Column rule box in Data View. To add a delimiter, select Text Before in the drop-down menu and enter <###> in the field next to it. See Append/Prepend Column.
 |