Add Meta Shops Ads exports to sell your products on Meta
Send your product and order data to Meta Shops Ads and import order data from Meta into Productsup.
Introduction
Meta Shops Ads are the new shopping format where Meta owns the checkout experience and lets social media users shop, order, and pay directly in the Meta apps. This leads to a smoother shopping experience, higher conversion rates, and more transparent ad performance, which yields a higher return on ad spend.
Note
Meta Shops Ads are currently in closed beta testing in the US. The general release of the new ads is due in mid-2023 in the US. There are currently no plans to expand Meta Shops Ads to countries other than the US.
To support customers interested in selling products in the US via the new Meta Shops Ads, Productsup has built an ecosystem that sends product and order data to Meta Shops Ads:
Meta Shops Ads Main
Meta requires receiving your full product catalog every 24 hours and your product data updates every hour. This API-based export uses the destinations Meta Shops Ads: Data Feed and Meta Shops Ads: Delta Upload to send your full product catalog or product data updates to Meta Shops Ads and meet these requirements.
Meta Shops Ads - Price & Stock Update
Meta requires receiving your price and stock updates every 15 minutes. This API-based export sends your products' price and stock changes to Meta to meet this requirement.
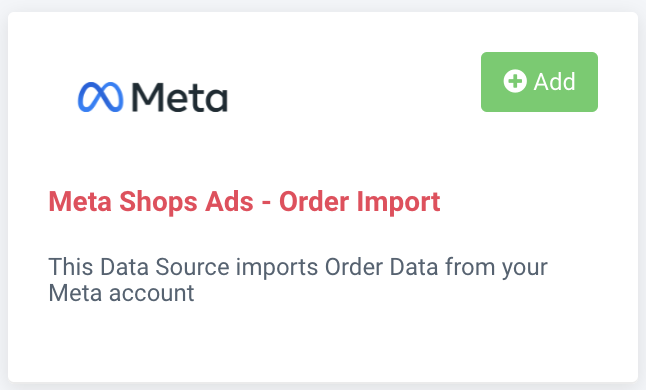
Meta Shops Ads - Order Import
This data source imports order data from Meta to let you send it to your order management system. When you import an order from Meta into Productsup, the order status on Meta changes from
CREATEDtoIN_PROGRESS.Meta Shops Ads - Order Fulfilment Export
When your orders have the status
IN_PROGRESS, you can send shipment and tracking information to Meta using this API-based export. You can notify customers of full and partial shipments. A partial shipment of the order means that not all of the ordered items are in one shipment.Note
You receive a payment transfer from Meta when you confirm the order's shipment and send the corresponding tracking details to Meta.
Meta Shops Ads - Order Cancellation Export
If you can't accept and ship an order, you can send cancellation information to Meta using this API-based export. You can cancel orders fully or partially. A partial cancellation means that some products in the order are still going to be shipped. Only orders with the status
IN_PROGRESScan be canceled.Meta Shops Ads - Order Refund
If you need to refund an order that you have already shipped, you can send refund information to Meta using this API-based export. You can refund only orders with the status
COMPLETEDorIN_PROGRESS. Refunds can be full or partial.
Note
The Meta Shops Ads ecosystem in Productsup doesn't manage ads. It only helps you send the needed product and order updates to Meta. You need to manage your ads on Meta.
To send your product and order data to Meta Shops Ads, you need to set up this ecosystem in the following order:
Meta Shops Ads Main. See Send your full product catalog and its updates to Meta.
Meta Shops Ads - Price & Stock Update. See Send your price and stock updates to Meta.
Meta Shops Ads - Order Import. See Import orders from Meta.
All exports dealing with order data. See Send order data to Meta.
Prerequisites
Warning
The entire Meta Shops Ads ecosystem in Productsup is currently available to a limited number of customers only. If you want to gain access to it, reach out to your Customer Success Manager or contact support@productsup.com.
To set up the Meta Shops Ads ecosystem in Productsup, you need:
A project in your Productsup organization where you are going to create multiple sites pushing and pulling data from Meta. In this separate project, you need to create a separate site for each Meta Shops Ads export. The data source Meta Shops Ads - Order Import should also have a separate dedicated site.
Note
A separate project for all Meta Shops Ads sites is a recommended option. If it doesn't fit your overall organization structure, you can ignore this advice.
However, splitting all product-data exports into separate sites is mandatory to keep your setup easy to manage and let you set up the needed site-running schedules.
A Facebook account.
A commerce account ID that you can find in Commerce Manager on Meta.
A catalog ID that you can find in Commerce Manager on Meta.
A Meta Shops Ads authentication created on the project or organization level to use it across all Meta Shops Ads sites. See Add OAuth authentication to external systems for more information.
Add this authentication as follows:
Go to Authentication from your organization's or project's menu and select ADD AUTHENTICATION.
In Type, select Meta Shops Ads Authentication, give it a custom name as desired, and select Next.
In CMS ID, enter your commerce account ID.
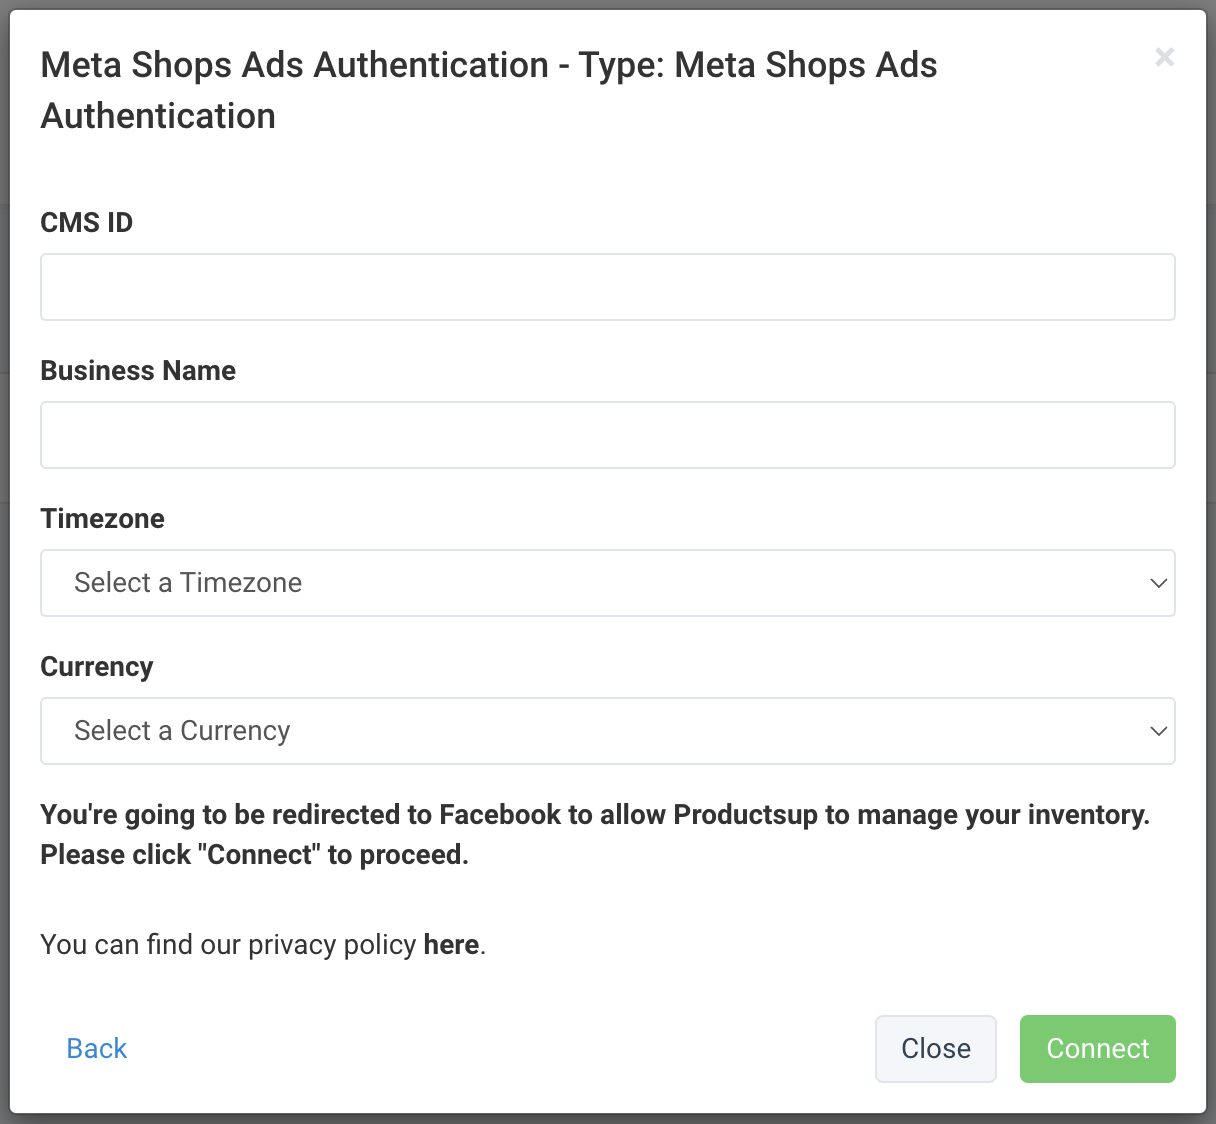
In Business Name, enter your business's name as displayed on Meta.
Select your location's timezone and currency in the respective fields.
Select Connect for Productsup to redirect you to a Meta account page where you can give Productsup access to your Meta account. Follow the instructions on Meta to connect the systems.
Tip
On the Open your shop screen, uncheck the box Facebook ads to skip creating an ad account and pixel on Meta.
Once ready, select Done to let Meta redirect you back to Productsup. Close the confirmation window in Productsup to proceed.
Add exports to send product data to Meta
Warning
Productsup should be your source of truth for product data. Creating and managing products on Meta directly can cause errors on Meta's site when you run exports in Productsup.
Send your full product catalog and its updates to Meta
According to the Meta Shops Ads requirements, you need to send your full product catalog to Meta once every 24 hours and all product data updates (delta files) once every hour. To set up different scheduling for the full catalog and delta exports, create two (2) separate sites in your Meta Shops Ads project.
Full product catalog
One of the sites you created in your Meta Shops Ads project is going to send your full product catalog to Meta. Open this site and follow these steps:
Go to Exports from your site's main menu and select ADD EXPORT.
Search for Meta Shops Ads Main, hover over it, and select Add.

On the Exports page, select the name of the added export to set it up.
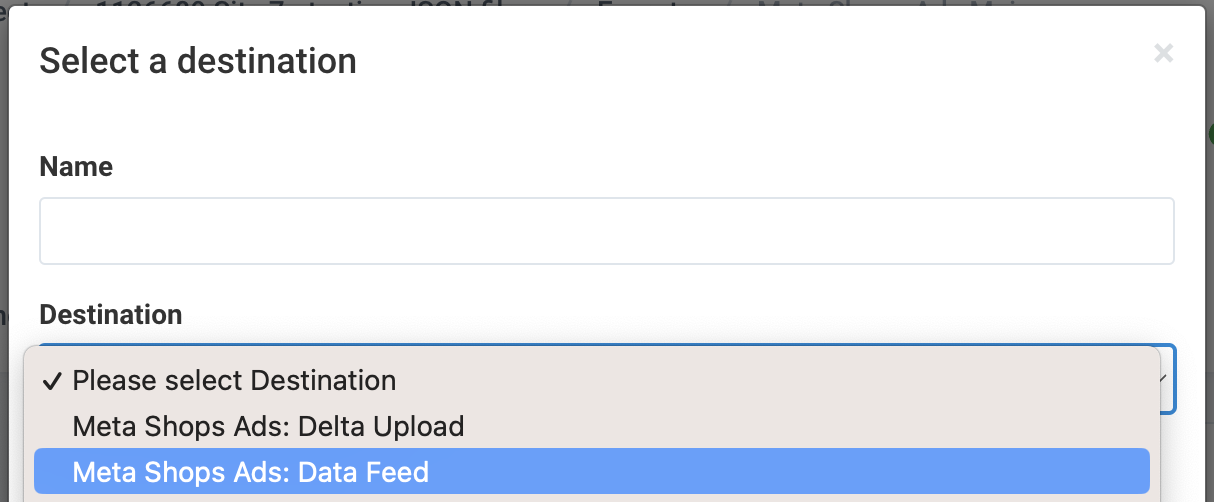
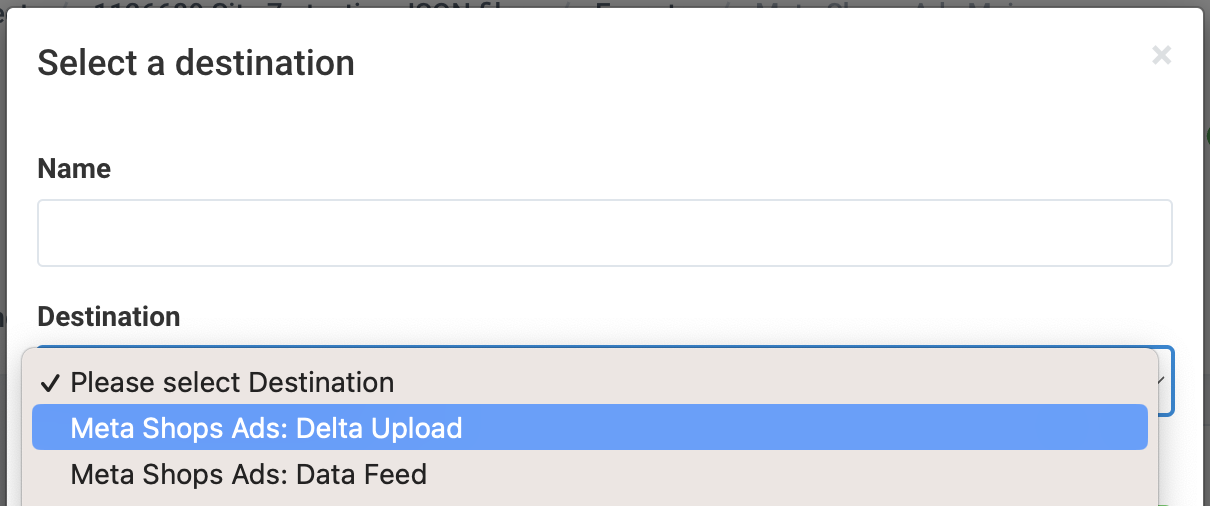
Select Add Destination, choose Meta Shops Ads: Data Feed from the drop-down list, give it a name as desired, and then select Save.
In Product Catalog ID, enter the catalog ID of your relevant catalog in Commerce Manager.
In Feed Name, enter the name that Meta should display in Commerce Manager as the name of your product catalog.
Toggle the Compression button to On if you want the site to export your feed as a .zip file.
In Authentication, select the Meta Shops Ads authentication you have added to your Productsup organization or project.
Toggle the Active button to On to activate the destination.
Select Save.
Go to Lists and add two (2) lists:
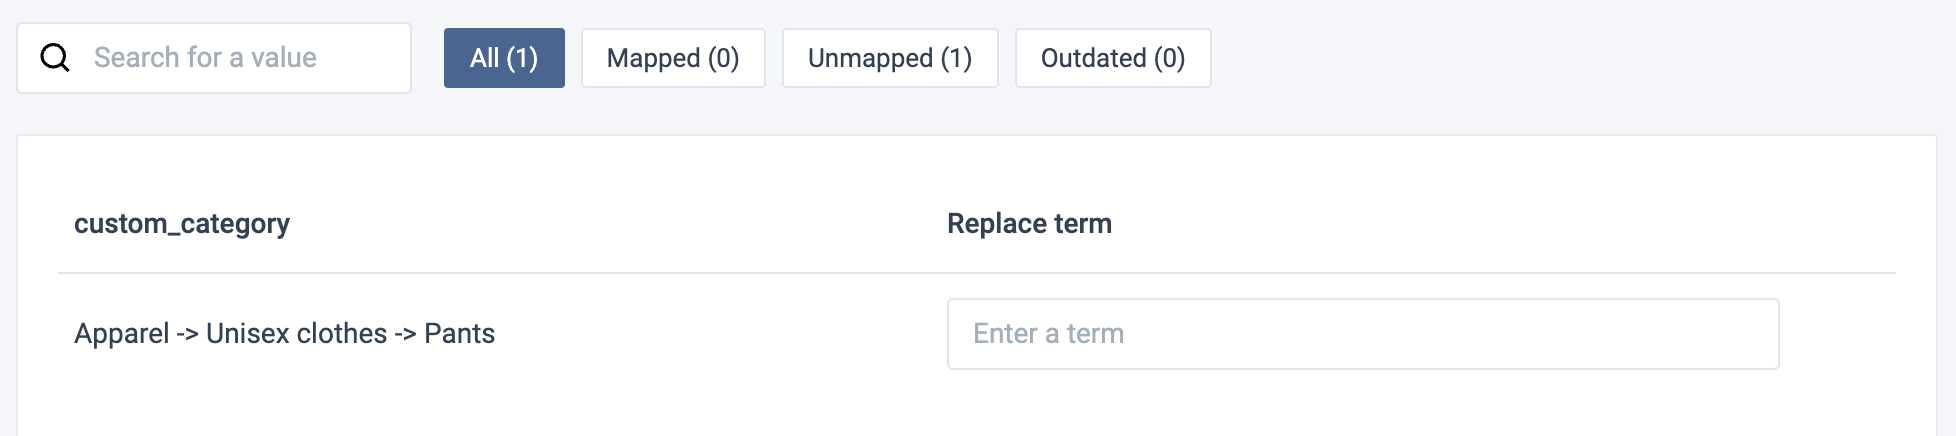
Add a Partner Taxonomy Mapping list to map your categories to the expected Google category taxonomy by selecting ADD LIST and choosing Partner Taxonomy Mapping. Then, select Continue.
Add a Classification Mapping list to map your categories to Meta's categories by selecting ADD LIST and choosing Classification Mapping. Then, select Continue.
Give each list a desired name, select Google MC - US in Taxonomy or Meta Shops Ads Main in Classification, and choose Import in Stage.
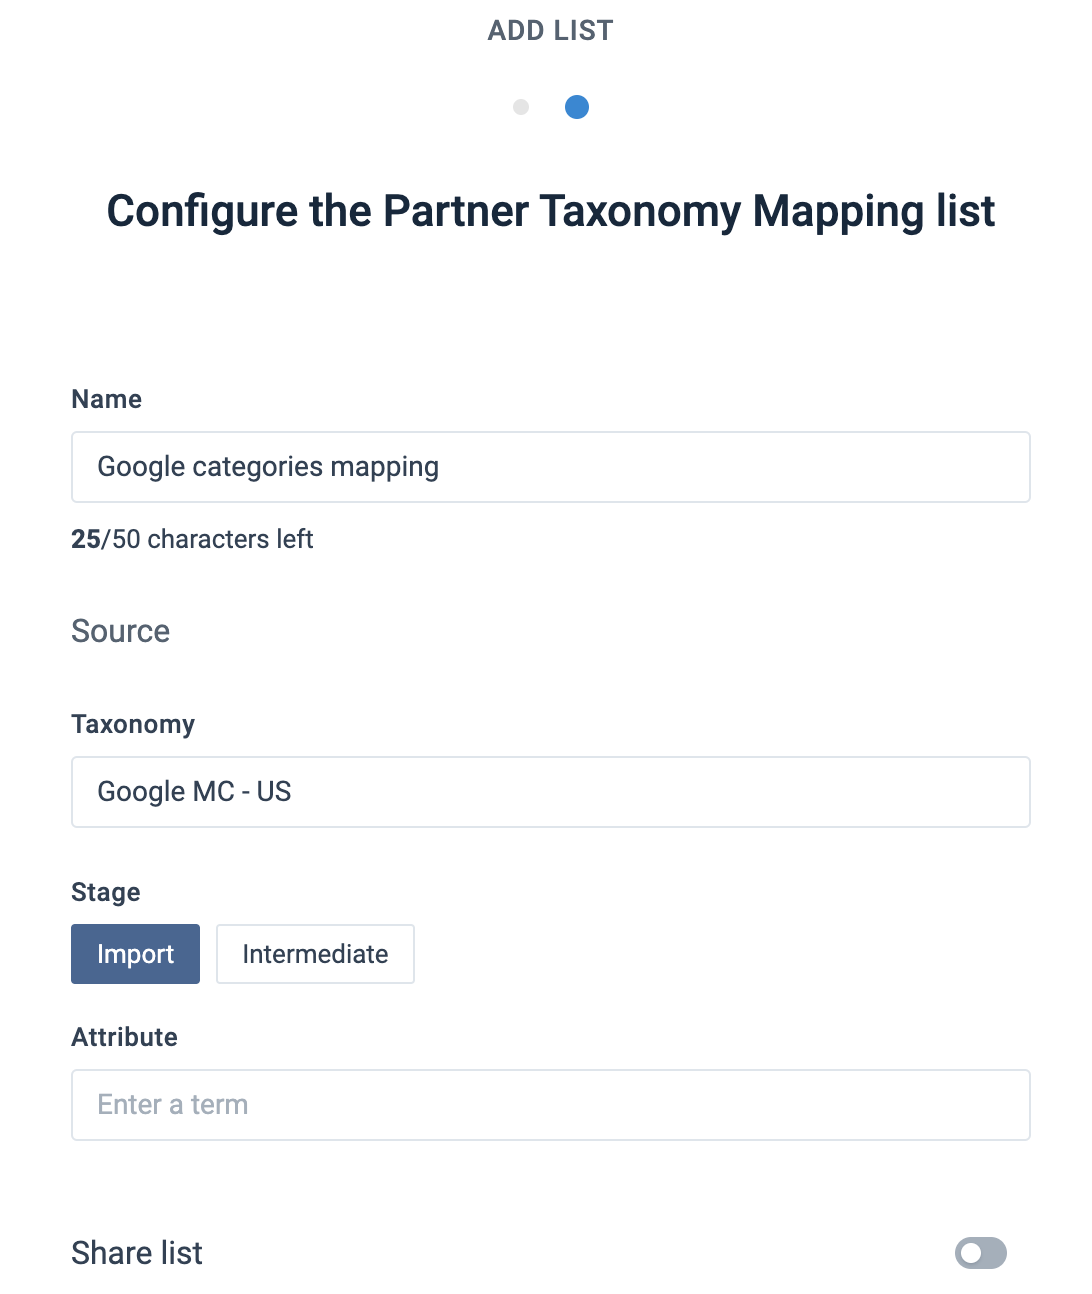
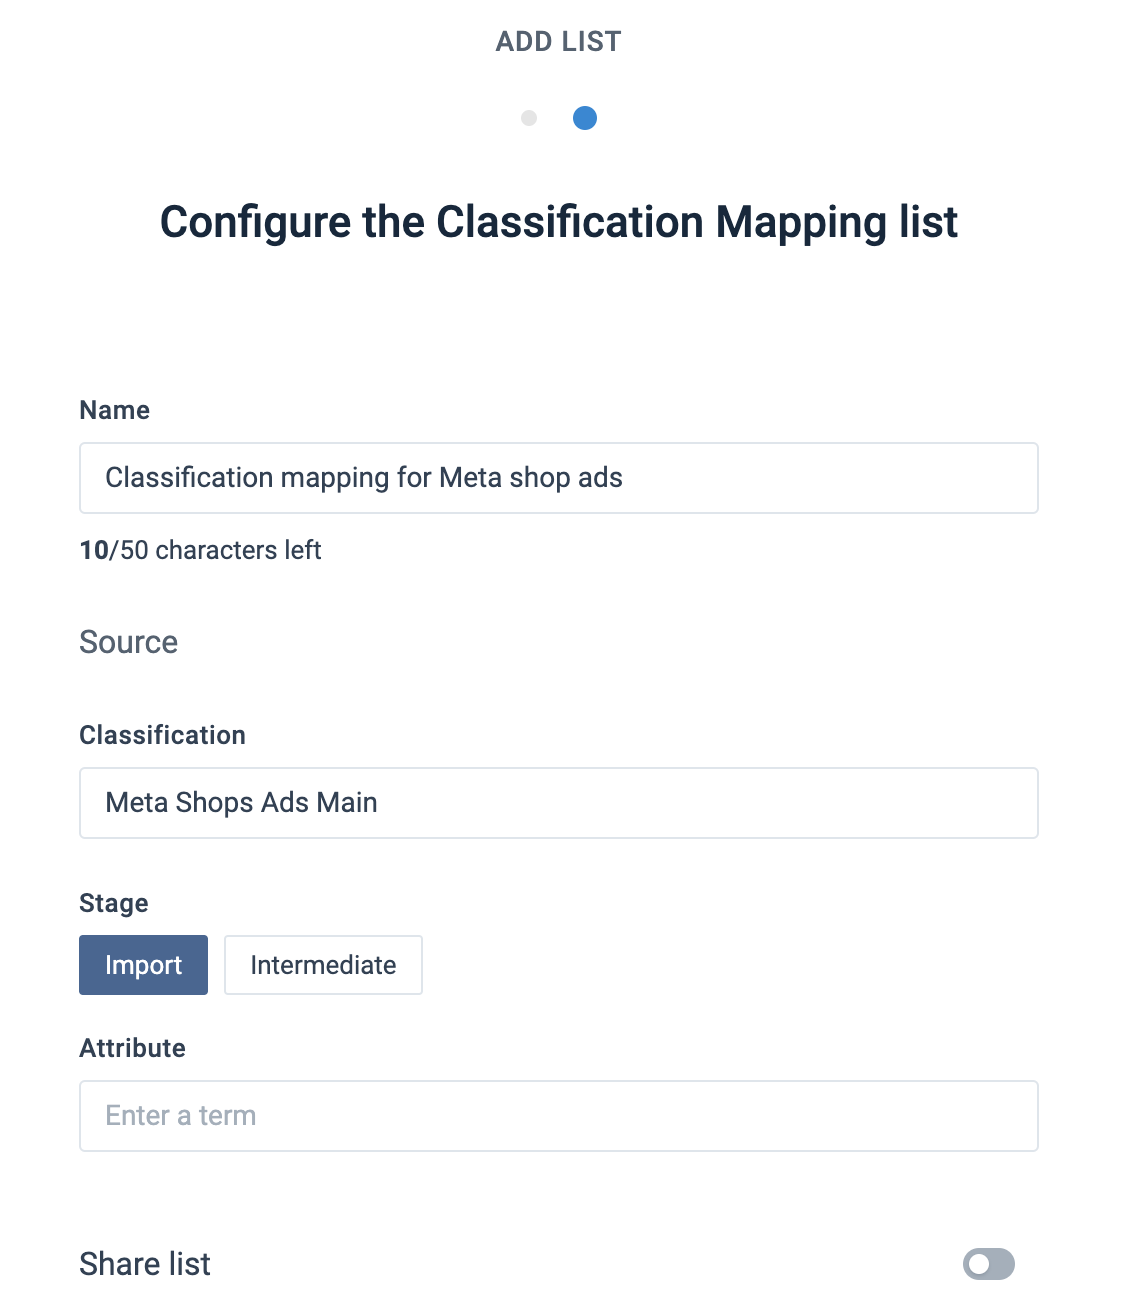
In both list types, select the Attribute field to choose the attribute in your import stage that contains your products' category data. Then, select Add at the bottom of the page to add the list.
In both list types, go through all the values of your category column and select corresponding Google or Meta categories in the Replace term column.
Go to Dataflow and select Meta Shops Ads Main from the drop-down menu on the left.
Map all the needed attributes from import to export. The attributes list you see in the export stage is relevant for products of all your categories.
Tip
Map your import-stage category attribute to both
category_pathandgoogle_product_categoryin the intermediate stage to add the needed rule boxes and apply the lists.Add rule boxes to apply your created lists to the needed attributes:
Select
google_product_categoryin the intermediate stage and open the Select an Option drop-down menu on the right to find and add the rule box Taxonomy Mapping. Choose your Partner Taxonomy list in List and select Save.Select
category_pathin the intermediate stage and open the Select an Option drop-down menu on the right to find and add the rule box Classification Mapping. Choose your Classification Mapping list in List and select Save.
To let the site display your category-specific attributes in Dataflow, select Run in the top-right corner of your view.
Warning
This run will fail because you haven't yet mapped all the mandatory attributes, so no data export occurs at this stage. The aim of the run is to import the needed categories and attributes in Dataflow.
Once the site run finishes, the Classifications drop-down menu appears in the upper ribbon in Dataflow. Select each category in this drop-down menu to let Dataflow display the relevant category-specific attributes in the export stage. Map all the needed attributes from import to export.
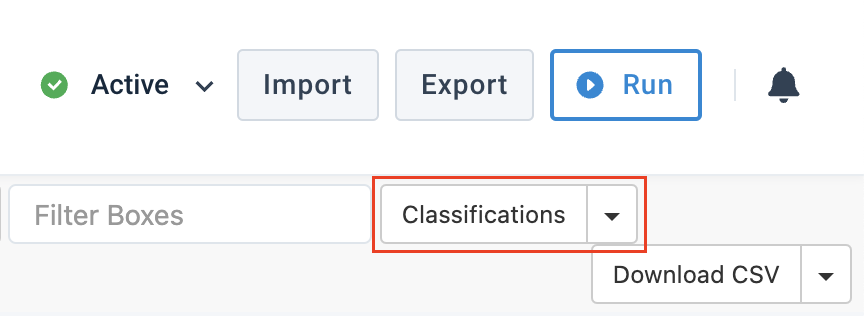
Tip
If you can't see the Classifications drop-down menu when the site run finishes, try refreshing your page.
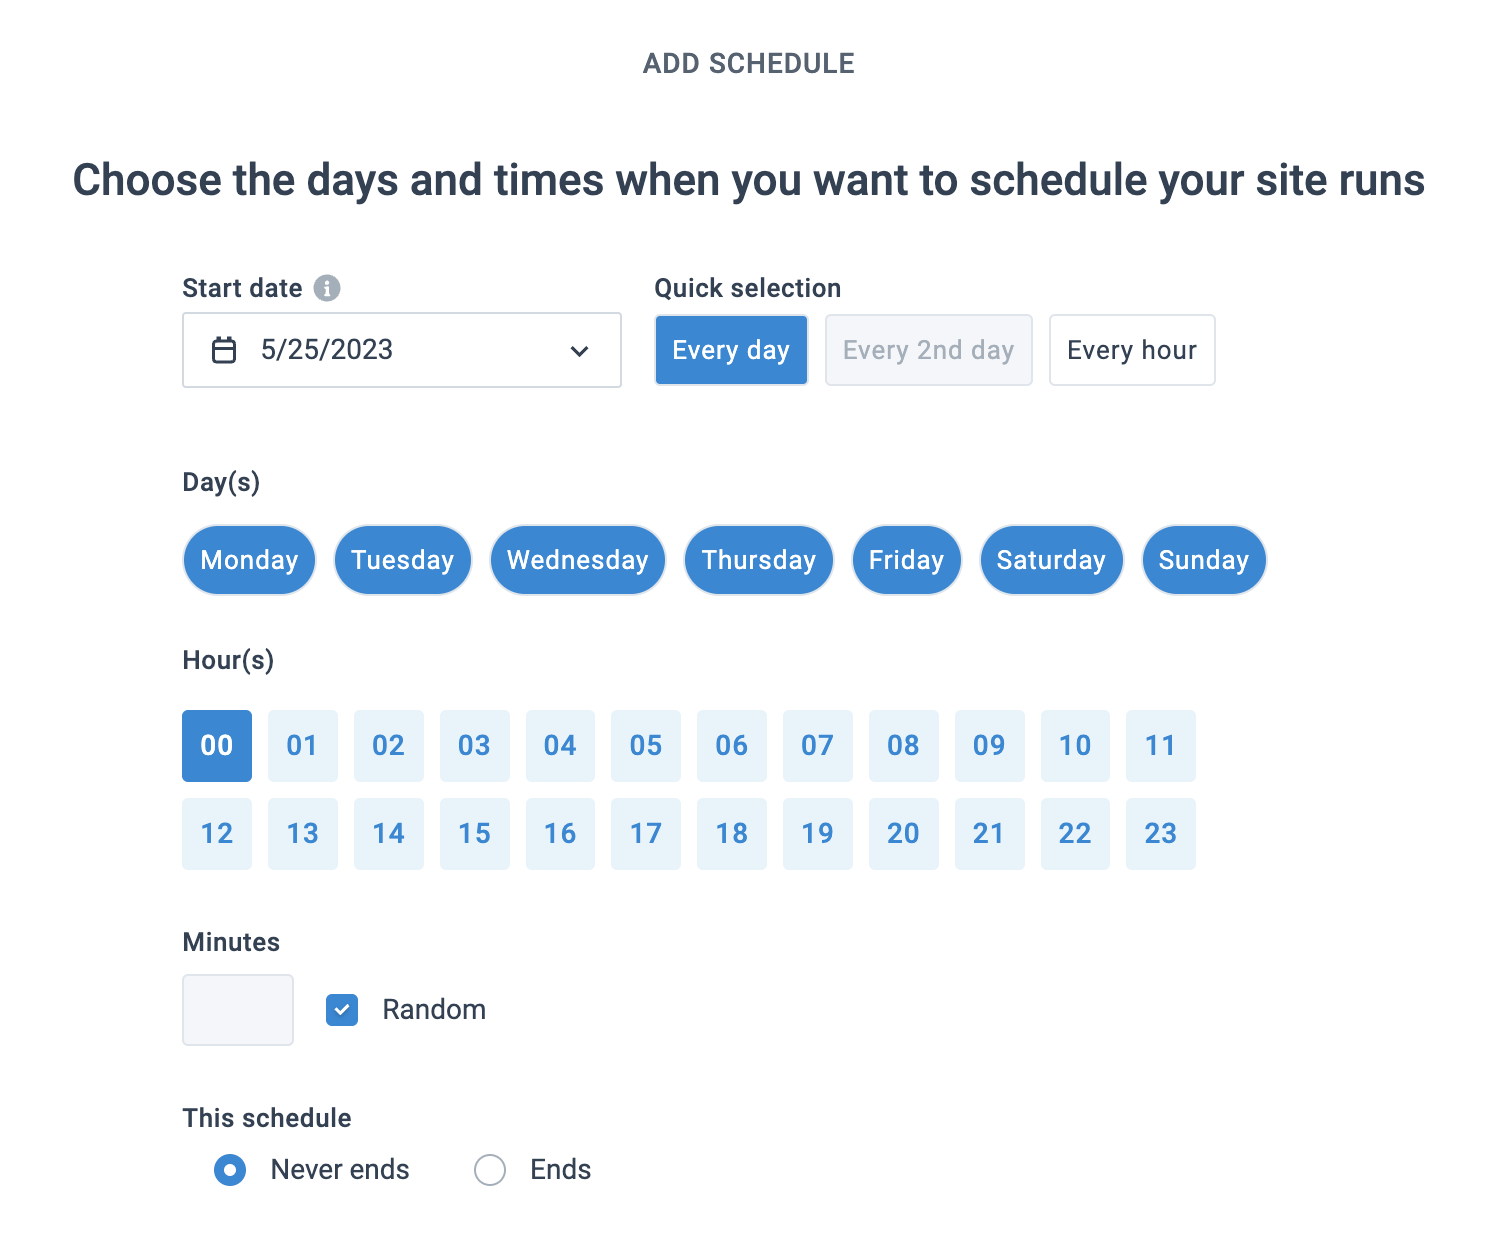
Go to Scheduling and add a schedule to run your site every 24 hours.
See Set up scheduling and triggering processes in Scheduling for more information.
Once all the settings are ready, you can send your product data to Meta. Start a site run manually by selecting Run in the top-right corner of your view or let your added schedule perform your first site run automatically at the defined time.
Delta files
The other site you created in your Meta Shops Ads project is going to send product data updates (delta files) to your Meta account. Open it and repeat all the steps you just took in the site that exports your full product catalog. Keep in mind the following modifications:
Send your price and stock updates to Meta
According to the Meta Shops Ads requirements, you need to send your price and stock updates to Meta every 15 minutes. Create a separate site in your Meta Shops Ads project and follow these steps:
Go to Exports from your site's main menu and select ADD EXPORT.
Search for Meta Shops Ads - Price & Stock Update, hover over it, and select Add.

On the Exports page, select the name of the added export to set it up.
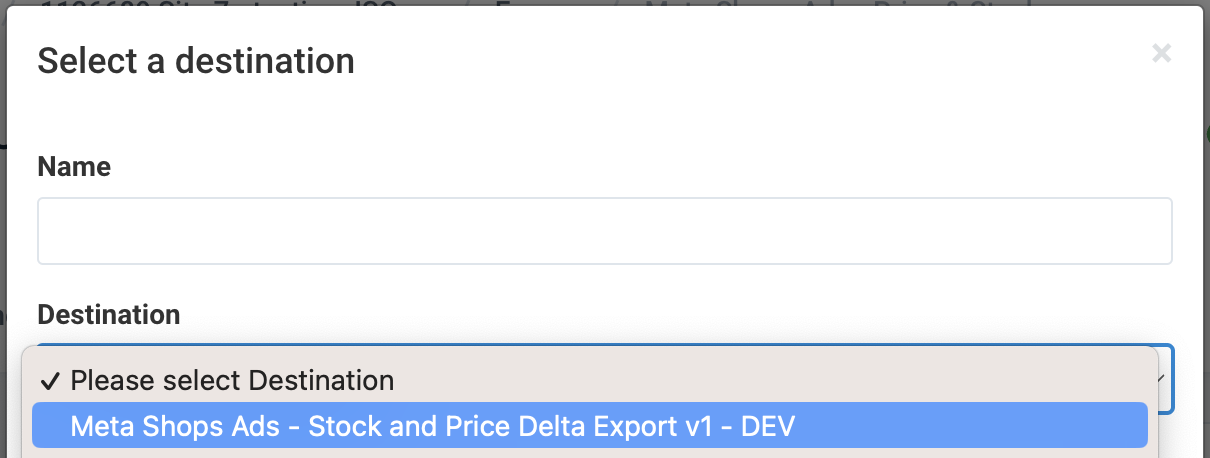
Select Add Destination, choose Meta Shops Ads - Stock and Price Delta Export v1 - DEV from the drop-down list, give it a name as desired, and then select Save.
In CMS ID, enter your commerce account ID.
In Product Catalog ID, enter the catalog ID of your relevant catalog in Commerce Manager.
In Authentication, select the Meta Shops Ads authentication you have added to your Productsup organization or project previously.
Toggle the Feedback Import button to Off if you don't want the platform to receive feedback files from Meta.
This feature is active by default to let Productsup receive a feedback file from Meta's Graph API in case of errors. This helps to troubleshoot the export setup.
Toggle the Active button to On to activate the destination.
Select Save.
Scroll down on the export setup page to find the Delta Files section. Select Update Files and then select Save to add delta files to your export.
Go to Dataflow and select Meta Shops Ads - Price & Stock Update from the drop-down menu on the left to map all the needed attributes from import to export.
Go to Scheduling to let your site run every 15 minutes. See Set up scheduling and triggering processes in Scheduling for more information.
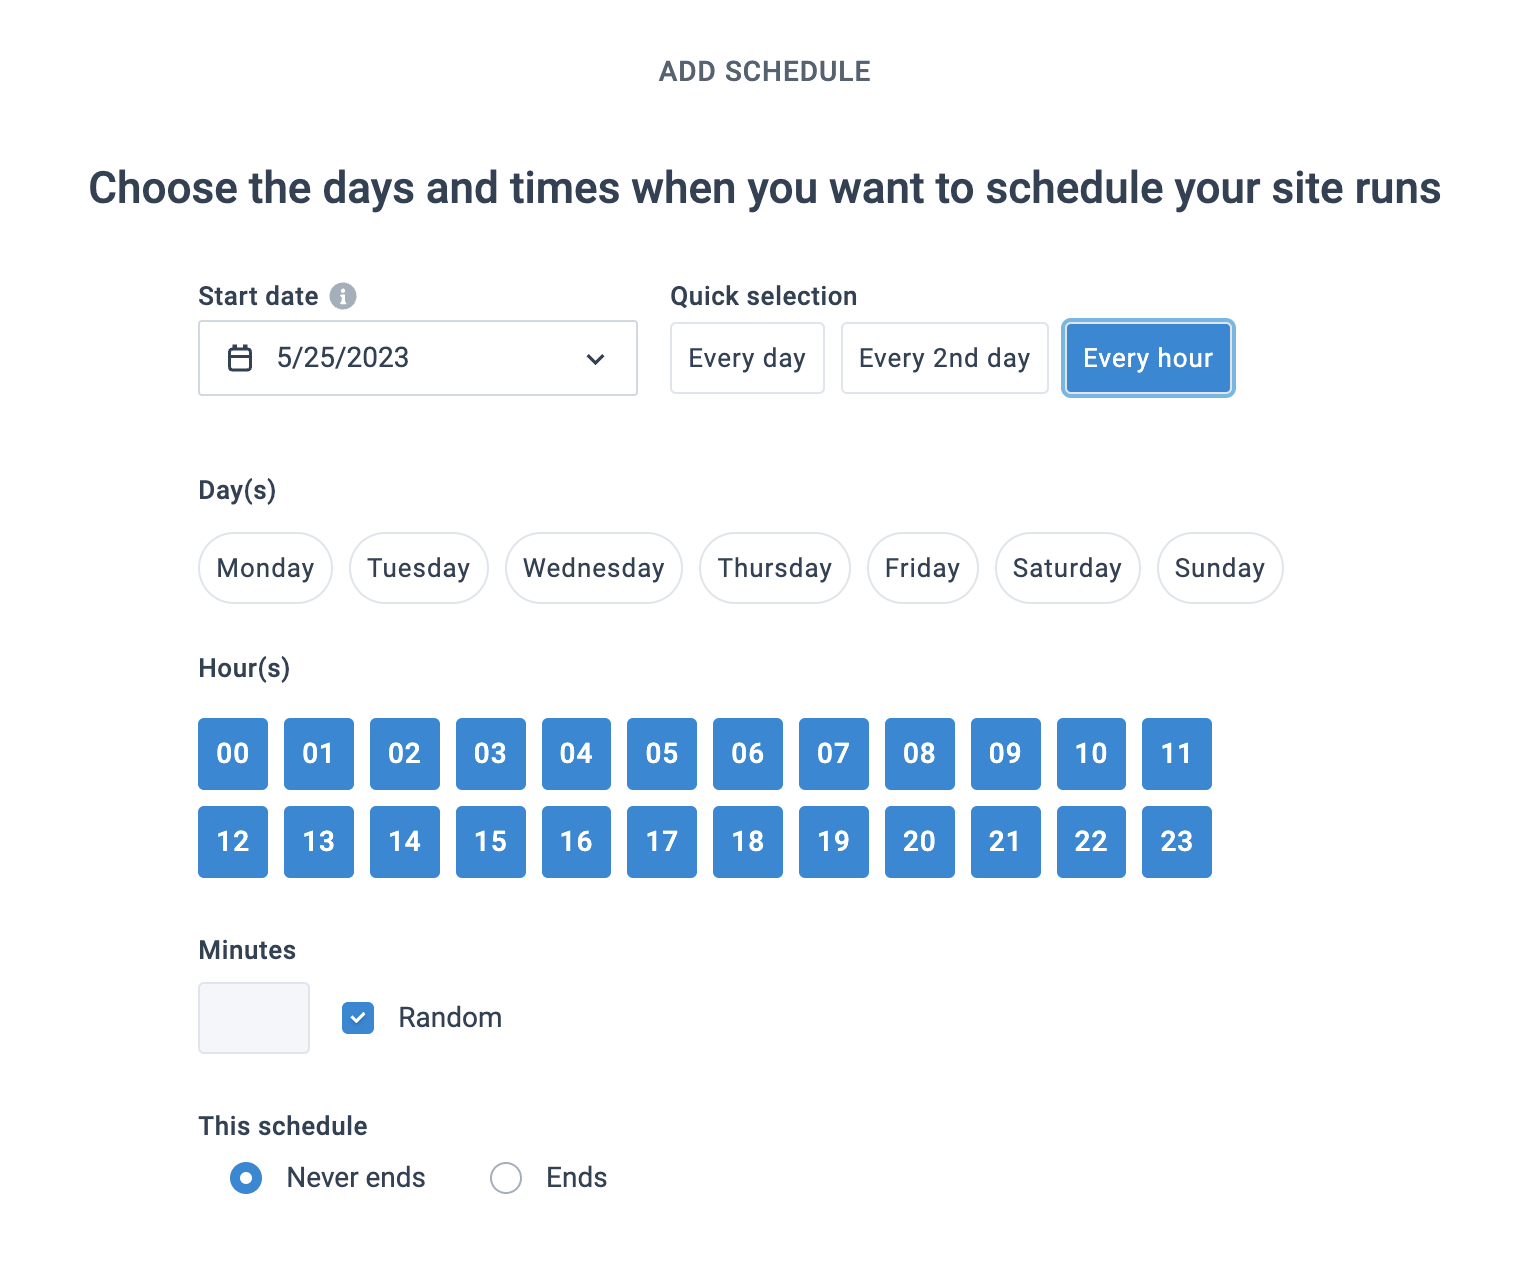
Tip
To set up a scheduling interval of 15 minutes, create four (4) schedules with the following setup in Quick selection and Hour(s):
In Minutes, uncheck the Random box and enter
00,15,30, and45in the four schedules respectively.Once all the settings are ready, you can send your price and stock updates to Meta. Start a site run manually by selecting Run in the top-right corner of your view or let the schedules perform your first site run automatically at the defined time.
Import orders into Productsup and send order data to Meta
Import orders from Meta
You can sync your Meta orders with your order management system, such as Shopify, via Productsup. Create a separate site in your Meta Shops Ads project and follow these steps:
Go to Data Sources from your site's main menu and select ADD DATA SOURCE.
Search for Meta Shops Ads - Order Import, select Add, give it a name as desired, and then choose Continue.
In CMS ID, enter your commerce account ID.
If you want to import orders created within a specific timeframe only, enter the desired dates in Updated before or Updated after. The expected input format is YYYY-MM-DD.
If you want your Productsup site to import orders with specific statuses only, enter them in Order state and separate them with commas.
The supported order statuses are:
FB_PROCESSINGCREATEDIN_PROGRESSCOMPLETED
Note
See Commerce Platform Overview for more information on order statuses and the order flow.
To import specific types of orders only, enter them in Order filter and separate them with commas.
The supported order types are:
no_shipmentsimports orders that you haven't shipped yet.has_cancellationsimports orders that contain canceled items.no_cancellationsimports orders that contain no canceled items.has_refundsimports orders that contain refunded items.no_refundsimports orders that contain no refunded items.
In Authentication, select the Meta Shops Ads authentication you have added to your Productsup organization or project previously.
Specify the desired name of the data source in Description (optional).
Select Save.
Go to Exports from your site's main menu and select ADD EXPORT.
Find your order management system, add it as an export, set it up, and map the needed attributes in Dataflow.
Choose Run in the upper-right corner of the page to let the site import your order data and send it to your order management system.
Note
When you import an order from Meta into Productsup, the order status on Meta changes from
CREATEDtoIN_PROGRESS.
Send order data to Meta
To send shipment, cancellation, and refund data to Meta, create three (3) separate sites in your Meta Shops Ads project and follow these steps to add the needed export in each site:
Go to Exports from your site's main menu and select ADD EXPORT.
Search for Meta Shops Ads - Order, hover over one of the following exports, and select Add:
Meta Shops Ads - Order Cancellation Export
Meta Shops Ads - Order Fulfilment Export
Meta Shops Ads - Order Refund
Select the name of the added export and choose Add Destination to add and set up the following export destinations:
For the export Meta Shops Ads - Order Cancellation Export, choose the destination Meta Shops Ads - Order Cancellation Export.
For the export Meta Shops Ads - Order Fulfilment Export, choose the destination Meta Shops Ads - Order Fulfilment Export.
For the export Meta Shops Ads - Order Refund, choose the destination Meta Shops Ads - Order Refund.
Change the names of the added destinations as desired and select Save.
On the setup page of each destination, take these steps:
In CMS ID, enter your commerce account ID.
In Authentication, select the Meta Shops Ads authentication you have added to your Productsup organization or project previously.
Toggle the Feedback Import button to Off if you don't want the platform to receive feedback files from Meta.
This feature is active by default to let Productsup receive a feedback file from Meta's Graph API in case of errors. This helps to troubleshoot the export setup.
Toggle the Active button to On.
Select Save.
Go to Dataflow from the site's main menu. Choose the added Meta Shops Ads exports in the drop-down menu on the left and map the following attributes from import to export:
Export name
Export-stage attributes
Meta Shops Ads - Order Cancellation Export
The full list of export-stage attributes:
facebook_order_idquantityreason_codeSee Cancel order for a list of accepted cancellation reason codes.
reason_descriptionrestock_itemsretailer_id
If you do a full cancellation, the order status on Meta changes to
COMPLETED. If you cancel an order partially, the order status staysIN_PROGRESSuntil shipped.Meta Shops Ads - Order Fulfilment Export
The full list of the mandatory export attributes:
facebook_order_iditem_quantityitem_retailer_idtracking_carriertracking_numberfulfillment_location_idor all of the following:Warning
The platform doesn't highlight these attributes as mandatory because they are conditional. Meta requires either
fulfillment_location_idor the full following list.address1address2citycountry_codepostal_codeprovince_codestatezip
Meta Shops Ads - Order Refund
Warning
The platform doesn't highlight the attributes listed below as mandatory because they depend on your refund type.
To refund an order in full, you need to send only two (2) attributes to Meta:
facebook_order_idreason_codeSee Refund order for a list of accepted refund reason codes.
To refund an order partially, you need to send either this list of attributes:
deduction_typededuction_amountshipping_refund.amountshipping_refund.currencyretailer_iditem_refund_amount.amountitem_refund_amount.currency
Or this one:
deduction_typededuction_amountitem_refund_quantity
Tip
If you plan to do both full and partial order refunds, you should create two (2) separate sites for the export Meta Shops Ads - Order Refund and set up the full and partial refund flows separately.
If your data is ready, select Run in the upper-right corner of your view to send order data to Meta.
Note
In your order data sites, the feed structure is product-based, meaning that every row is a product. If an order contains multiple products, those products have the same
facebook_order_idortracking_number. Based on a unique identifier like this, the site groups all products belonging to one order during export and sends notifications to customers about the order or shipment on the whole, and not about separate items in them.